


Using Serial
How to use Serial to communicate over USB and Bluetooth connections
Lessons You Should Know

Introduction
Sparki features several communications capabilities. Among them are two easy to use serial ports. One of them is a serial connection that works through the USB cable that you can use to program the Sparki. The other serial port is a Bluetooth wireless module (also available for advanced uses in the Expansion Port).
A quick note about failing to upload code- Sometimes Sparki gets hung up and you can’t upload code to it because there is serial communication happening. If this happens try turning Sparki off, unplugging your USB from both Sparki and the computer, waiting for at least thirty seconds and then plugging everything back in before trying to upload code again. If Sparki still won’t accept code try doing everything I just outlined AND closing the SparkiDuino application. If you’re having trouble try this.
What You’ll Need
- A Sparki.
- The Bluetooth module included with Sparki.
Setting up the USB serial connection
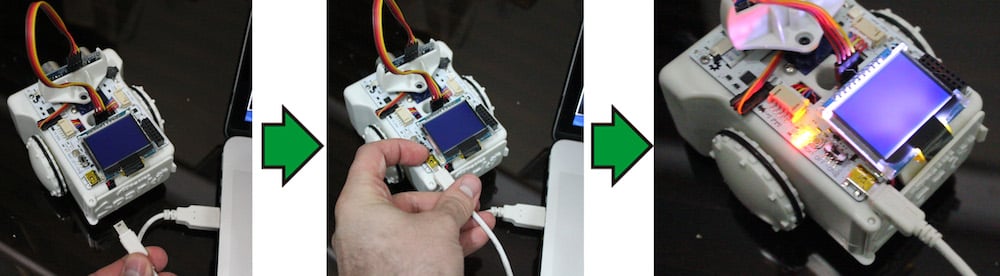
Making your Sparki communicate with your computer using the USB cable is easy. You just need to have your SparkiDuino software installed, and the Sparki plugged into your computer through the USB port:
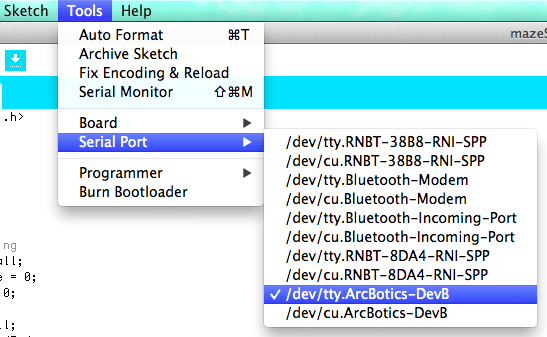
And of course, please don’t forget to select the corresponding serial port in the Tools->Serial Port menu. You can take a look at this page if you need more information about that.
Finally, to effectively communicate with Sparki’s port from the computer, we need to use SparkiDuino’s terminal (also called Serial Monitor), which can be opened both with the Tools->Serial Monitor menu or with the following button:
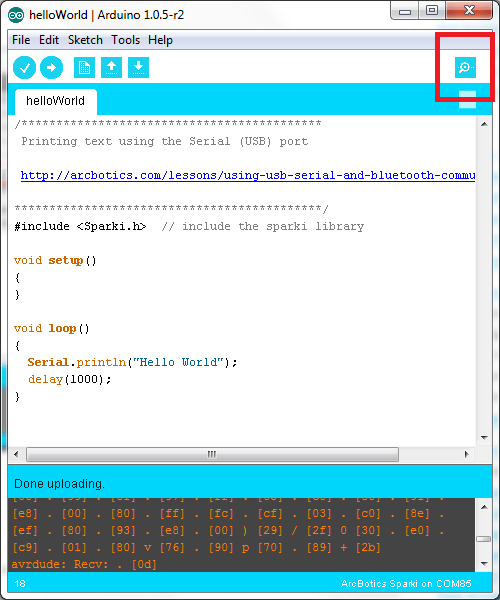
Note: When programming the Sparki, please be patient and do not open the SparkiDuino’s terminal until the programs that you are going to use here have been completely uploaded to your Sparki. You should see a message similar to the following, once the SparkiDuino environment has finished the upload process:

Hello World
Let’s start by sending a small piece of text from your Sparki to your SparkiDuino‘s terminal (which will be running on your computer). The text to be sent will be the phrase “Hello World”. To do that, we will use the Serial.println command. Here is the code:
#include <Sparki.h>  // include the sparki library

void setup()
{
}

void loop()
{
  Serial.println("Hello World");
  delay(1000);
}

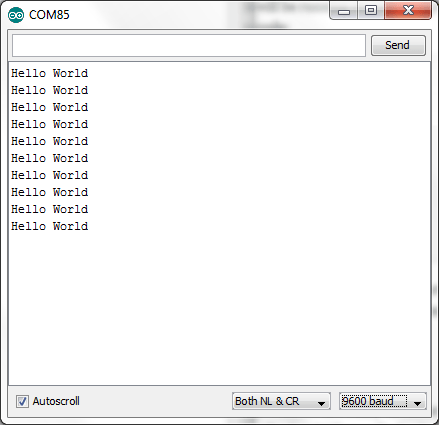
Please note the delay command after sending the text. This is because Sparki’s microcontroller is much faster than the serial port, so if you omit that delay, the serial port will be saturated since we are sending the text each time the loop function iterates, not showing the expected results. Of course, a delay of 1 second (1000 milliseconds) is high and the communications can work faster than that. But this long delay here lets us see the results on the terminal’s screen comfortably:
Note: If you are already an Arduino user, you may be wondering where the Serial.begin command is. Well, it’s not really necessary when using Sparki’s USB serial port, since the robot’s software libraries initializes the port automatically when loaded. Strictly speaking, the constructor for the SparkiClass calls the Serial.begin function (but please don’t worry if you don’t understand this, since everything is automatically managed by the software and it’s not really necessary for this lesson).
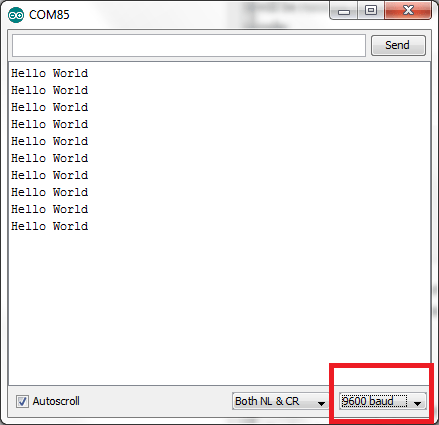
So, what about the speed of the connection, or baud rate? If you make a small experiment and change the baud rate from the terminal, even when the program is running, you will note that the communications continue working. Please try selecting there another value, like 115200 for example:
Why? Well, this is beyond the materials in this lesson, but the basic idea is that Sparki’s port isn’t a standard physical serial port. Instead, it’s an emulated serial port over a USB connection (also called USB-CDC), which in certain ways adapts to the communication speed selected in the terminal. So, it should work with any baud rate selected on your terminal except with 1200 baud (for a complex technical reason that we are not going to explain here).
Note: If by chance you select the 1200 baud speed in the terminal, Sparki’s serial port could disappear from the serial ports list in your SparkiDuino software. In that case, you should make a Manual Upload of any example program to see the port again in the list.
Serial.Println and Serial.Print
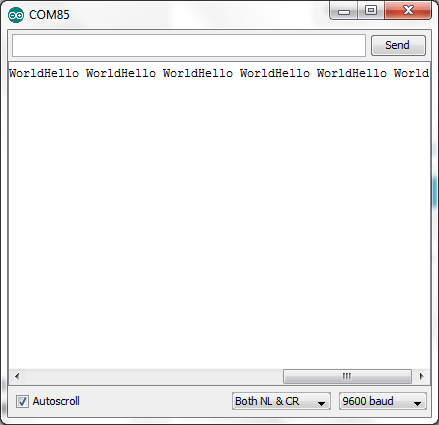
At this point you may have noted that the Serial.println adds a “new line” after sending the text to the terminal. If you want to send text without it, you can always use the similar Serial.print command. For example, if you modify a bit our prior program, you will clearly see the difference:
#include <Sparki.h>  // include the sparki library

void setup()
{
}

void loop()
{
  //Serial.println("Hello World");
  Serial.print("Hello World");
  delay(1000);
}
Here is a screenshot of the terminal when running this program:
Echo
Now that we have a basic understanding of the serial communications on our robot, let’s do something a bit more complex: an echo program. The idea here is program Sparki so we can send characters to it, and then see it send them back to us in the serial terminal. To start with we will use the USB cable, so make sure that you leave your Sparki plugged in after uploading code.
To see Sparki “echo” our typing, we will need to use the Serial.read instruction. Each step of the simple code below is outlined in the following steps:
- Serial.read will get the last received character from the serial port and store it in a variable. In this code the variable is called “inByte.” We call it that because it is “incoming” information and it’s size is exactly one byte. If you’re interested in learning more about why it’s important to know about the size of your variable, click here.
- After that, the stored character will be sent again back to the computer using the Serial.print command. The (char) portion of the code makes sure that Sparki is converting the communication variable information into a character type variable so that we can read it as text.
- The program will also only read the serial port when it knows that there is new data available. To do this, we will use an if-statement where the program will ask if there is new data using the Serial.available command. Only if there is information waiting for Sparki to read from the serial port with the USB cable will the two lines of code above execute. Here is the code:
#include <Sparki.h>  // include the sparki library

void setup()
{
}

void loop()
{
  if (Serial.available())
  {
    int inByte = Serial.read();
    Serial.print((char)inByte);
  }
}
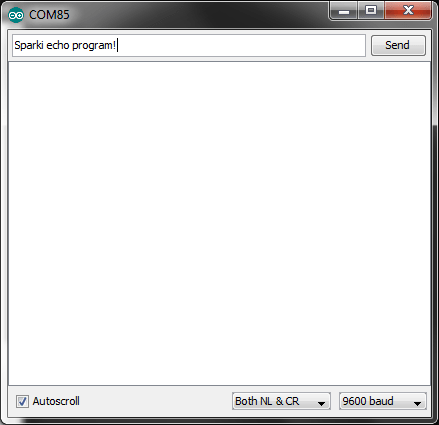
You can try it with the terminal. Try writing single characters at first and once you see how it works you can even write whole sentences to send to Sparki:
Then you can press the both the ENTER key in your keyboard, or the Send button on the screen to send the text that you have entered, and Sparki will answer with the same text:
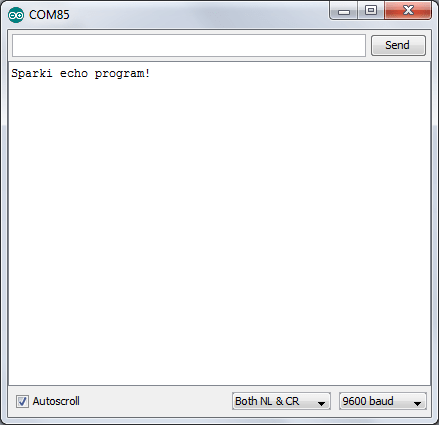
It may seem like the Terminal is just displaying the information you typed into it below, but I promise you, that’s not the case. The information first gets sent to Sparki through the USB cable. The communication you see in the Terminal is also displaying like a Serial.println command, even though we are using a Serial.print command. What’s going on there? This is because when you press the Return key or the Send button you’re sending a carriage return to Sparki along with your message. Then Sparki reads in the information before sending it back to the computer. To test this try adding an “else” statement to the code above so that Sparki tells you when there is no incoming information on the Serial port:
#include <Sparki.h>  // include the sparki library

void setup()
{
}

void loop()
{
  if (Serial.available())
  {
    int inByte = Serial.read();
    Serial.print((char)inByte);
  }
  else
  {
    Serial.println("There's no communication, I'm bored!");
    delay(100);
  }
}
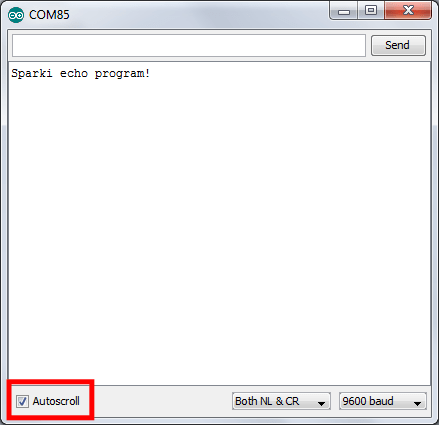
If you want to scroll back through your communications with Sparki simply click on the Autoscroll button so that option is not selected. With this code above the terminal window will fill up really quickly and you might miss some of your communication. If you like you can change the delay command so that Sparki waits a longer time before sending the “I’m bored” message, but the downside of this is that it will take longer for Sparki to check the information in its serial buffer. Sparki’s serial buffer is where it stores incoming information before it reads the information, kind of like your mail box. The more days you wait before checking your mail, the more there will be, right? With a longer delay command you’ll probably be able to send multiple messages before Sparki can read them, so they’ll pile up in Sparki’s serial buffer and only be sent back to the Terminal on your computer once Sparki exits the “else” statement and sees that there is information available in the serial buffer with the “if” statement.
Printing Other Data Types
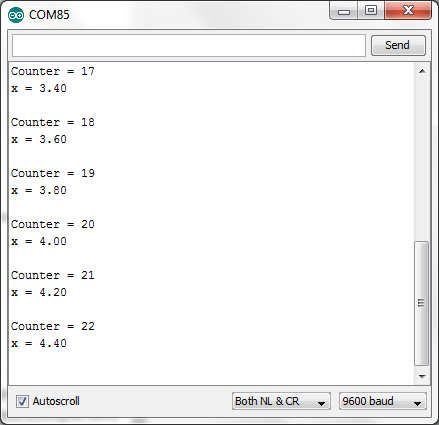
A very useful feature of both Serial.print and Serial.println instructions is that they can work with different data types. So we can print not just text (or strings) and characters, but also integer and floating point numbers, as can be seen in this short program:
#include <Sparki.h>  // include the sparki library

int counter = 0;  // integer variable.
float x = 0.0;    // floating point variable.

void setup()
{
}

void loop()
{
  Serial.print("Counter = ");
  Serial.println(counter); // prints an integer value

  Serial.print("x = ");
  Serial.println(x); // prints a floating point value

  Serial.println(); // prints an empty line

  counter++; // increment the counter variable
  x = x + 0.2; // increment the x variable in 0.2 steps

  delay(500);
}
You should see something like this in your terminal:
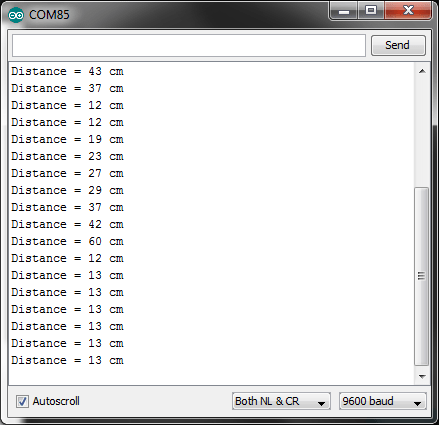
And in addition to printing variables, you can always print the values returned from sensor reading functions or from any other function which returns printable data. All you need to do is write the code that checks the sensor inside of the parenthesis of a Serial.print or Serial.println command, but make sure you don’t use any quotation marks! In the following example, we send to the terminal the value coming from the ultrasonic sensor reading function:
#include <Sparki.h>  // include the sparki library

void setup()
{
}

void loop()
{
  Serial.print("Distance = ");
  Serial.print(sparki.ping());
  Serial.println(" cm");

  delay(300);
}
And here is the result:
Setting Up the Bluetooth Serial Connection
The Bluetooth module is included with Sparki, but you have to plug it into the robot’s Expansion Port in order to use it. Also, it’s necessary to configure the connection from your computer before starting to use this useful part. Please make sure that you have followed the steps in this lesson before continue with the next examples here.
Once this is done, using the Bluetooth module is as easy as using the USB serial port previously seen here. Except you get to unplug your Sparki from the computer! The only change that you need to make in your programs is to replace the Serial keyword by Serial1. Let’s see some examples…
Bluetooth Testing: Hello World
The first test that we should do to ensure that our Bluetooth module is working fine is to run the Hello World program, but where we used Serial we want to change that to Serial1. We’ll also need to add the Serial1.begin(9600) command to the setup function. This command tells Sparki that the communication we’ll be sending over the Bluetooth Module will be at a speed of 9,600 bits per second or a baud rate of 9600. It’s important to be aware of this number because it needs to match in the code running on Sparki and in the program on your computer or device you use to receive the communication from Sparki. If Sparki is “speaking” at a faster or slower speed than your receiving device can “listen” (if the baud rates don’t match up) then the communication will be show up as gibberish.
#include <Sparki.h>  // include the sparki library

void setup()
{
  Serial1.begin(9600);
}

void loop()
{
  Serial1.println("Hello World");
  delay(1000);
}
On computers running Windows, using the Bluetooth communications will require a bit of extra effort, since the Arduino terminal (which is the terminal used in SparkiDuino’s software) may not be able to work with Bluetooth serial ports. So, to ensure that everything works properly, we will install a better terminal program.
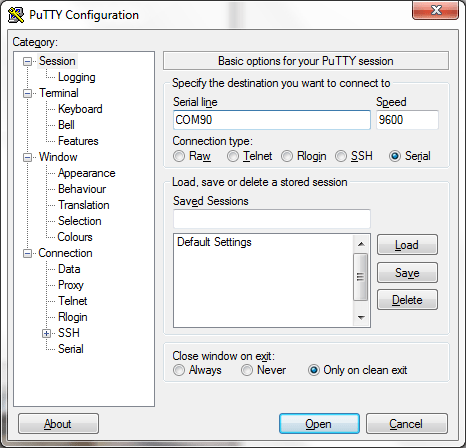
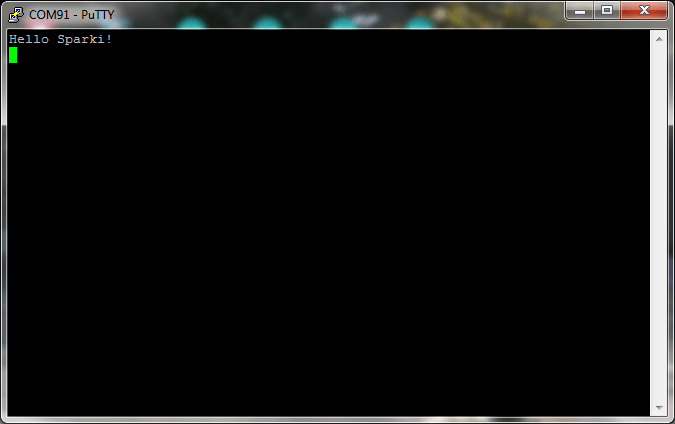
There are a lot of free terminal programs out there, but one of the best is PuTTY. This flexible and reliable software will allow us to work easily with any serial connection, being it over Bluetooth, USB, etc… Once you have downloaded PuTTY, you just need to run it. In the first screen, please select Serial and configure the port of your Bluetooth connection, as well as the Speed, which should be 9600:
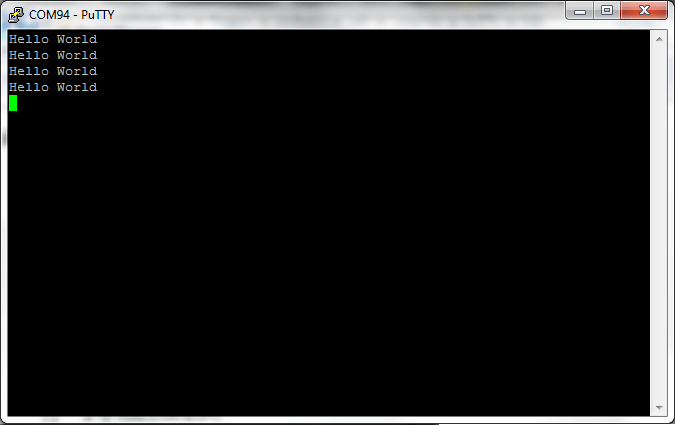
Them press the Open button. Your Bluetooth module in the Sparki robot should stop blink (the LED there will be ON permanently while a connection is established), and the following screen will appear:
With a Mac you can just go to Tools in SparkiDuino, select the Serial Port menu and make sure that your Bluetooth Module serial port is selected, and then click on the Serial Monitor button to see the “Hello World” message.
Selecting the serial port
What your Serial Monitor should look like
Making a Serial Bridge Between the USB and the Bluetooth ports
Let’s test bidirectional communications, but instead of just running the echo program for Serial1 (which you can test of course if you want!), we will make something a bit more interesting: a bridge between the USB and the Bluetooth ports. With it, we will be able to send text from one port and see it on the other one. To do this though, we will need two terminals.
We can run two instances of PuTTY, or open the SparkiDuino’s terminal for the USB port, and the PuTTY terminal for the Bluetooth. If you’re using a Mac and you really don’t want to work with a Terminal program like PuTTY (CoolTermMac is a nice, fairly simple Terminal program that I use) you can download and install Arduino, which is almost exactly like SparkiDuino. Then you can use the Serial Monitors in Arduino and SparkiDuino to talk over the USB port and the Bluetooth Module.
Before we look at any terminals, Mac or PC, here is the code, which is similar to the echo program, but a bit more complex since it deals with two ports instead of one:
#include; // include the sparki library void setup() { Serial1.begin(9600); } void loop() { if (Serial1.available()) { int inByte = Serial1.read(); Serial.print((char)inByte); } if (Serial.available()) { int inByte = Serial.read(); Serial1.print((char)inByte); } }
Please note that the received characters on Serial are sent to the Serial1, and vice versa.
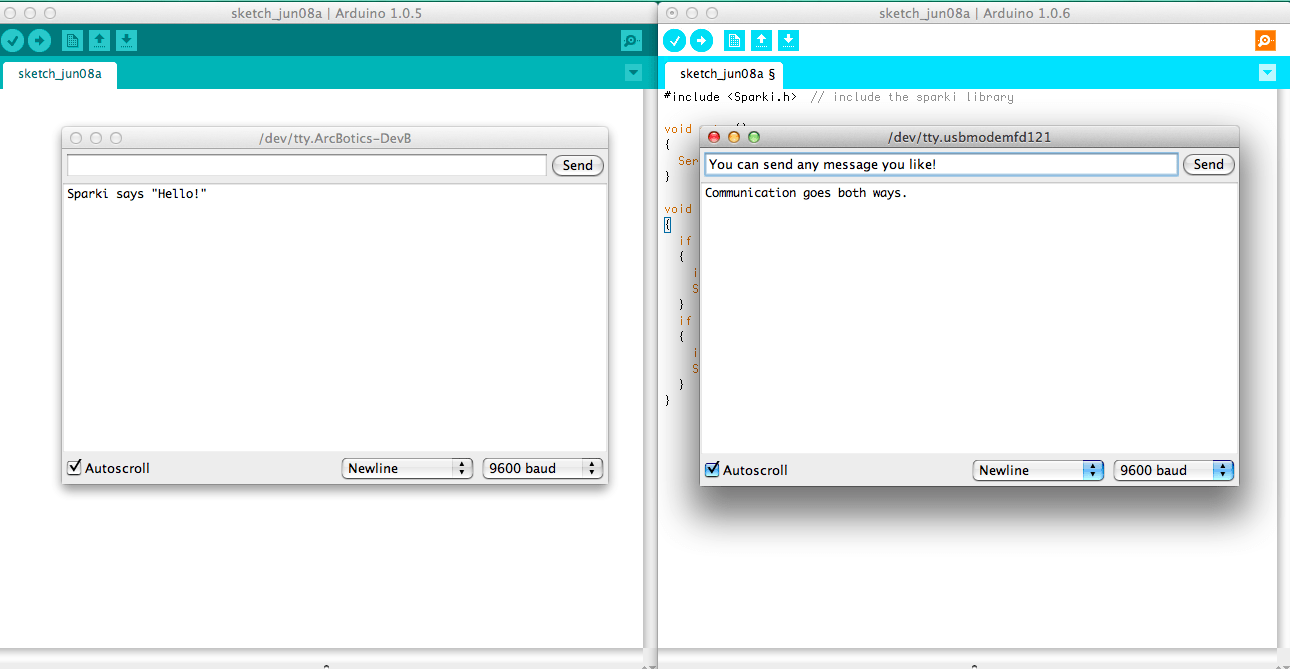
Now that you have uploaded this program, you can open the terminals and type on one of them to see the text on the other :

Note: If you experience problems with your Bluetooth connection on Windows machines, please go to the Sparki Troubleshooting page and look there for the “I’m running Windows and the Bluetooth port disappears” subsection.
Here’s what it might look like on a Mac if you use Arduino and SparkiDuino:
Advanced Bluetooth Communication Lessons
Ok, now that you feel comfortable with basic serial communication and have used the Bluetooth Module a little let’s do something more interesting like controlling how your Sparki rolls around using Bluetooth serial commands.
Let’s use pseudo-code to think about the various things we need Sparki’s code to do before we start writing it:
- Read in serial communication from the Bluetooth Module
- Store the value of that communication in a String variable
- Compare the communication in the String variable to a list of commands that will make Sparki perform actions
- Make Sparki perform the action that is associated with a command
- Make Sparki stop and wait for more serial communication after performing the action
So, we know how to do the first part. We just learned in the previous lesson. Let’s start our code with some of the commands we just learned:
#include <Sparki.h>  // include the sparki library

void setup()
{
  Serial1.begin(9600);
}

void loop()
{
  if (Serial1.available())
  {
    int inByte = Serial1.read();

  }
}
Great! We’re reading in commands. That’s the first step. Now we need to put the value stored in the inByte variable into a String. First we need to convert the integer value of the inByte to a character and then we need to add that character to an empty String. (And we need to initialize an empty String.) Adding the character to a String is called concatenation and it’s actually really easy with SparkiDuino!
#include <Sparki.h>  // include the sparki library

String inputString; //make an empty String called inputString

void setup()
{
  Serial1.begin(9600);
}

void loop()
{
  if (Serial1.available())
  {
    int inByte = Serial1.read();
    inputString += (char)inByte; //add the character from bluetooth to the string
  }
  Serial1.println(inputString);  //this code is for debugging and checking comm.
}
Now we can check out how this code works by opening the Bluetooth serial monitor and typing in some text. Try typing the word “Right” and pressing the Return key or the Send button. Does it show up scrolling back to you in the Serial monitor? Ok, next try typing the word “Left” and pressing the Return key or Send button. Something a little strange happens now, doesn’t it?
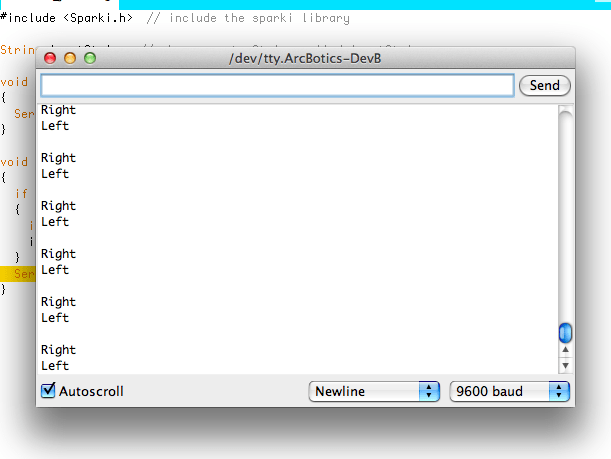
So when there was just one word, “Right” everything was pretty normal, correct? But then we added a second word to the communication and it turned up on a second line. That’s because the carriage return (our pressing of the Return button) also gets stored in the inputString! So if you keep adding more and more communications to this you’ll get a longer and longer set of words being stored inside inputString. That’s no good for what we want our code to do, is it? No, it’s not. So we need to add a little bit of code that resets inputString to an empty String if there is a new line of communication coming over the Bluetooth Module.
We’ll reset the String by using a “flag.” Before the inByte character is stored in the inputString we’ll check to see if it’s a carriage return, which looks like a slash and an N- ‘n’. If it a carriage return is we won’t bother to store the carriage return in the String, but we will set the flag so that next time there is some communication the inputString resets to an empty String. If the character isn’t a carriage return we’ll concatenate the character into inputString and set the flag to false. We’ll also need to reset the flag after we clear out inputString. Here’s the code to do all that:
#include <Sparki.h>  // include the sparki library

String inputString; //make an empty String called inputString
boolean returnFlag; //flag to check for carriage return

void setup()
{
  Serial1.begin(9600);
}

void loop()
{
  if (Serial1.available())
  {
  if (returnFlag)
    {
      inputString = "";
      returnFlag = false;
    }
    int inByte = Serial1.read();
  if ((char)inByte == 'n')
    {
      returnFlag = true;
    }
  else
    {
      inputString += (char)inByte; //add the character from bluetooth to string
    }
  }
  Serial1.println(inputString);  //this code is for debugging and checking comm.
}
Try this code out. Now Sparki only sends you back the last line you typed into the Terminal, right? Nice. Now we can move on to comparing the value we’ve stored in inputString to a list of words that will make Sparki change direction or move.
To do this we’ll need to decide on a list of words that Sparki will accept and create a bunch of “if/else” statements to check for those words. I’m only going to use four different words- “Forward,” “Left,” “Right, ” and “Stop.” I want you to follow along but add your own code for “Backwards.” If you’re really into robots you might even try adding your special “Dance” command that makes Sparki’s LEDs light up as it spins in circle or something crazy like that. (I’m only showing you the loop portion of the code because nothing else changes.)
void loop()
{
  if (Serial1.available())
  {
  if (returnFlag)
    {
      inputString = "";
      returnFlag = false;
    }
    int inByte = Serial1.read();
  if ((char)inByte == 'n')
    {
      returnFlag = true;
    }
  else
    {
      inputString += (char)inByte; //add the character from bluetooth to string
    }
  }
  Serial1.println(inputString);  //this code is for debugging and checking comm.

  //here's the code I'm adding this time around
  if (inputString == "Forward")
  {
    sparki.moveForward();
  }
  else if (inputString == "Left")
  {
    sparki.moveLeft();
  }
  else if (inputString == "Right")
  {
    sparki.moveRight();
  }
  else if (inputString == "Stop")
  {
    sparki.moveStop();
  }
}
Upload this code and test it out. Does it work? Did your additional code work as well? What happens when you type “forward” instead of “Forward”? The command doesn’t work, does it? Sometimes it’s important to help your user (the person giving Sparki the commands may not always be you) by making your communication robust. This means that there are a couple different ways to communicate or make things happen written into the code and everything doesn’t always have to go exactly perfectly. Which is a good thing to do when you’re dealing with humans instead of robots.
What we’ll do is add to the “if/else” statement conditionals (the bits inside the parenthesis) so a bunch of different commands work. Feel free to add whatever commands you want on top of the ones I show you. You might even want to put a secret word with another “if/else” statement into Sparki’s code so that something really amazing happens if a user types that word into the Terminal.
void loop()
{
  if (Serial1.available())
  {
  if (returnFlag)
    {
      inputString = "";
      returnFlag = false;
    }
    int inByte = Serial1.read();
  if ((char)inByte == 'n')
    {
      returnFlag = true;
    }
  else
    {
      inputString += (char)inByte; //add the character from bluetooth to string
    }
  }
  Serial1.println(inputString);  //this code is for debugging and checking comm.

  //here's the code I'm adding this time around
  if (inputString == "Forward" || inputString == "forward" || inputString == "Go")
  {
    sparki.moveForward();
  }
  else if (inputString == "Left" || inputString == "left")
  {
    sparki.moveLeft();
  }
  else if (inputString == "Right" || inputString == "right")
  {
    sparki.moveRight();
  }
  else if (inputString == "Stop" || inputString == "stop")
  {
    sparki.moveStop();
  }
}
![]()
Nice. Now our Sparki command code is a little more robust. What are some other ways you could make the code robust? You could add different languages. What about if a user types in a bunch of spaces before or after a command? Will this code still work? How about creating some code that gets rid of spaces? I already showed you how to find a carriage return and do something different if the character is a carriage return, that’s very similar to what you would need to do for a space….
Sending Multiple Commands in One Line of Communication
There’s one last way to make our communication with Sparki very robust that we’ll cover in this lesson. What if a user wants to send Sparki a set of words that will make Sparki perform actions, all with one line of communication? We’ll cover the code you need to use to help Sparki understand multiple words in a single line of communication.
Ok, pseudo-code time. Here’s a brief list of what we need to accomplish, there might be bits we miss but we’ll add that in as we go and problems arise. You should be used to this by now….
- Send a communication from Sparki to the Terminal explaining how to communicate with Sparki and wait for the Terminal user to respond with “OK”
- Create an array of Strings to hold incoming words and parameters
- Create a counter variable to keep track of where we are in the word array
- Create a boolean variable to keep track of whether Sparki is ready to receive a communication from the Terminal
- Store information from Bluetooth communication in the array of Strings
Wow. That’s a lot of code. It’s a good thing we’ve already done some of this work with our previous code. It’s also a very good thing we wrote the steps out and didn’t just jump into writing code. With complex programs it’s easy to get confused and make things more complicated than they really are if you don’t have a good plan before you get started. We’ll take this code one step at a time.
1. Send a communication from Sparki to the Terminal explaining how to communicate with Sparki and wait for the Terminal user to respond with “OK”- this will be pretty easy. It’s more or less like the code we worked on previously, except instead of making Sparki’s motors move when it gets the “OK” command, we’ll make Sparki send back a message and get ready to receive commands. In order to make this portion of the code happen over and over again while Sparki is waiting for an “OK” message we’ll use a “while” loop. A “while” loop is just like an “if” statement except it happens over and over again if the condition inside the parenthesis is true.
#include <Sparki.h> // include the sparki library

String inputString; //make an empty String called inputString
boolean returnFlag; //flag to check for carriage return
boolean oKSent; //flag to check for OK communication

void setup()
{
  Serial1.begin(9600);
}

void loop()
{
  while (oKSent == false)
  {
//start code for reading in communication
  if (Serial1.available())
  {
    if (returnFlag)
    {
      inputString = "";
      returnFlag = false;
    }
  int inByte = Serial1.read();
    if ((char)inByte == 'n')
    {
      returnFlag = true;
    }
    else
    {
      inputString += (char)inByte; //add the character from bluetooth to string
    }
  }
//end code for reading in communication

//start code to check for OK communication
  if ((inputString == "OK" || inputString == "ok" || inputString == "Ok") && returnFlag == true)
  {
    Serial1.println("Have fun sending Sparki movement commands!");
    oKSent = true; //exit the OK while loop
  }
//end code to check for OK communication
  else //send instructions once a second
  {
    Serial1.println("Sparki expects to receive communication that are");
    Serial1.println("movement commands (Forward, Right, Left, Stop)");
    Serial1.println("separated by spaces.");
    Serial1.println("Do not send Sparki more than ten commands at a time.");
    Serial1.println("The line below is an example of valid communication.");
    Serial1.println("Forward Right Forward Left Forward");
    Serial1.println("Type OK and press Send or Return to continue.");
    Serial1.println();//empty line to separate messages
    delay(2000);
  }
}
It’s always a good idea to provide instructions whenever you are creating an interface for humans to use. You may know what your code does, but no one else who sits down to use your code knows what it does! You have to help them out.
This code works fine, but there is one little hiccup. Do you see it? The instructions are repeated after the user types the “OK” before displaying the “Have fun….” message. That’s because Sparki reads in the serial communication one letter at a time and sends the instructions between reading each single letter. There’s a delay in there that makes Sparki wait two seconds before reading a second letter in the serial communication. There’s definitely a better way to help Sparki read in all of the serial communication before moving on in the code. To do that we’ll use another “while” loop!
To make Sparki read in serial communication while there is more information in the serial buffer simply change the “if” statement line that reads-
if (Serial1.available())
into a “while” loop-
while (Serial1.available())
Ok. Test this code out now. Does that work a little better? Feel free to customize your instructions, the “Have fun….” message and the amount of time that Sparki waits between messages.
2. Create an array of Strings to hold incoming words and parameters- To create an array of Strings simply type the following line of code at the very top of your code below your String inputString declaration (don’t type inputString again, that’s there to help you figure out where to put the String array declaration)-
String inputString;
String commArray [10];
This will make an array of Strings called commArray that has ten spaces for storing Strings. Strings use a lot of memory and we’re not sure how long the Strings we’ll be storing in our array will be, so we’ll limit the size of the array to ten. If you’re into communication and parsing information you’ll get into optimizing this code later, for now let’s move on to get something working.
3 & 4. Create a counter variable to keep track of where we are in the word array & Create a boolean variable to keep track of whether Sparki is ready to receive a communication from the Terminal– Man, this should be really easy by now. Just add an integer variable and a boolean variable below comArray.
String inputString;
String commArray [10];
int arrayCounter = 0;
boolean commReady;
5. Store information from Bluetooth communication in the array of Strings- This is a little more complicated than what we did before when we stored information and checked for a carriage return, but it’s a similar concept. We’ll simply read values in once and store them in commArray, checking to make sure we’ve read in the correct values with a println() command and a “for” loop. I’ve moved the instruction code from the loop( ) function to its own function named instructions( ) and I’m writing this new code in a function named readComm( ) to try and keep things from getting too complicated. We’ll get into clearing commArray later once we start to deal with a second (and third and fourth, etc…) message from the Terminal. So now my code looks like this-
#include <Sparki.h> // include the sparki library

String inputString; //make an empty String called inputString
boolean returnFlag; //flag to check for carriage return
boolean oKSent; //flag to check for OK communication
String commArray [10]; //array to store communication
int arrayCounter = 0; //integer to count through commArray

void setup()
{
Serial1.begin(9600);
}

void loop()
{
instructions();
readComm();
}

void readComm()
{
  while (Serial1.available())
  {
    int inByte = Serial1.read();
    if ((char)inByte == 'n')
    {
      returnFlag = true;
      arrayCounter = 0;
    }
    else
    {
    //here is where the code differs a lot from the previous code
      if(inByte == 32) //if it's a blank space
      {
        arrayCounter ++; //increment array counter to store in new array space
      }
      else
      {
      //add the character to the arrayCounter space in commArray
      commArray[arrayCounter] += (char)inByte;
      }
    }
  }
//debugging/checking to make sure it works
  for(int i = 0; i <=9; i++)
  {
    Serial1.println(commArray[i]);
  }
}

void instructions()
{
//Start code for instructions
  while (oKSent == false)
  {
//start code for reading in communication
    while (Serial1.available())
    {
      if (returnFlag)
      {
        inputString = "";
        returnFlag = false;
      }
    int inByte = Serial1.read();
      if ((char)inByte == 'n')
      {
        returnFlag = true;
      }
      else
      {
        inputString += (char)inByte; //add the character from bluetooth to string
      }
    }
//end code for reading in communication

//start code to check for OK communication
  if ((inputString == "OK" || inputString == "ok" || inputString == "Ok") && returnFlag == true)
    {
      Serial1.println("Have fun sending Sparki movement commands!");
      delay(500);
      oKSent = true; //exit the OK while loop
    }
//end code to check for OK communication
  else //send instructions once a second
    {
     Serial1.println("Sparki expects to receive communication that are");
     Serial1.println("movement commands (Forward, Right, Left, Stop)");
     Serial1.println("separated by spaces.");
     Serial1.println("Do not send Sparki more than ten commands at a time.");
     Serial1.println("The line below is an example of valid communication.");
     Serial1.println("Forward Right Forward Left Forward");
     Serial1.println("Type OK and press Send or Return to continue.");
     Serial1.println();//empty line to separate messages
     delay(2000);
    }
  }
//end code for instructions
}
![]()
While this code works and spits back the information you type over the serial Terminal if you try to add any more commands Sparki runs out of RAM space and you wind up getting all sorts of weird errors. (If you’re serious about programming you should get used to the idea that errors happen all the time and coders often have to backtrack to fix them.) In order to fix this issue we’re going to switch up our code so that Sparki expects single characters instead of Strings to control its movement.
This change is pretty easy. Here’s a list of the changes that you’ll need to do-
- Change the commArray variable from “String” to “char”
- Change the Serial1.println( ); commands so that they tell the user to send a single character (‘F,’ ‘R’ or ‘L’) instead of the words “Forward,” “Right” or “Left”
- Change the line-
commArray[arrayCounter] += (char)inByte;
to
commArray[arrayCounter] = (char)inByte;
so that commArray now stores a single character instead of adding characters together to form words
With these changes and adding a “for” loop with some movement commands our code has turned into the following-
#include <Sparki.h> // include the sparki library

String inputString; //make an empty String called inputString
boolean returnFlag; //flag to check for carriage return
boolean oKSent; //flag to check for OK communication
char commArray [10]; //array to store communication
int arrayCounter = 0; //integer to count through commArray

void setup()
{
 Serial1.begin(9600);
}

void loop()
{
 instructions();
 if(oKSent){
 readComm();
 makeMove();
 }
}

void makeMove(){
 for(int i = 0; i <= 9; i++)
 {
 if(commArray[i] == 'f' || commArray[i] == 'F')
 {
 sparki.moveForward();
 delay(1000);
 sparki.moveStop();
 }
 else if (commArray[i] == 'r' || commArray[i] == 'R')
 {
 sparki.moveRight(90);
 }
 else if (commArray[i] == 'l' || commArray[i] == 'L')
 {
 sparki.moveLeft(90);
 }
 else if (commArray[i] == 's' || commArray[i] == 'S')
 {
 sparki.moveStop();
 delay(1000);
 }
}

void readComm()
{
 while (Serial1.available())
 {
 int inByte = Serial1.read();
 if ((char)inByte == 'n')
 {
 returnFlag = true;
 arrayCounter = 0;
 }
 else
 {
 //here is where the code differs a lot from the previous code
 if(inByte == 32) //if it's a blank space
 {
 arrayCounter ++; //increment array counter to store in new array space
 }
 else
 {
 //add the character to the arrayCounter space in commArray
 // commArray[arrayCounter] += (char)inByte; //this line changed to
 commArray[arrayCounter] = (char)inByte;
 }
 }
 }
}
void instructions()
{
 //Start code for instructions
 while (oKSent == false)
 {
 //start code for reading in communication
 while (Serial1.available())
 {
 if (returnFlag)
 {
 inputString = "";
 returnFlag = false;
 }
 int inByte = Serial1.read();
 if ((char)inByte == 'n')
 {
 returnFlag = true;
 }
 else
 {
 inputString += (char)inByte; //add the character from bluetooth to string
 }
 }
 //end code for reading in communication

 //start code to check for OK communication
 if ((inputString == "OK" || inputString == "ok" || inputString == "Ok") && returnFlag == true)
 {
 Serial1.println("Have fun sending Sparki movement commands!");
 delay(500);
 oKSent = true; //exit the OK while loop
 }
 //end code to check for OK communication
 else //send instructions once a second
 {
 Serial1.println("Sparki expects to receive communication that are");
 Serial1.println("characters for movement commands separated by spaces.");
 Serial1.println("(F for forward, R for Right, L for Left, S for Stop)");
 Serial1.println("The line below is an example of valid communication.");
 Serial1.println("F R F L F S");
 Serial1.println("Type OK and press Send or Return to continue.");
 Serial1.println();//empty line to separate messages
 delay(2000);
 }
 }
 //end code for instructions
}
I’m going to leave the rest of this code up to you write. You should be able to store multiple words in Sparki’s commArray by now. It’s up to you to figure out how to do the final steps listed below. Good luck!
- Clear the commArray once all the movement commands have been executed by using the memSet command-
memset(commArray, 0, sizeof(commArray)); //clear out commArray
- Optional- Make Sparki occasionally send a “Hello? I’m waiting for a command.” message if the user doesn’t communicate with Sparki often enough
- It might also be useful to send a “Command not recognized.” or “I’m confused!” message when Sparki receives a command that it can’t find in its list of movement commands so the user knows that whatever they typed into the serial Terminal isn’t understood by Sparki
Taking it a Little Further
How about creating a communication program that asks the user to send a character and a number, instead of just a single character? This way the user can control the movement command even more. For example a “F 10” serial communication might make Sparki move forward for ten seconds or ten centimenters and a “R 90” might make Sparki turn ninety degrees to the right.
What if Sparki hasn’t finished with its current movement commands and the user sends a command over the Bluetooth Module serial connection? Can you figure out how to change the makeMove( ) function so that Sparki sends a “Please be patient while I finish this movement” communication?
There is no end to the different things you can do with Bluetooth and Sparki! You could even add a special command to make Sparki enter Maze Solving or Line Following mode if you like.
Final Code
Here’s some code that makes Sparki do all of the actions outlined in the Sending Multiple Commands in One Line of Communication section. Sparki still needs a backwards command, though. Feel free to add that and anything else you like on your own!
![]()
Related Lessons
If you haven’t seen it yet, another useful way of showing values from variables, sensor readings, etc. is by using the LCD display. Here is a lesson on First Steps with the LCD Display where you can learn more about it.