


Line Following
Learn how to get Sparki to follow a black line on white paper
Lessons You Should Know

Introduction
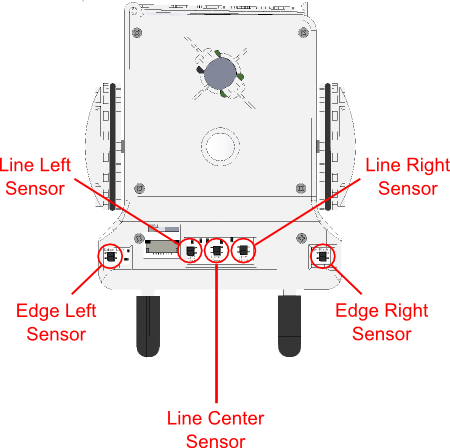
Sparki can use the sensors below the hands to sense edges and lines. In this tutorial you’ll have Sparki follow a line.
What You’ll Need
- A Sparki.
- A path line for it to follow, like the poster in ArcBotics’ Sparki Materials Packs:
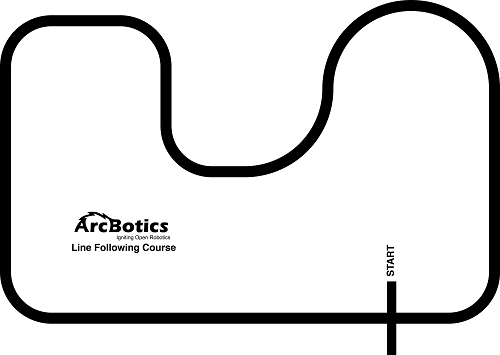
Note: If you make your own line path and the lines aren’t dark enough, or the material is too reflective in general, Sparki may become confused. Try something with more contrast and less reflectivity, or change the threshold in the code.
How It Works
Sparki has an array of infrared sensors underneath that it uses to detect if there are lines below it. We’re going to program Sparki to follow the dark lines in our path, since they are printed over a more reflective background (typically, the path is printed in dark black, over a white background).
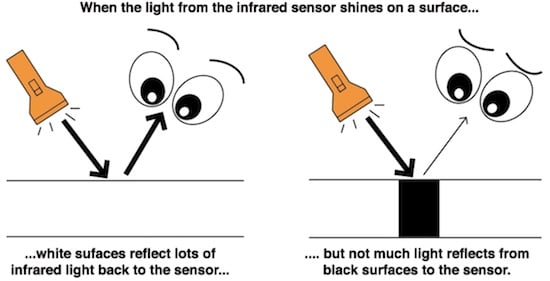
Infrared reflectance sensors can be thought of as an infrared light (which humans can not see), and some special eyes that look at that light. The eyes are made out of a special photo sensing material and an infrared LED (or Light Emitting Diode):
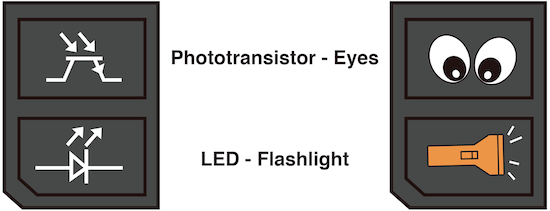
Here are the parts again, but with pictures showing what you’d normally think of them as!
Following a Line
So, let’s use these sensors to make the Sparki to follow printed lines in the floor.
![]() Please remember to check that the batteries are properly connected (and charged!). And as we are going to use the motors here, please check that the On/Off Switch is on. Another important thing to take care of when playing with the robot’s motors is to be careful not to be working over a table. A fall from that table could permanently damage your Sparki.
Please remember to check that the batteries are properly connected (and charged!). And as we are going to use the motors here, please check that the On/Off Switch is on. Another important thing to take care of when playing with the robot’s motors is to be careful not to be working over a table. A fall from that table could permanently damage your Sparki.
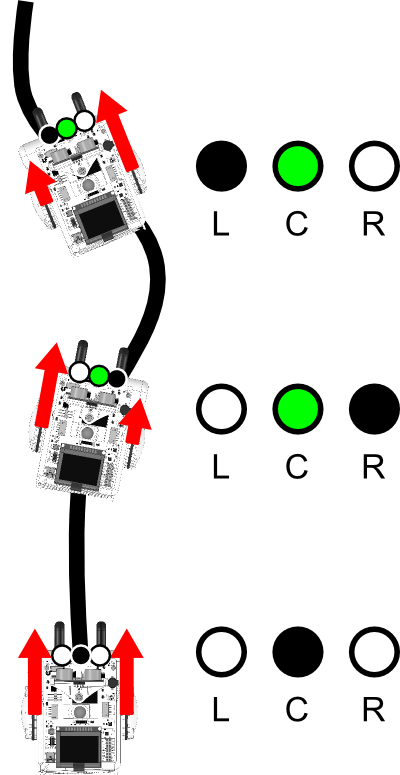
In this example code, Sparki continues to move forward as long as it detects a line underneath the center sensor. If there is no line underneath it, it will look under the left and right line sensors to see if it has started to move off course. If there is a line underneath the left sensor, it will move left to move the robot back to the line (by accelerating the right wheel, as explained in this previous lesson). If there is a line underneath the right sensor, it will move right to move the robot back to the line.
The following image shows the possible states of these sensors, the different ways they can be thought of, as seen by our program. The black dot means that the sensor is reading a line below it. A white dot means that the white background is below the sensor. With the green dots means Sparki does not care what color it is.
This code requires integers, variables, basic programming, wheel code, if statements and infrared reflector sensors. The readings from the infrared sensors will be sent to the LCD display so we can have a better idea of what is happening inside Sparki’s brain:
/*******************************************
 Sparki Line-following example

 Threshold is the value that helps you
 determine what's black and white. Sparki's
 infrared reflectance sensors indicate white
 as close to 900, and black as around 200.
 This example uses a threshold of 500 for
 the example, but if you have a narrow line,
 or perhaps a lighter black, you may need to
 adjust.
********************************************/

#include <Sparki.h> // include the sparki library

void setup()
{
}

void loop() {
  int threshold = 500;

  int lineLeft   = sparki.lineLeft();   // measure the left IR sensor
  int lineCenter = sparki.lineCenter(); // measure the center IR sensor
  int lineRight  = sparki.lineRight();  // measure the right IR sensor

  if ( lineLeft < threshold ) // if line is below left line sensor
  {
    sparki.moveLeft(); // turn left
  }

  if ( lineRight < threshold ) // if line is below right line sensor
  {
    sparki.moveRight(); // turn right
  }

  // if the center line sensor is the only one reading a line
  if ( (lineCenter < threshold) && (lineLeft > threshold) && (lineRight > threshold) )
  {
    sparki.moveForward(); // move forward
  }

  sparki.clearLCD(); // wipe the screen

  sparki.print("Line Left: "); // show left line sensor on screen
  sparki.println(lineLeft);

  sparki.print("Line Center: "); // show center line sensor on screen
  sparki.println(lineCenter);

  sparki.print("Line Right: "); // show right line sensor on screen
  sparki.println(lineRight);

  sparki.updateLCD(); // display all of the information written to the screen

  delay(100); // wait 0.1 seconds
}

Congrats! You have programmed Sparki to follow a line!
Extra Activities
- Of course, there are other techniques to follow lines with a robot, such as with two sensors instead of three, or even with one! Why not take a look out there in the Internet to see if you can find new ways of doing this?
- If the line forks, which way will Sparki turn? Is there a way you can give it directions with the remote as it comes to a split in the road? Are there ways you could have Sparki tell you when it has reached a branching path?
- What about following a line that is wider than the distance between the left and the right sensor?