


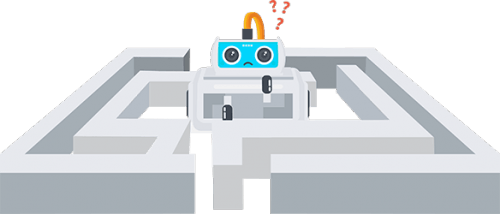
Maze Solving
Teach Sparki how to get through mazes
Lessons You Should Know


Introduction
Solving a maze is fun and will help you build your roboticist skills up- thinking about every instruction that Sparki needs to not just wander around the maze, but actually complete it. At this point, with the things that we have already learned in the previous lessons, we can take advantage of some of Sparki’s sensors to implement some maze solving programs. To understand this lesson, it’s strongly recommended that you have learned the concepts from the Line Following and the Moving the Robot lessons first.
So, let’s help Sparki get through the maze!
What You’ll Need
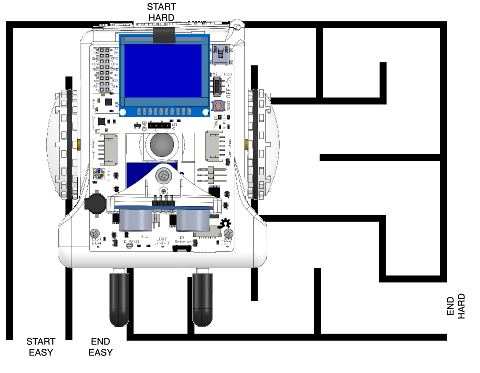
- A Sparki.
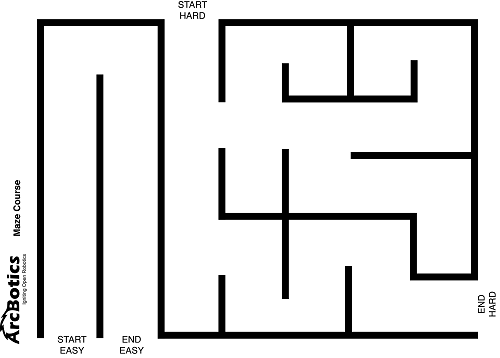
- A maze. What we will use here is the poster in ArcBotics’ Sparki Materials Packs. You can also make your own with a white cardboard as the base, using black insulating plastic tape to “print” the walls. You can also download a ready to print maze from this link (please note that this maze can be printed in standard plotters, since it’s 90 cm wide). If you’re really into mazes, you can download that maze’s source SVG file, and modify it using the Inkscape open source vector graphics editor (or any other SVG editor of your choice).
How It Works
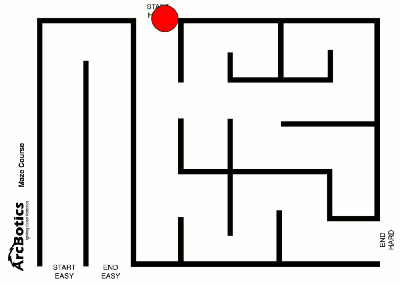
One of the simplest ways of solving a maze with a robot is by using the Wall Follower algorithm, also know as the left-hand rule (or right-hand rule). Forget about the robot for a while, and suppose that you are a person inside a maze. Finding the exit could be done just by keeping one of your hands always touching a wall. And by “always”, we really mean always here. It might take you a while and you might wind up taking all the wrong paths in the maze before getting to the end but by keeping your left hand on the wall of the maze you wind up taking every single left hand turn (sometimes turning around completely) and, as long as you keep taking steps forward, eventually you’ll get to the end of the maze. Take a look to the following animation, where the red point represents the person:
Do you see the trick? It’s important to stick with either the left hand rule or the right hand rule and never switch between them in the middle of the maze. One will get Sparki through the maze faster, but you’ll never know which one unless you’ve seen the maze before.
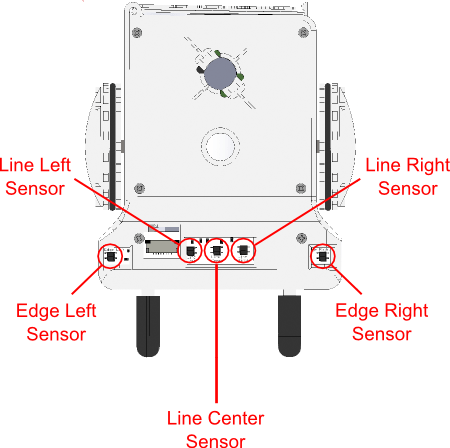
Let’s think about this. What do we have on our Sparki to imitate this behavior in a printed maze? The line following infrared sensors! So, how do we implement the “Left Hand” algorithm with Sparki ? The first thing to do is to ensure that Sparki really understands the lines that he is “viewing” with the infrared sensors. And to do that, we will need to use all of our line and edge sensors.
Let’s remember what sensors we have:
Soon we’ll see how to use these infrared sensors in our maze solving problem. First, let’s talk a bit about geometry…
Maze Geometry and Sparki
We can freely draw a maze and try to program Sparki to escape from it. But sooner or later we will find that not every robot can solve every maze. There are some shape and size constraints that we should think of when leaving a poor robot alone in a maze. Some are easier to spot, like the size of the robot to the maze. Suppose that your robot is too big (or too small) for the maze:
The robot will not even be able to see some of the turns because they are underneath it! The sensors also won’t be in the right place in order to sense the walls. Sparki might sense some walls, but they might be a corridor or two over to the right or left since Sparki is so huge in comparison to the maze. The walls of a maze corridor for Sparki need to be just a little bit narrower than the space between Sparki’s two infrared edge sensors. (We’ll go over how Sparki will use these sensors to find the walls in just a moment.)
But other constraints are not that obvious, and we may need to figure them out when we are programming the maze solver algorithm on a specific robot. Things like the number of sensors, the distances between them, and the distances from the sensors to the wheels centers may become really important in the maze solving activity.
Here are the most important rules to follow if you are creating your own printed maze for this Sparki activity:
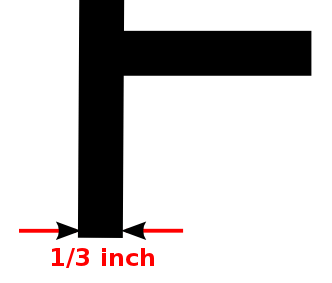
1. Line width: Sparki needs to be able to see the walls of the maze and not shoot right over them. This isn’t so important when Sparki is navigating the maze (if Sparki overshoots the walls you could just change your code a little to adjust), but it’s a nice reference for you as a maze builder. So our line’s width here will be 1/3 inch. You can make your walls thicker, but in order to make sure that Sparki’s sensors don’t accidentally pass over any walls make sure that your walls are at least 1/3 inch thick.
2. Width of corridors: Sparki should be able to turn when the wall line forms a corner in a way that all Sparki’s Line Sensors are kept over the white interior of the maze corridor. Sparki’s Edge Right Sensor and its Edge Left Sensors will sense the maze walls to make sure that Sparki keeps the maze walls between them. (In a real maze there would be walls, then you would need to use a different set of sensors to sense the walls, right? Which sensors would you use for that?) To ensure that Sparki has enough room inside of the maze, the maze wall lines have to always be a minimum of about 2.4 inches from each other:

3. 90 degrees corners and branches: As you have seen in all the previous maze pictures, all the corners and branches in the maze are 90 degrees. This is necessary to help Sparki find dead ends and branches. It also makes writing your first maze solving code a little bit easier. Once you feel comfortable with this activity feel free to draw more complicated mazes with different angle turns, it would be a great way to test your new found maze solving skills!
Now we have a good idea of which kind of maze is Sparki going to solve, and which sensors Sparki will use. Also, we know that we are going to use the Wall Follower algorithm (or left-hand rule). So let’s see how to code Sparki to use this algorithm!
![]() Please remember to check that the batteries are properly connected (and charged!). We are going to use the motors here so please make sure that the On/Off Switch is set to on. Also, make sure you’re not working on a table since a fall could permanently damage your Sparki.
Please remember to check that the batteries are properly connected (and charged!). We are going to use the motors here so please make sure that the On/Off Switch is set to on. Also, make sure you’re not working on a table since a fall could permanently damage your Sparki.
The Main Idea
At a higher level, the Wall Follower algorithm consists of these four simple steps:
- If you can turn left, do it.
- Else (if you can’t turn left), if you can continue going straight, just go straight.
- Else (if you can’t do either of the previous steps), if you can turn right, do it.
- If you reached a dead end, turn back by turning around (in either direction) 180 degrees.
But it is not always that simple for a real robot. For example, even just going straight may be a problem for the robot if it’s positioned anything other than perfectly straight with respect to the black lines that make up the maze walls. Also- detecting some parts of the maze may use more than one sensor, as we will see in the next couple steps. Read on to begin your maze solving adventures!
Getting Sparki’s Bearings
So, our first problem is figuring out how to make Sparki go straight through a maze corridor. We need to make sure that Sparki knows where the wall on the left hand side of the corridor is and that Sparki travels along while keeping that wall on it’s left hand side. This sounds easy, but there’s actually a couple different ways to this and we have to use different sensors for checking the walls drawn on the maze than we would use if there were actual maze walls. (We’re going to use the infrared line and edge sensors, what sensors might Sparki use if there were real walls?) We’ll start with code that’s similar to the way we programmed Sparki to follow a line but we’ll change the code (a lot) so that it fits our needs. Programmers often do this, even though writing code from scratch is a much better way to teach yourself how to code, sometimes it’s nice to work with some code that already does something and then change it a little bit. So we will use that knowledge here, but adapt it to our specific problem.
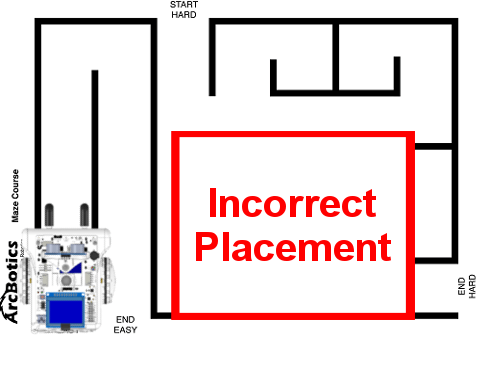
In the Line Following lesson, the robot followed a line that was between the Line Left Sensor and the Line Right Sensor. This time, the lines we want to check are on the outside of the Edge Right Sensor and Edge Left Sensor. The walls of our maze are just a little bit narrower than the width between Sparki’s edge sensors. We’ll assume that Sparki is going to start off kind of pointed straight down a maze corridor, but we’ll need to make sure that the code helps keep it that way. For this particular tutorial’s code you do need to place Sparki a little bit to the right of the center of the maze corridor. (If you’re good with code you’ll be able to easily change this code so that Sparki is ok with being placed to the left of the center of the maze corridor, or even to either side.)

The first thing we want to do is create a “calibrating” function that helps Sparki find the wall on it’s left hand side and then orient itself so that it is pointing straight down the corridor. We won’t use this function a lot, but it’s one of the most important functions since we’ll use it to get Sparki pointed in the correct direction when we don’t really know where it is. Let’s think about the steps we want Sparki to take. (this is called writing pseudo-code and is a very important part of writing code) We’ll cover this code bit by bit but you can find the entire program at the end of each section, labeled “Current Code.”
1. Pivot left to find a line with the Edge Left Sensor.
sparki.moveLeft(1); //turn Sparki to the left a tiny bit
We’ll also need some boolean variables (I used three, but you may be able to figure out how to calibrate with even less flags.) that will serve as flags to tell Sparki when it needs to do each part of the calibration function. I added these outside of the loop( ) function, just below the Sparki library, since we’ll need to be able to access the variables from all of our code, not just inside the loop( ) function. (For more about this read up on variable scope.)
#include <Sparki.h> // include the sparki library

boolean foundLeftWall = false;
boolean calibrated = false;
boolean rightWall = false;

void setup()
Now that we have flag variables and the action Sparki needs to take we can put them together inside of the loop( ) function to make Sparki turn left as long as it hasn’t found a wall yet.
  if( foundLeftWall == false && calibrated == false ) //if Sparki hasn't found a left wall and hasn't been calibrated yet
  {
    sparki.moveLeft(1); //turn Sparki to the left a tiny bit

      if ( edgeLeft < threshold ) // if there is a line below left edge sensor
      {
        foundLeftWall = true; //Sparki found the left wall
      }
   }
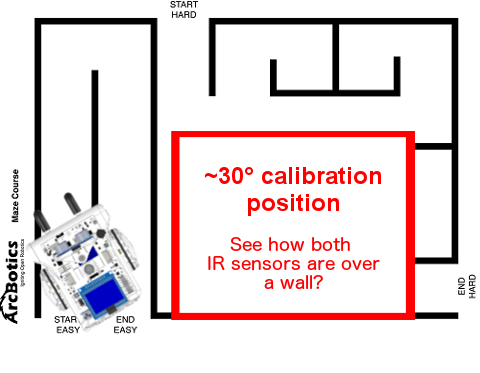
2. Once Sparki has found a line on the left we need to make Sparki rotate to the left until there is a line underneath both the Edge Left Sensor and the Edge Right Sensor. With Sparki in this position we know Sparki’s angle in comparison to the walls, about 30° counterclockwise (it’s not exactly 30° but we’ll tidy up our code in a little bit, the important thing is first to get a rough draft that kind of works). Since we now know the position of Sparki in comparison to the walls we call this a “known good” position because we know for sure, no matter where Sparki started, that Sparki is now at the position of 30° counterclockwise from straight ahead. This code goes right below the previous code we discussed, inside the loop( ) function.
Here’s the code that has Sparki moving to the left and detects when Sparki is at this ~30° orientation.
  if( foundLeftWall == true && calibrated == false ) //if Sparki found a wall but isn't calibrated yet
  {
    if( rightWall == false )
  {
    sparki.motorRotate(MOTOR_LEFT, DIR_CCW, 15); //move forward while rotating to the right a little
    sparki.motorRotate(MOTOR_RIGHT, DIR_CW, 55); //move forward while rotating to the right a little
  }

    if( edgeLeft < threshold && edgeRight < threshold ) //if there is a wall beneath both sensors we're at -30 degrees from the wall
    { //this is also called a "known good" position because we know, no matter where Sparki started, where it is now in relation to the wall
      rightWall = true;
    }
  }
3. Now Sparki just needs to do a little wheeling around in order to get into the right position. This code should go inside of the last “if” statement, just after where we made the variable rightWall equal true. There are plenty of ways you can do this, I had Sparki move forward a little, turn to the right until it is pointed straight ahead and then back up a little bit. How else could you write this code so that Sparki gets pointed in the right direction?
4. Finally we need to take this code and put it in a function that is especially for calibration. That should be pretty easy for you by now. But don’t forget to call the function inside of the loop( ) function, otherwise it will never happen! You could even call this function in the setup( ) portion of Sparki’s code if you want, but the flags will make sure that Sparki only executes it when we want it to calibrate.
void calibrateSparki()
{
  rightWall = false; //variable so we know if Sparki found the right wall

  if( foundLeftWall == false && calibrated == false ) //if Sparki hasn't found a left wall and hasn't been calibrated yet
  {
    sparki.moveLeft(1); //turn Sparki to the left a tiny bit

    if ( edgeLeft < threshold ) // if there is a line below left edge sensor
    {
      foundLeftWall = true; //Sparki found the left wall
    }
  }

  if( foundLeftWall == true && calibrated == false ) //if Sparki found a wall but isn't calibrated yet
  {
    if( rightWall == false )
    {
      sparki.motorRotate(MOTOR_LEFT, DIR_CCW, 15); //move forward while rotating to the right a little
      sparki.motorRotate(MOTOR_RIGHT, DIR_CW, 55); //move forward while rotating to the right a little
    }

    if( edgeLeft < threshold && edgeRight < threshold ) //if there is a wall beneath both sensors we're at -30 degrees from the wall
    { //this is also called a "known good" position because we know, no matter where Sparki started, where it is now in relation to the wall
      rightWall = true;
      //turn 28 degrees clockwise and scoot back close to the beginning
      sparki.moveForward();
      delay(1650); //this variable got changed a little
      sparki.moveRight(30); //this variable got changed a little
      sparki.moveBackward();
      delay(1000);
      sparki.motorStop(MOTOR_LEFT);
      sparki.motorStop(MOTOR_RIGHT);
      calibrated = true; //set calibrate flag to true so we exit calibrated code
    }
  }
}
5. Uh oh! We’re not quite done yet. If you try to run this code now it results in some errors. To fix these errors we need to move our variable declarations from inside the loop( ) function to up near the top with our boolean flag variable declaration.
So we need to change these lines of code-
edgeLeft = sparki.edgeLeft(); // measure the left IR sensor
edgeRight = sparki.edgeRight(); // measure the left line IR sensor
And here’s what the new variable declarations look like near the top of our code-
boolean rightWall = false;

int edgeLeft;
int edgeRight;

int threshold;

void setup()
Phew. That was a lot of work just to get Sparki pointed in the right direction. The cool thing about code is, now that we wrote that function, we can use it any time we need to later on in our maze solving algorithm, share it with friends or repurpose it for another robot!
Take a moment to look at the boolean”flag” variables and make sure you understand how they were used in the “if” statements to help Sparki find the walls.
Now you’ll need to change variable values in the code just a little so that Sparki’s wheeling takes it to a place where the Edge Left Sensor is over a wall and Sparki is pointed straight, as precisely as we can make it.
Here’s the Current Code–
#include <Sparki.h> // include the sparki library

//for sensors
int edgeLeft;
int edgeRight;

int threshold;

//for calibrating
boolean foundLeftWall = false;
boolean calibrated = false;
boolean rightWall = false;

void setup()
{
  //indicates to the user that the program started:
  sparki.beep(440, 300);
  delay(300);
  sparki.beep(880, 500);
  Serial.begin(9600);
}

void loop() {
  threshold = 700;

  readSensors();

  calibrateSparki();

  //sparki.moveForward();

  sparki.clearLCD(); // wipe the screen

  sparki.print("Edge Left: "); // show left line sensor on screen
  sparki.println(edgeLeft);

  sparki.print("Edge Right: "); // show left line sensor on screen
  sparki.println(edgeRight);

  sparki.updateLCD(); // display all of the information written to the screen
}

void readSensors()
{
  edgeLeft = sparki.edgeLeft();   // measure the left IR sensor
  edgeRight = sparki.edgeRight(); // measure the left line IR sensor
  //int lineRight  = sparki.lineRight();  // measure the right IR sensor
}

void calibrateSparki()
{
  rightWall = false; //variable so we know if Sparki found the right wall

  if( foundLeftWall == false && calibrated == false ) //if Sparki hasn't found a left wall and hasn't been calibrated yet
  {
    sparki.moveLeft(1); //turn Sparki to the left a tiny bit

    if ( edgeLeft < threshold ) // if there is a line below left edge sensor
    {
      foundLeftWall = true; //Sparki found the left wall
    }
  }

  if( foundLeftWall == true && calibrated == false ) //if Sparki found a wall but isn't calibrated yet
  {
    if( rightWall == false )
    {
      sparki.motorRotate(MOTOR_LEFT, DIR_CCW, 15); //move forward while rotating to the right a little
      sparki.motorRotate(MOTOR_RIGHT, DIR_CW, 55); //move forward while rotating to the right a little
     }

    if( edgeLeft < threshold && edgeRight < threshold ) //if there is a wall beneath both sensors we're at -30 degrees from the wall
    { //this is also called a "known good" position because we know, no matter where Sparki started, where it is now in relation to the wall
      rightWall = true;
      //turn 28 degrees clockwise and scoot back close to the beginning
      sparki.moveForward();
      delay(1000); //this variable got changed a little
      sparki.moveRight(24); //this variable got changed a little
      sparki.moveBackward();
      delay(1000);
      sparki.motorStop(MOTOR_LEFT);
      sparki.motorStop(MOTOR_RIGHT);
      calibrated = true; //set calibrate flag to true so we exit calibrated code
    }
  }
}

There’s one other thing we have to do before we can move on, we have to put the calibrateSparki( ) function inside of an “if” statement that is only called the while Sparki has not yet been calibrated. Check the next section of “Current Code” if you can’t figure out how to do this on your own. Hint- find the calibrated = true; line in the code. (You also may be able to optimize this code, meaning rewrite it so there is less code. You know, figure out how to take out some “if” statements, maybe a variable or two…. If you really like coding, give it a try.)
The process we just followed is a good technique to complete a complicated piece of code-
1.First cut up the actions you want to accomplish into smaller, manageable chunks.
2.Write some pseudo-code for one of these smaller chunks.
3.Write rough draft code (and rewrite your rough draft code, and rewrite your rough draft code….) until it does more or less what you want.
4.Finally, mess around with your variable values to really dial the code in precisely. Make sure you only change one variable value at a time, otherwise you may get confused about which changes did what!
If you look at the code there is another activity that Sparki is doing in this code, right? That’s right! Sparki displays some variables on its LCD so we can see what it’s actually doing. Go ahead and make another function to hold the LCD code and transfer that code into this new function. I named my new function lcdDisplay, but you can name it whatever you like.
If you like the LCD screen click here to learn more about it, but in this activity we’re pressing onwards since Sparki can’t even do move down the maze corridor yet!
Going Straight
Next we need to create some code that makes Sparki move straight ahead down a corridor. After we get our function for moving straight ahead set up we’ll back up and create the code that tells Sparki when to move straight ahead, as well as some code to display what Sparki is doing on the LCD display.
Ok. Pseudo-code time! There are a bunch of parts to this code-
- Declaring some variables or “flags” to help Sparki go straight.
- Adding code to the sensor function to test to see if Sparki found a wall.
- Setting the variables to true or false.
- Adding an “if” statement that makes Sparki actually move in the loop.
- An “else” statement to stop Sparki if it didn’t find a wall.
So, let’s make a boolean variable and set it to false at the beginning. (If you don’t set it to anything it’s automatically considered to be false.)
int threshold;

//for wall finding
boolean foundLWall; //set false at the beginnning

//for calibrating
boolean foundLeftWall = false;
Ok. Now we need to add a little bit of code to our sensorReading function to see if there is a wall beneath the Edge Left Sensor.
void readSensors()
  {

    edgeLeft = sparki.edgeLeft();
    edgeRight = sparki.edgeRight();
    if(edgeLeft < threshold)
    {
      foundLWall = true;
    }
  }
But wait! This will set foundLWall to true once and then foundLWall will always be true, no matter what! (This happens with sensors a lot.) We need to make sure we set the variable to false before we check it.
void readSensors()
  {
    foundLWall = false;
    edgeLeft = sparki.edgeLeft();
    edgeRight = sparki.edgeRight();
      if(edgeLeft < threshold)
      {
        foundLWall = true;
      }
   }
Now to use the variable inside the loop( ) function! You should also feel pretty comfortable with “if” statements by now. One of the tricky things about this code is the “else” statement after it, the rest of the code inside of the loop( ) function will go inside of it! Also, you might be used to seeing a single conditional or question with two equals signs, greater than or equal signs or even a not equal sign (!=) inside of these parenthesis. By placing just the boolean variable name inside of these parenthesis we are still asking a yes or no question, but the answer is simply the value of the boolean variable.
 readSensors();

 if(calibrated == false)
 {
 calibrateSparki();
 }
 else
  {
  if(foundLWall)
  {
    sparki.moveForward();
  }
  else
    {
    sparki.moveStop();
    sparki.println("Didn't find wall.");
    sparki.updateLCD();
    }
  }
}
Try this code out now, Sparki should calibrate and then start marching straight ahead until the wall on its left side ends.
Sparki Lost the Wall or Came to a Branch in the Maze
Sometimes Sparki will lose the wall, so we really only want Sparki to move forward when there is a wall underneath the Edge Left Sensor. We already took care of that. But, if Sparki doesn’t detect a wall underneath the Edge Left Sensor then that may mean that there is a turn in the maze Sparki needs to take. (Remember, Sparki will always turn left if it can in our algorithm.) It’s time for… you guessed it, pseudo-code. Here are the steps we want to take for staying with the wall or finding the two different types of left hand turn that Sparki might take. (Remember, there’s a 90° left hand turn and a 180° left hand turn, these are different and will require different code for each.) We’ll put all of this code inside of a function called something like wallFinder( ).
1. Check the Edge Left Sensor, if there is no wall underneath it Sparki needs to turn off the straight( ) function and begin a wall finding function.
2. First, assume we just lost the wall somehow and try this pseudo-code- If there is no line underneath the Edge Left Sensor move forward and to the right a little trying to find the line again. If Sparki doesn’t find the wall again that way, back up exactly the same amount in the same direction to get back to where Sparki started searching and try the same thing again, only this time moving forward and to the left. If that doesn’t result in Sparki finding the wall then have Sparki move back to the starting position. If it did result in Sparki finding the wall, Sparki still needs to make sure it is pointed forward again so it doesn’t immediately lose the wall again.
3. So, Sparki didn’t find the wall, that means Sparki is probably at a left hand turn of some sort. To test for a 90° turn we’ll try this pseudo-code- Have Sparki move forward until the wheels are at the last place Sparki knows there was a wall. Now have Sparki turn to the left 90° and check the sensors to see if there is a wall underneath the Edge Left Sensor.
4. Still no wall! This means that Sparki is probably (hopefully) at a 180° turn. Sparki has already turned 90°, so Sparki just needs to turn another 90°, all the while looking for a wall. Hmmm. This pseudo-code sounds almost exactly like the code in section 3. We may be able to reuse some code for this….
5. At this point we’ve exhausted all the possibilities we can think of for Sparki in a maze. (That’s not exactly true, what about a dead end in a maze? We’ll get to that later.) But often, between code errors and the unpredictability of the real world, situations like this will pop up. Always have a backup plan. There are a couple different options for Sparki now- Sparki can start its wall finding code all over again, it can do something like beep, or Sparki can just sit there waiting for a human to pick it up and help it out.
Variables- Let’s think about the variables we’re going to need to achieve the pseudo-code above before launching into writing anything. We’re going to need a variable to keep track of how much Sparki has turned and which portion of our wallFinder code Sparki is currently using. We’ll call these variables wallFindType and turnCount. So, our first move is creating those variables-
int threshold;

//for wall finding
boolean foundLWall;
int wallFindType = 0;
int turnCount = 0;

boolean foundWall;

void setup(){
Checking Sensors- Now that we’ve got our variables we need to set these variables equal to certain values depending on what Sparki is doing. We’ll start with wallFindType. If Sparki is going straight ahead the wallFindType is zero. Then we’ll use a value of one to make Sparki start the wallFinder( ) function. (I’m also going to start adding LCD println commands to make debugging easier.)
Also, our conditional is a little different. By using two ampersands (&&) we can check two conditions to see if they are true. Only if foundLWall is false and wallFindType is zero will the code inside of the “else if” code execute.
void loop()
{
threshold = 700;

readSensors();

if( calibrated == false )
   {
   calibrateSparki();
   }
   else
   {

   if( foundLWall )
   {
     wallFindType = 0;
     sparki.moveForward();
     sparki.println("Found wall.");
   }
   else if( foundLWall == false && wallFindType == 0 )
   {
     sparki.moveStop();
     sparki.println("Didn't find wall.");
     sparki.updateLCD();
     wallFindType = 1; //now we enter the wall finding routine
     sparki.moveForward(.5); //move forward a little
   }
   if( wallFindType > 0 ){
     wallFind();
   }

   sparki.updateLCD();
  }
}
Upload this code and test it out. Sparki should calibrate and then move forward until the wall stops. Does it? If it doesn’t go back over your code to make sure you didn’t make any mistakes.
Now we need to fill in the wall finding function, mine is called wallFinder. The wallFinder( ) function will first turn Sparki to the right and left 5° to search for a wall in case we just sort of lost the wall and there was no turn. It will complete this 5° turn a degree at a time, checking for a wall underneath the Edge Left Sensor each time through the code. Why are we only searching 5° to the left and the right? Good question. We’re limiting it to 5° because at 6° Sparki would actually start to see a 90° left hand turn!
To fill in the wallFinder( ) function we’ll use a switch/case statement. Case/switch statements are a great way to create a sort of list of different possible chunks of code and make only one of them happen at a time by assigning different values to a variable which controls the logic flow. It’s much easier to show you, rather than try and explain it. After the code inside of a certain case is executed Sparki gets to a break; line and it knows the switch/case statement is done for now. For more on case/switch statements click here. First we’ll create the empty switch/case statement inside of the wallFind( ) function-
void wallFind(){
 switch(wallFindType){
 case 1: //Sparki might just be off track a little, search around 5 degrees
 //our code in the case that wallFindType = 1 goes here
 break;

 case 2://we didn't just lose the wall, there was a turn, check for 90 degree turn
 //our code in the case that wallFindType = 2 goes here
 break;

 default:
 //the default case is here just in case wallFindType is equal to a value we didn't cover with our other cases
 break;
 }
}
Now we’ll fill it in with our code that makes Sparki look to the right 5°. This where we start to use the turnCount variable to keep track of how much of the 5° we’ve checked. When we get up to 5°, if we haven’t found a wall yet, then we’ll check to the left. (We’ll reuse some of this code to do that.)
void wallFind(){
 switch(wallFindType){
 case 1: //Sparki might just be off track a little, search around 5 degrees
   while( foundLWall == false && turnCount < 5 )
   { //as long as we haven't found a wall or turned 10 degrees yet
   sparki.moveRight(1);
   turnCount ++;
   readSensors();
   sparki.println("Searching right");
   }
   if(turnCount >= 5)
   {
   sparki.moveLeft(5);//turn back to original position
   sparki.println("Done searching right");
   }
   else{ //otherwise Sparki found a wall
   wallFindType = 0;
   turnCount = 0;
   return;
   }
   turnCount = 0;

   break;
 case 2://we didn't just lose the wall, there was a turn, check for 90 degree turn

 break;

 default:
 break;
 }
}
Remember, you always want to zero out any variables that are keeping track of something like angle or time once you are done using them. That way Sparki won’t get confused because it has the wrong number stored in a variable the next time it comes to this code. So whenever we find a wall, and want to stop searching for walls we set wallFindType equal to zero as well as storing a zero in turnCount.
So this code has Sparki turning 5° to the right and checking its Edge Left Sensor every time it moves a single degree. If Sparki turns all 5° then it moves back to its original position. (How could you make Sparki look 15° to the left? How about 45°?) Now we’ll do the same, but while turning to the right. We can copy the code we just wrote since we’re doing the same thing, only as a mirror image. We really only need to change a couple lines of codes to make this work, basically you can look for anything that says “left” and change it to “right” and vice versa.
 void wallFind(){
 switch(wallFindType)
  {
 case 1: //Sparki might just be off track a little, search around 5 degrees
  while( foundLWall == false && turnCount < 5 ){ //as long as we haven't found a wall or turned 10 degrees yet
  sparki.moveRight(1);
  turnCount ++;
  readSensors();
  sparki.println("Searching right");
  }
  if( turnCount >= 5 )
  {
  sparki.moveLeft(5);//turn back to original position

  sparki.println("Done searching right");
  }
  else
  { //otherwise Sparki found a wall
  wallFindType = 0;
  turnCount = 0;
  return;
  }
  turnCount = 0;
  while( foundLWall == false && turnCount < 5 )
  {
  sparki.moveLeft(1);
  turnCount ++;
  readSensors();
  sparki.println("Searching left");
  }
  if(turnCount >= 5)
  {
  sparki.moveRight(5);//turn back to original position

  wallFindType = 2;//move on to next wall finding type
  sparki.println("Done searching left");
  }
  else
  {//otherwise Sparki found a wall
  sparki.println(turnCount);
  wallFindType = 0;
  turnCount = 0;
  return;
  }
  turnCount = 0;
  break;
 case 2://we didn't just lose the wall, there was a turn, check for 90 degree turn

 break;

 default:
 break;
 }
}
We could have left Sparki at 5° to the left, since next we’re just going to turn 90° to the left and then tell Sparki not to look for a wall anymore. This way, if there is a wall underneath Sparki’s Edge Left Sensor it will just keep moving forward, otherwise it will search around a little for a wall and if it can’t find one, it will turn again… meaning we don’t have to write any code for a 180° turn. It’s nice to write code that saves you time and works for a couple different scenarios!
But wait. Turning 90° to the left isn’t as simple as just turning. Because of where Sparki’s wheels are we need to make sure that Sparki moves forward a little before turning. Otherwise Sparki won’t stay inside our maze lines! Here’s the case 2: statement-
  break;
case 2://we didn't just lose the wall, there was a turn, check for 90 degree turn
  sparki.moveForward(7);
  sparki.moveLeft(90);
  sparki.moveStop();
  sparki.println("Search Level 2");
  wallFindType = 0;
  break;

  default:
  break;
 }
Nice. You may be asking why we didn’t just use an “if” statement instead of a switch/case statement? What if you wanted to make Sparki do other stuff between searching, like beeping or checking a sensor? It would be really easy to insert that into the switch/case statement, but a little more typing to do so with “if” statements.
Ok. Now we’re really getting somewhere. The last thing we need to do is check for dead ends. Sparki is going to act a little differently when it finds a dead end and it even needs to check a different sensor. Can you guess which one? Really any of the other IR sensors will work, but we’re going to use the Center Line Sensor. What we will do is create another boolean variable called foundDeadEnd and add some code to our readSensor( ) function which overrides the foundLWall variable. We do this because a dead end still has a left wall, so if we don’t override the foundLWall variable Sparki will just keep rolling, thinking everything is cool as it cruises past the dead end wall. So here are the two sections of code we’re adding now-
int turnCount = 0;

boolean foundWall;
boolean foundDeadEnd; //the variable

void setup(){
Aaaaand in the readSensors( ) function….
void readSensors()
{
  foundLWall = false;
  foundDeadEnd = false;
  edgeLeft = sparki.edgeLeft();
  edgeRight = sparki.edgeRight();
  lineCenter = sparki.lineCenter();

  if( edgeLeft < threshold )
  {
    foundLWall = true;
  }
  if( edgeLeft < threshold && lineCenter < threshold )
  {
    foundLWall = false;
    foundDeadEnd = true;
  }
}
Now we need to use the foundDeadEnd variable inside of our loop( ). That looks like this-
readSensors();

  if( foundDeadEnd && wallFindType == 0 )
  {
    sparki.moveRight(90);

    sparki.moveForward();
  }
  else if( foundLWall )
  {
  wallFindType = 0;
  sparki.moveForward();
  }
We can just have Sparki move to the right 90° because then Sparki will check its sensors again. If it’s a true dead end Sparki will sense the other wall in front of it now and complete the 180° turn. If it’s just a 90° turn to the right then Sparki will complete the turn, and without a wall to block its way, keep on cruising.
Try running the code you have so far. It should get Sparki through the easy maze and through most of the hard maze. So close….
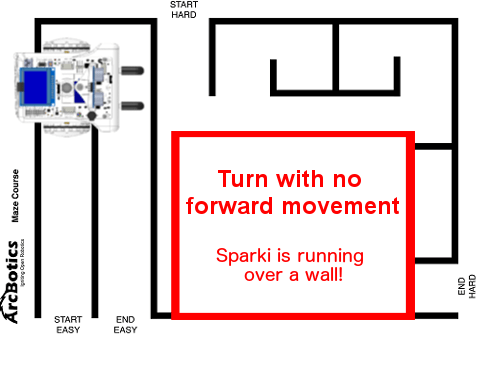
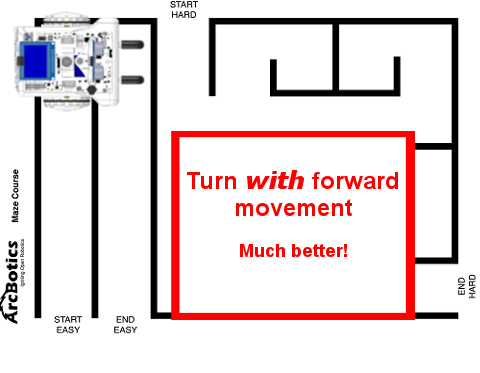
We’re just about done. But there are some places in the maze where Sparki doesn’t quite behave and will run over walls at a dead end. So we need to add just a little bit of code to make Sparki back up a little after turning around in a dead end. With this latest addition our loop code looks like this-
void loop(){
  threshold = 700;
  readSensors();
  if( calibrated == false )
  {
    calibrateSparki();
  }
  else
  {
    if( foundDeadEnd && wallFindType == 0 )
    {
      sparki.moveRight(90);
      sparki.moveBackward(4); //added this line of code
      sparki.moveForward();
    }
    else if( foundLWall )
    {
      wallFindType = 0;
      sparki.moveForward();
    }
    else if( foundLWall == false && wallFindType == 0 )
    {
      sparki.moveStop();
      wallFindType = 1; //now we enter the wall finding routine
      sparki.moveForward(.5);
    }
    if( wallFindType > 0 )
    {
      wallFind();
    }
  }
}
Blam. Sparki can now cruise around mazes. Have fun with your code, trying adding to it so that Sparki whistles or lights up when it performs certain maze maneuvers. Maybe the next step is creating a real maze, with real walls! To navigate that maze you’ll need to use different sensors, but your code will look very similar.
Here’s the final maze solving code for download-
Congratulations! Your Sparki is now capable of spectacular maze breakaways.
Extra Activities
As you may have seen in the maze solving programs link above, there are other ways of solving a maze. Why not try some of them, like the Random mouse algorithm (Tip: Remember that you can use the random function included in Sparki’s software)?
Once you’ve explored using the random function to help Sparki navigate the maze, how about putting a marker in Sparki’s marker holder and creating a program to make Sparki draw a maze? The skills are extremely similar…..