
Magnetometer
Learn about Sparki's Magnetometer
Lessons You Should Know

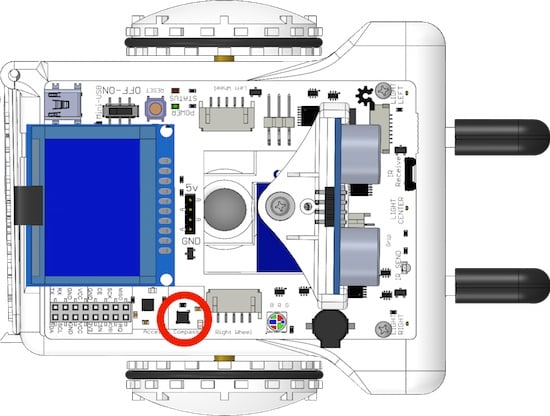
Sparki has a 3-Axis magnetometer. It is used to detect the magnetic field Sparki is experiencing. This can mean the earth’s magnetic field, the field generated by Sparki’s motors and wires, or many other sources. It can do this in all 3 XYZ axis, which are left/right (X), forward/backwards (Y), and up/down (Z). This is the same part that smartphones use to act as a compass.
How It Works
The magnetometer is what’s called a microelectromechanical, or MEMs device. MEMs are made of very tiny mechanical parts and wires too small to see, made in the same way microchips are made. Inside the part, too tiny to see, are tiny coils and a beam. Each axis has a beam. That beam has a pressure sensor on each side, and a coil wrapped around it passing current through it. Due to Lorentz force, the stronger the magnetic field, the more the bar with the current passing through it bends. The pressure sensors measure this bending, do calculations on how much magnetic field it means, and send this information to Sparki. Pretty complicated for such a tiny chip!

The part has 3 different axis, left/right (X), forward/backwards (Y), and up/down (Z):
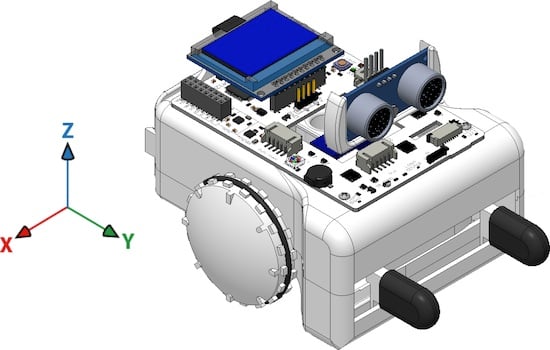
The direction of the arrows shows the positive direction of the reading. If the magnetic field is in the opposite direction, the reading will be negative.
Using the Part
With the basic Sparki code in place, you can measure the magnetic field in each axis using these commands:
sparki.magX();
sparki.magY();
sparki.magZ();
This command returns the magnetic field the magnetometer reads on the X, Y or Z axis in milliGauss.
SparkiDuino already has code examples for you to use:
File > Examples > Magnetometer
/*******************************************
 Basic Magnetometer Sensor test

 Sparki has a 3-Axis magnetometer. It is
 used to detect the magnetic field Sparki is
 experiencing. This can mean the earth’s
 magnetic field, the field generated by
 Sparki’s motors and wires, and many other
 sources.  It can do this in all 3 XYZ axis,
 which are left/right (X),
 forward/backwards (Y), and up/down (Z). This
 is the same part that smartphones use to act
 as a compass.

 This program shows how to read the sensor
 and display the information on the LCD.
********************************************/
#include <Sparki.h> // include the robot library

void setup()
{
}

void loop() {
  sparki.clearLCD(); // wipe the screen

  float x  = sparki.magX();   // measure the accelerometer x-axis
  float y  = sparki.magY();   // measure the accelerometer y-axis
  float z  = sparki.magZ();   // measure the accelerometer z-axis

  // write the measurements to the screen
  sparki.print("Mag X: ");
  sparki.println(x);

  sparki.print("Mag Y: ");
  sparki.println(y);

  sparki.print("Mag Z: ");
  sparki.println(z);

  sparki.updateLCD(); // display all of the information written to the screen
  delay(100);
}