


Object Retrieval
Teach Sparki how to retrieve objects
Lessons You Should Know


Introduction
Now that we have learned a lot of things about Sparki, like moving it or using its distance, light and line sensors, gripper, buzzer and display, why not put all this together in one (a bit) more complex application? In this lesson we will learn how to find objects with Sparki’s ultrasonic ranger along a line following course, grasp them with the gripper and bring them to an area behind the starting point. Some of the concepts that we are going to use here were already explained in the Maze Solving lesson. It’s strongly recommended that you read it before going on with this lesson.
What You’ll Need
- A Sparki.
- Some lightweight objects, which may be cardboard boxes, cylinders, or even balls. We will show below in this lesson how to build a cylindrical object that fits well in Sparki’s gripper.
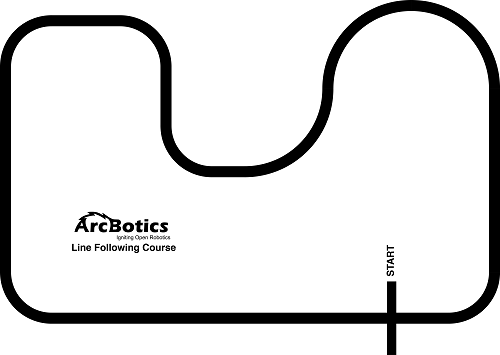
- A line path along which the objects to be retrieved will be deployed, like the one in ArcBotics’ Sparki Materials Packs:
How It Works
The object retrieval program is easier to understand if we first think about the steps that Sparki should actually do to accomplish the task. The overall idea is to program the Sparki to do the following:
- The robot starts to follow the black line, searching for an object with its ultrasonic distance sensor (also called ultrasonic range finder).
- Once Sparki finds an object, the robot advances (moves forward) towards it until the object is inside its gripper’s reach.
- Sparki grasps the object with its gripper and then rotates itself until it finds the line again, so it can go back.
- The robot now follows the line again, but this time it’s moving towards the START mark, looking for it with its infrared sensors.
- Once the robot finds the START mark, it goes to the place (a few centimeters behind the mark) that the object has to be released, and releases it.
- Sparki counts the retrieved objects, so when all the objects are retrieved, the program stops.
The Objects
Before starting to program the robot, let’s take a look to the objects to be retrieved. Of course, you can use any object that fits into Sparki’s gripper, but if you don’t figure out which kind of objects to use, we will show here how to create some cheap and easy to make cylinders that will be ideal for this and other future advanced robotic lessons:
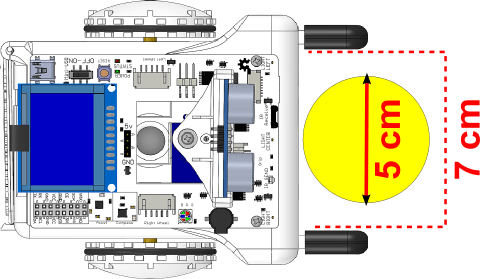
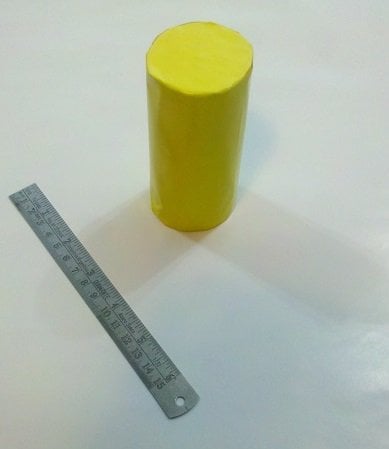
1. Dimensions: We want our objects to fit inside’s Sparki’s gripper, which has a maximum span of about 7 centimeters (cm). Our choice was to use cylinders with a diameter of about 5 cm, which resulted on a relatively easy to grip object, as you can see in the video above. Regarding the height, ideally our cylinders should be between 10 and 12 cm, to allow the Sparki’s ultrasonic ranger to detect them:
2. Flexibility: It’s convenient that the objects are a bit flexible, in order to be grasped with Sparkis gripper easily. Materials such as cardboard could be ideal for our purposes.
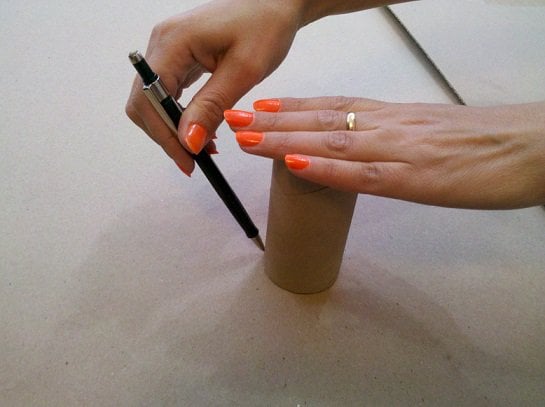
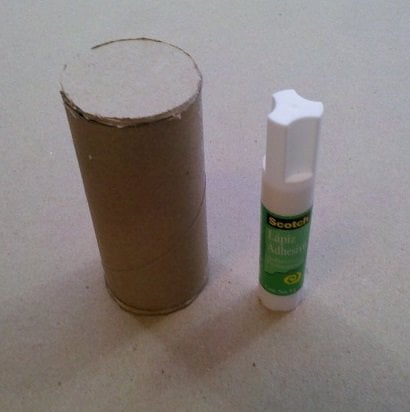
3. Weight: We don’t want the objects to be heavy weighted, since our little robot needs to deal with them. So, to make our objects we can grab some cardboard tubes, often easy to recycle from cleaning paper rolls (just to give an idea of a possible source for them):

4. Appearance: Of course we can use the crude cardboard cylinders for our activities. But this has two drawbacks. First, without caps, they will probably last less since they will be structurally weaker. Second, they are ugly! So let’s create the caps, also with cardboard. Then you can glue them with a glue stick, for example:
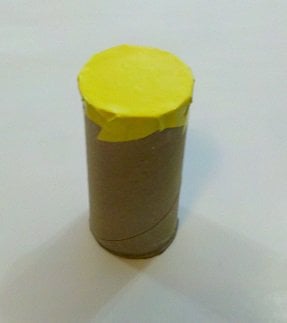
Finally, we may want to cover the cylinders with colored paper, starting with the caps:
Here we are:
Now that we have the objects (we will use 2 of them here, but you can make some more if you want), let’s program Sparki to go for them!
Coding!
Let’s start programming one step at a time in order to better understand the whole program.
![]() Please remember to check that the batteries are properly connected (and charged!). And as we are going to use the motors here, please check that the On/Off Switch is on. Another important thing to take care of when playing with the robot’s motors is to be careful not to be working over a table. A fall from that table could permanently damage your Sparki.
Please remember to check that the batteries are properly connected (and charged!). And as we are going to use the motors here, please check that the On/Off Switch is on. Another important thing to take care of when playing with the robot’s motors is to be careful not to be working over a table. A fall from that table could permanently damage your Sparki.
As explained previously, the first task that Sparki should be able to do is follow a line. To do this, we will use the same algorithm used in the Line Following lesson. Please read it if you are not familiar with the concepts there before continuing. But our program here will be far more complex that the line follower, so all the line following algorithm will be encapsulated in a function, as we did before in the Maze Solving lesson:
void followLine(bool approachingObject)
{
  state = "follow line";
  if (approachingObject)
  {
    state = "approaching";
    if (ping <= objectDistance) // if the object is so close, stop the robot
    {
      gripObject();
      finished();
      while(true); //work done => program ends here!
    }
  }

  if (!lineLeft) // if the black line is below left line sensor
  {
    moveLeft(); // turn left
  }
  else if (!lineRight) // if the black line is below right line sensor
  {
    moveRight(); // turn right
  }
  else if (lineLeft && !lineCenter && lineRight) // if the center line sensor is the only one reading a line
  {
    sparki.moveForward(); // move forward
  }
}
As you can see in the previous code snippet, this function does not just follow a line, but it also manages the approaching to an object when required. That’s why it receives a bool parameter called approachingObject: when it’s false, the function is just a plain line follower. But if it’s true, this function makes the robot to carefully approximate to the object by sensing the distance to it with the ultrasonic ranger. Please note that the function continues to follow the line, even when it’s driving the robot to approximate to the object, so it does not deviate from the line course.
We have also defined other auxiliary functions, in order to modularize the program, such as the readSensors and showSensorsAndState functions. These are similar to the ones used in the Maze Solving lesson. There is also a small one line function that will just tell us if the robot has found the START mark with its infrared sensors:
void readSensors()
{
  //each sensor is 1 if reading white, and 0 if reading black:
  lineLeft =  sparki.lineLeft() > threshold;
  lineCenter = sparki.lineCenter() > threshold;
  lineRight =  sparki.lineRight() > threshold;
  ping = sparki.ping();
}

bool startMark()
{
  return !lineLeft && !lineCenter && !lineRight;
}

void showSensorsAndState()
{
  sparki.clearLCD(); // wipe the screen

  sparki.print("Line Left: "); // show left line sensor on screen
  sparki.println(lineLeft);

  sparki.print("Line Center: "); // show center line sensor on screen
  sparki.println(lineCenter);

  sparki.print("Line Right: "); // show right line sensor on screen
  sparki.println(lineRight);

  sparki.print("Ping: "); // ultrasonic ranger on screen
  sparki.print(ping);
  sparki.println(" cm");

  sparki.println(String("state = ") + state);

  sparki.updateLCD(); // display all of the information written to the screen
}
On the other hand, there is a new function which takes care of the object gripping. As you can see in the following code, it just stops the robot and closes the gripper during a predetermined time, defined in the gripTime constant at the beginning of the program:
void gripObject()
{
  sparki.moveStop();
  state = "gripping object";
  sparki.gripperClose();
  delay(gripTime);
  sparki.gripperStop();
}
Please take into account that his constant should be defined experimentally, according to the diameter of the objects to grasp. Please read the Basic Gripper Usage lesson if you are not familiarized with it. Finally, a few words about the main application cycle (the loop). Please note that in this loop, after calling to the readSensors function, the program checks whether there is an object in the range of the predefined distance to start the approaching to it or not. If there is an object, it calls the followLine function with the approachingObject (Boolean) parameter valuing true. If not, followLine is called with a false parameter:
void loop()
{
  readSensors();
  if (ping < (objectDistance * 3))
  {
    followLine(true); // aproximates to the detected object, but always centered on the black line
  }
  else
  {
    followLine(false);
  }

  showSensorsAndState();
  delay(100); // wait 0.1 seconds
}
This could have been done with a code a bit shorter, like the following, but for some people this way with the if statement could result clearer:
void loop()
{
  readSensors();
  followLine(ping < (objectDistance * 3));
  showSensorsAndState();
  delay(100); // wait 0.1 seconds
}
The other auxiliary functions on the program are straightforward.
Also, as you will note in the code, we have defined states for the program. But don’t worry: as in the Maze Solving lesson, we use them here just as an indication of what is the robot doing, so we have a better understanding of its behavior. The states that we are going to define for our program are the following:
- undefined: this is the initial state, when the robot has not yet even started to follow a line.
- gripping object: the robot has stopped to move, and is trying to grasp the detected object with its gripper.
- releasing object: the robot is releasing the object (this should happen only when it’s in the retrieval zone).
- approaching: an object was detected near enough, so the robot is now carefully approaching to it (while still following the line, of course) in order to grasp the object as soon as it reaches the gripper’s range.
- follow line: as its name says, the robot is following the line course.
- turn back: the robot rotates to turn back, since it has grasped an object and wants to retrieve it to the retrieving zone.
- finished: the robot has retrieved all the objects to the retrieving zone. The program has stopped at this point until the next reset or on/off cycle of the robot.
Some of these states will not be present in the following code but in the final version (later in this lesson). So, before going to solve the full object retrieval problem, let’s advance a smaller step, programming Sparki to just follow the line, detect an object and grip it, without retrieving it or going further to find new objects. Here is the complete code for our first approach to the problem:
#include <Sparki.h> // include the sparki library

const int threshold = 500; // line sensors thereshold

const int objectDistance = 3; // distance to the object where the gripper has to grip it [cm]
const int gripTime = 1500; // time that takes to the gripper effectively grip the object [milliseconds]

const int turnSpeed = 0; //used to turn the robot over an external center of rotation.

bool  lineLeft = false,
      lineCenter = false,
      lineRight = false;

int ping = 0;

String state = "undefined";

void readSensors()
{
  //each sensor is 1 if reading white, and 0 if reading black:
  lineLeft =  sparki.lineLeft() > threshold;
  lineCenter = sparki.lineCenter() > threshold;
  lineRight =  sparki.lineRight() > threshold;
  ping = sparki.ping();
}

bool startMark()
{
  return !lineLeft && !lineCenter && !lineRight;
}

void showSensorsAndState()
{
  sparki.clearLCD(); // wipe the screen

  sparki.print("Line Left: "); // show left line sensor on screen
  sparki.println(lineLeft);

  sparki.print("Line Center: "); // show center line sensor on screen
  sparki.println(lineCenter);

  sparki.print("Line Right: "); // show right line sensor on screen
  sparki.println(lineRight);

  sparki.print("Ping: "); // ultrasonic ranger on screen
  sparki.print(ping);
  sparki.println(" cm");

  sparki.println(String("state = ") + state);

  sparki.updateLCD(); // display all of the information written to the screen
}

void gripObject()
{
  sparki.moveStop();
  state = "gripping object";
  sparki.gripperClose();
  delay(gripTime);
  sparki.gripperStop();
}

void finished()
{
  //tells the user that the work is done:
  state = "finished!";
  sparki.gripperStop();
  sparki.moveStop();
  showSensorsAndState();
  sparki.beep(880, 300);
  delay(300);
  sparki.beep(440, 300);
  delay(300);
  sparki.beep(880, 600);
  delay(600);
}

void moveLeft()
{
  //turn left at a lower speed:
  sparki.motorRotate(MOTOR_LEFT, DIR_CCW, turnSpeed);
  sparki.motorRotate(MOTOR_RIGHT, DIR_CW, 100);
}

void moveRight()
{
  //turn right at a lower speed:
  sparki.motorRotate(MOTOR_LEFT, DIR_CCW, 100);
  sparki.motorRotate(MOTOR_RIGHT, DIR_CW, turnSpeed);
}

void followLine(bool approachingObject)
{
  state = "follow line";
  if (approachingObject)
  {
    state = "approaching";
    if (ping <= objectDistance) // if the object is so close, stop the robot
    {
      gripObject();
      finished();
      while(true); //work done => program ends here!
    }
  }

  if (!lineLeft) // if the black line is below left line sensor
  {
    moveLeft(); // turn left
  }
  else if (!lineRight) // if the black line is below right line sensor
  {
    moveRight(); // turn right
  }
  else if (lineLeft && !lineCenter && lineRight) // if the center line sensor is the only one reading a line
  {
    sparki.moveForward(); // move forward
  }
}

void setup()
{
  sparki.servo(SERVO_CENTER); // rotate the servo to is 0 degree postion (forward)

  //indicates to the user that the program started:
  sparki.beep(440, 300);
  delay(300);
  sparki.beep(880, 500);
}

void loop()
{
  readSensors();
  if (ping < (objectDistance * 3))
  {
    followLine(true); // aproximates to the detected object, but always centered on the black line
  }
  else
  {
    followLine(false);
  }

  showSensorsAndState();
  delay(100); // wait 0.1 seconds
}

Now that you can test Sparki finding one object and grasping it, we can go for the full program to retrieve all the objects on the line course. But first, please take into account that the program that we are going to write may not be able to retrieve objects which are deployed over the curves. You can always improve this in your program as an extra activity, but for the current version, this image shows some suggested places where the objects could be better found and caught by Sparki:
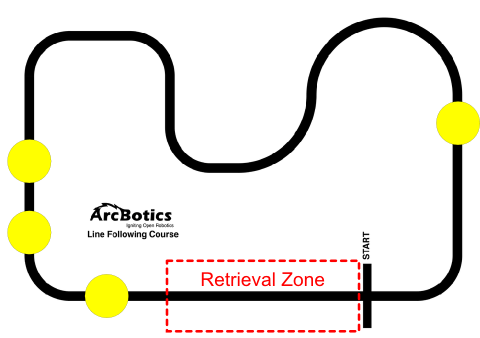
Please note also in the previous image that once we finish the program, the objects are going to be retrieved by Sparki to the red marked zone, so it’s not a good idea to deploy objects there. And, as showed in the video at the beginning of this lesson, to start the activity you need to place the Sparki pointing to the left, preferable with its pen holder hole centered on the START mark. Finally, in our activity, we will work with two objects. As you will soon see in the program’s code, the number of objects will be defined at the beginning of the program so Sparki will be able to know when it has finished to find more objects. You can change this number if you want, but here, for simplicity, two objects will be enough.
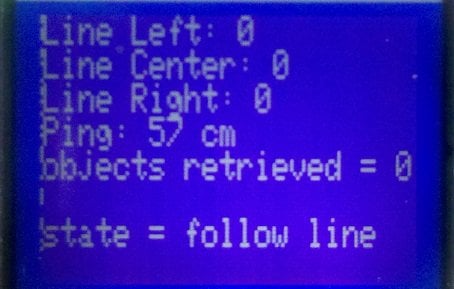
A few more words before starting to write the final program. As you can see in the showSensorsAndState function, although it’s quiet similar to the one that we have already used in the Maze Solving lesson, we added here the ultrasonic ranger reading too. In the final version of this function, we are also going to print the current quantity of retrieved objects:
So now, let’s add the necessary stuff to make our program find, catch and retrieve objects to the retrieval zone. We are near to reach that goal, so let’s start for the basics: once our robot has caught an object, it needs to turn back. The turnBack function is easy to understand, since it just rotates 90 degrees to the left (to move the robot infrared line sensors outside the black line), and then starts to rotate until it’s centered again over the line (calling to the centerRobot function, showed below):
void turnBack()
{
  state = "turn back";
  sparki.moveLeft(90); //turn left a fixed angle to ensure that the center sensor does not see the line
  sparki.moveLeft(); // turn left until the robot is centered
  centerRobot();
  sparki.beep(); // the line has been found!
}
And here is the centerRobot function:
void centerRobot()
{
  readSensors(); //very important! if this is not done, lineCenter will still be false from the last reading
  while(lineCenter) // this cycle ends when the Center Line sensor detects the black line
  {
    readSensors();
    showSensorsAndState();
  }
}
As you can see in the previous code, it will read the sensors on a while cycle, and will only return once the Line Center Sensor stops to read white.
After having the robot centered but pointing towards the START mark (and with the object gripped), the only thing that the robot should do is to follow the line until it finds the START mark:
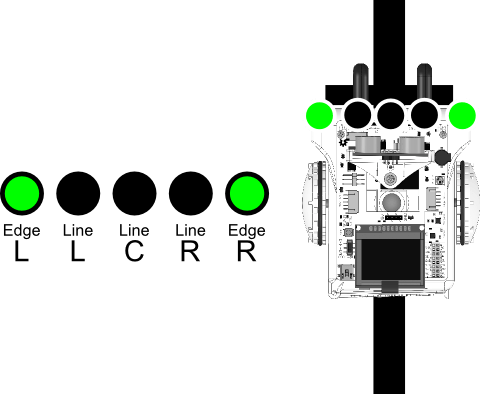
In the image above, please remember that the green color for a sensor means that we don’t take care of its value in the program (so it really does not matter if it’s reading a black or white value). The START mark checking is done inside our new lineFollowing function, in the condition of a while cycle:
void followLine(bool approachingObject)
{
  state = "follow line";
  if (approachingObject)
  {
    state = "approaching";
    if (ping <= objectDistance) // if the object is so close, stop the robot
    {
      gripObject();
      turnBack();
      readSensors();
      while (lineLeft || lineCenter || lineRight) // when the START mark is reached the 3 sensors read false (black)
      {
        readSensors();
        followLine(false);
        delay(100);
      }
      sparki.beep(440, 300); // make a sound to tell the START mark is there

      sparki.moveForward((maxObjects - objectIndex) * objectSize); // passes the mark
      releaseObject();
      sparki.moveBackward(objectSize + 2); // the constant number is a small security margin to avoid the object when turning
      turnBack();

      objectIndex++;
      if (objectIndex == maxObjects)
      {
        finished();
        while(true); //work done => program ends here!
      }
    }
  }

  if (lineLeft && !lineCenter && lineRight) // if the center line sensor is the only one reading a line
  {
    sparki.moveForward(); // move forward
  }
  else if (!lineLeft) // if the black line is below left line sensor
  {
    moveLeft(); // turn left
  }
  else if (!lineRight) // if the black line is below right line sensor
  {
    moveRight(); // turn right
  }
}
As can be seen in the previous code, now when the robot is near enough to the object, our program just grips it (gripObject function), rotates back until it founds the line and is pointed in the backard direction (turnBack function). Then it just enters on a cycle that will end when the robot reaches the START mark:
    state = "approaching";
    if (ping <= objectDistance) // if the object is so close, stop the robot
    {
      gripObject();
      turnBack();
      readSensors();
      while (lineLeft || lineCenter || lineRight) // when the START mark is reached the 3 sensors read false (black)
      {
        readSensors();
        followLine(false);
        delay(100);
      }
      sparki.beep(440, 300); // make a sound to tell the START mark is there
[...]
So, what happens when the robot finds the START mark? Here is the good part: Sparki has to move forward far enough so it can left the object in a way that there is still space enough to add the remaining objects later. So, it will move the size of the object (we are working with predefined sizes here), multiplied by the quantity of remaining objects. And how do we calculate how many remaining objects are there? Simple: we said before that we are working here with a fixed quantity of objects. So we define at the beginning of the program, how many objects we want to retrieve:
const int maxObjects = 2; // number of objects to retrieve
Also, we are using a variable to keep count of the retrieved objects:
int objectIndex = 0;
Thus, the number of remaining objects is just maxObjects – objectIndex, and here is the line of code that calculates the distance to go to left the object after the START mark:
sparki.moveForward((maxObjects - objectIndex) * objectSize); // passes the mark
Finally, it’s very important that each time that we have retrieved an object, we increment the objectIndex variable and then ask if this was the last obect (so Sparki can finish the work and rest). Here is the remaining code from the followLine function:
[...]

      sparki.moveForward((maxObjects - objectIndex) * objectSize); // passes the mark
      releaseObject();
      sparki.moveBackward(objectSize + 2); // the constant number is a small security margin to avoid the object when turning
      turnBack();

      objectIndex++;
      if (objectIndex == maxObjects)
      {
        finished();
        while(true); //work done => program ends here!
      }
    }
  }
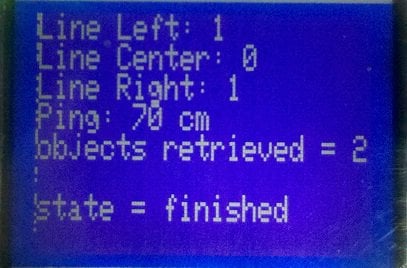
The following image is what the display will show after the robot has finished to retrieve all the objects (2 in our case):
And here is the complete code for the final program:
/*******************************************

 Ojbect Retrieval example: The robot follows
 a line looking for objects that has to be
 retrieved to the course's START mark.

********************************************/

#include <Sparki.h> // include the sparki library

const int threshold = 500; // line sensors thereshold

const int objectDistance = 3; // distance to the object where the gripper has to grip it [cm]
const int objectSize = 5; // diamter of the (cylindrical) objects
const int maxObjects = 2; // number of objects to retrieve

const int gripTime = 1500; // time that takes to the gripper effectively grip the object [milliseconds]
const int turnSpeed = 0; //used to turn the robot over an external center of rotation.

bool  lineLeft = false,
      lineCenter = false,
      lineRight = false;

int ping = 0;

int objectIndex = 0;

String state = "undefined";

void readSensors()
{
  //each sensor is 1 if reading white, and 0 if reading black:
  lineLeft =  sparki.lineLeft() > threshold;
  lineCenter = sparki.lineCenter() > threshold;
  lineRight =  sparki.lineRight() > threshold;
  ping = sparki.ping();
}

void showSensorsAndState()
{
  sparki.clearLCD(); // wipe the screen

  sparki.print("Line Left: "); // show left line sensor on screen
  sparki.println(lineLeft);

  sparki.print("Line Center: "); // show center line sensor on screen
  sparki.println(lineCenter);

  sparki.print("Line Right: "); // show right line sensor on screen
  sparki.println(lineRight);

  sparki.print("Ping: "); // ultrasonic ranger on screen
  sparki.print(ping);
  sparki.println(" cm");

  sparki.print(String("objects retrieved = "));
  sparki.println(objectIndex);

  sparki.println(String("state = ") + state);

  sparki.updateLCD(); // display all of the information written to the screen
}

void gripObject()
{
  sparki.moveStop();
  state = "gripping object";
  sparki.gripperClose();
  delay(gripTime);
  sparki.gripperStop();
}

void releaseObject()
{
  sparki.moveStop();
  state = "releasing object";
  sparki.gripperOpen();
  delay(gripTime);
  sparki.gripperStop();
}

void finished()
{
  //tells the user that the work is done:
  state = "finished";
  sparki.gripperStop();
  sparki.moveStop();
  showSensorsAndState();
  sparki.beep(880, 300);
  delay(300);
  sparki.beep(440, 300);
  delay(300);
  sparki.beep(880, 600);
  delay(600);
}

void centerRobot()
{
  readSensors(); //very important! if this is not done, lineCenter will still be false from the last reading
  while(lineCenter) // this cycle ends when the Center Line sensor detects the black line
  {
    readSensors();
    showSensorsAndState();
  }
}

void turnBack()
{
  state = "turn back";
  sparki.moveLeft(90); //turn left a fixed angle to ensure that the center sensor does not see the line
  sparki.moveLeft(); // turn left until the robot is centered
  centerRobot();
  sparki.beep(); // the line has been found!
}

void moveLeft()
{
  //turn left at a lower speed:
  sparki.motorRotate(MOTOR_LEFT, DIR_CCW, turnSpeed);
  sparki.motorRotate(MOTOR_RIGHT, DIR_CW, 100);
}

void moveRight()
{
  //turn right at a lower speed:
  sparki.motorRotate(MOTOR_LEFT, DIR_CCW, 100);
  sparki.motorRotate(MOTOR_RIGHT, DIR_CW, turnSpeed);
}

void followLine(bool approachingObject)
{
  state = "follow line";
  if (approachingObject)
  {
    state = "approaching";
    if (ping <= objectDistance) // if the object is so close, stop the robot
    {
      gripObject();
      turnBack();
      readSensors();
      while (lineLeft || lineCenter || lineRight) // when the START mark is reached the 3 sensors read false (black)
      {
        readSensors();
        followLine(false);
        delay(100);
      }
      sparki.beep(440, 300); // make a sound to tell the START mark is there

      sparki.moveForward((maxObjects - objectIndex) * objectSize); // passes the mark
      releaseObject();
      sparki.moveBackward(objectSize + 2); // the constant number is a small security margin to avoid the object when turning
      turnBack();

      objectIndex++;
      if (objectIndex == maxObjects)
      {
        finished();
        while(true); //work done => program ends here!
      }
    }
  }

  if (lineLeft && !lineCenter && lineRight) // if the center line sensor is the only one reading a line
  {
    sparki.moveForward(); // move forward
  }
  else if (!lineLeft) // if the black line is below left line sensor
  {
    moveLeft(); // turn left
  }
  else if (!lineRight) // if the black line is below right line sensor
  {
    moveRight(); // turn right
  }
}

void setup()
{
  sparki.servo(SERVO_CENTER); // rotate the servo to is 0 degree postion (forward)

  //indicates to the user that the program started:
  sparki.beep(440, 300);
  delay(300);
  sparki.beep(880, 500);
}

void loop()
{
  readSensors();
  if (ping < (objectDistance * 3))
  {
    followLine(true); // aproximates to the detected object, but always centered on the black line
  }
  else
  {
    followLine(false);
  }

  showSensorsAndState();
  delay(100); // wait 0.1 seconds
}
If you prefer the program version with the shorter loop function, you can download if from here:
void loop()
{
  readSensors();
  followLine(ping < (objectDistance * 3));
  showSensorsAndState();
  delay(100); // wait 0.1 seconds
}
Congratulations! Your Sparki can now retrieve objects left over the way!
Extra Activities
- There is an interesting function available in SparkiDuino software which allows us to know the exact time (in milliseconds) since the current program has started to run in the robot’s brain. Its name is millis. Using it, (and with the help of a variable), you can measure the time between the beginning and the end of the program. And as with any internal value, you can show that time in the LCD display. Why not try to distribute the objects in different parts of the course, measuring the time that takes to Sparki to retrieve the objects deployed with these different distributions? Also, you can modify the maxObjects constant in your program to make Sparki try to retrieve more objects.
- There is another improvement that can be done to the current program on this lesson. If you look carefully to the robot’s behavior, you will note that when it’s looking for the right place to release an object behind the START mark, the robot is not really following the line, but just moving forward. The program works fine anyway, since if the robot is a bit deviated from the line at this point, that doesn’t matter because it will move just for a short distance. But why not modify the program in a way that Sparki can follow the line even when it’s looking for the object retrieval place? Tip: you can change the bool parameter that the followLine function receives by an integer number, which will content a value indicating if the robot is just following a line (0), approaching an object (1), or finding the retrieval place (2).
Related Lessons
There are other lessons using the edge or line infrared sensors, as well as the ultrasonic rangefinder. If you did not see them yet, you can take a look at the following activities: