


Making Music with the Accelerometer
Teach Sparki how to get jiggy - and beep accordingly!
Lessons You Should Know

Making Music with the Accelerometer
Introduction
Although we have used different sensors like the ultrasonic distance ranger, the light sensors, or the line following sensors, there are more Sparki sensors to discover. One of them is the 3D accelerometer. The accelerometer can be used for a lot of things, but in this lesson, we will start to learn about it with a simple goal in mind: make music by moving Sparki with our hands.
What You’ll Need
- A Sparki.
How It Works
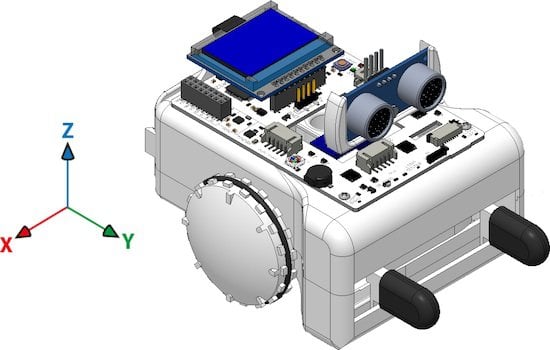
If you are not familiar with Sparki’s accelerometer, please first read this description. It is one of Sparki’s more complex parts. The accelerometer commands in SparkiDuino give the acceleration acting on Spark in X, Y and Z axes. Here is a map of those Axes:
These are the basic instructions to read the accelerations:
sparki.accelX();
sparki.accelY();
sparki.accelZ();
For this activity, we will read the X and Y values and then we will generate musical notes with them. A musical note will be defined by two parameters: its frequency and its duration.
So let’s first make different notes, which means modifying the frequency sent to Sparki’s buzzer but with a fixed duration. The accelerometer returns the acceleration values in m/s2. If you don’t understand this unit, don’t worry! You just need to know that the Earth’s gravity acceleration is approximately -9.8 m/s2. The minus sign indicates that the value is towards the Earth’s center.
Let’s see it by running the following program in the Sparki, which will send the X, Y and Z values from the accelerometer directly to the robot’s LCD display:
/*******************************************
 Basic Accelerometer Sensor test

 Sparki has a 3-Axis accelerometer. It is
 used to detect the acceleration Sparki is
 experiencing. Usually, this mostly means the
 force of gravity. It can do this in all
 3 XYZ axis, which are left/right (X),
 forward/backwards (Y), and up/down (Z). This
 is the same part that smartphones use to tell
 how you’re tilting them.

 This program shows how to read the sensor
 and display the information on the LCD.
********************************************/
#include <Sparki.h> // include the sparki library

void setup()
{
}

void loop() {
  sparki.clearLCD(); // wipe the screen

  float x  = sparki.accelX();   // measure the accelerometer x-axis
  float y  = sparki.accelY();   // measure the accelerometer y-axis
  float z  = sparki.accelZ();   // measure the accelerometer z-axis

  // write the measurements to the screen
  sparki.print("Accel X: ");
  sparki.println(x);

  sparki.print("Accel Y: ");
  sparki.println(y);

  sparki.print("Accel Z: ");
  sparki.println(z);

  sparki.updateLCD(); // display all of the information written to the screen
  delay(100);
}
Note: The complete code for the final version of this program is available at the end of this lesson.
If you put your Sparki over a table as horizontal as possible, take a look at its display. You will see that the X and Y values are near 0.0 (with some noisy small variations perhaps), while the Z value will be around -9.8. But if you take the Sparki with your hands and tilt it around its X axis (thus producing a variation in the Y and Z readings), you will see that the values are similar to these:

So, let’s use the Y value to make the notes! The idea is simple:
- Read the Y acceleration value from the accelerometer.
- Make that value to always be positive (since frequencies can not be negative!) using the abs function.
- Multiply that value for a number. The number should be big enough to convert our Y reading in a frequency corresponding to an audible sound that can be sent to the buzzer. For example: a frequency of 440 Hz is the A note. So, let’s start multiplying the reading by 100. Thus if Sparki is fully vertical (in the Y axis), the frequency will be near 1000 Hz (or 1 KHz), since 9.8 x 100 = 980.
- Wait for some milliseconds (note’s duration) using the delay function.
Here is the code. We are just modifying the previous example, since viewing the accelerometer values is always useful:
#include <Sparki.h> // include the sparki library

void setup()
{
}

void loop() {
  sparki.clearLCD(); // wipe the screen

  float x  = sparki.accelX();   // measure the accelerometer x-axis
  float y  = sparki.accelY();   // measure the accelerometer y-axis
  float z  = sparki.accelZ();   // measure the accelerometer z-axis

  // write the measurements to the screen
  sparki.print("Accel X: ");
  sparki.println(x);

  sparki.print("Accel Y: ");
  sparki.println(y);

  sparki.print("Accel Z: ");
  sparki.println(z);

  sparki.updateLCD(); // display all of the information written to the screen

  sparki.beep(abs(y)*100);

  delay(300); // note duration
}
See the key line?
sparki.beep(abs(y)*100);
You can experiment with that 100 value, increasing or decreasing it to create higher and lower notes.
Finally, the delay(300) instruction defines the duration of the note. So, to complete our musical instrument, we can change this line in a way that the note duration is defined by the X value from the accelerometer instead of being a fixed number. Let’s try this line of code there:
delay(abs(x)*50 + 100); // note duration: the 100 number is there to prevent zero duration notes.
Of course, you can now play with the numbers in that line too! Please click on the following button to get the complete final version of the previous code:

Related Lessons
If you have enjoyed what you have learned here, and if you did not read it yet, you may find the other musical instrument lesson for Sparki interesting: Theremin. Also, you might like the Hill Climb lesson where you can learn more about other uses for Sparki’s accelerometer.