


Basic Moving
Learn how to use make Sparki do basic movements.
Lessons You Should Know

Introduction
So you’ve unpacked your friend Sparki and now you’re getting to know more about the robot and how Sparki works. The first thing to start playing with are the motors. Robots are pretty cool. Robots that move around and can roll along beside you while you go for a walk are even cooler! Let’s talk about how to get Sparki moving.
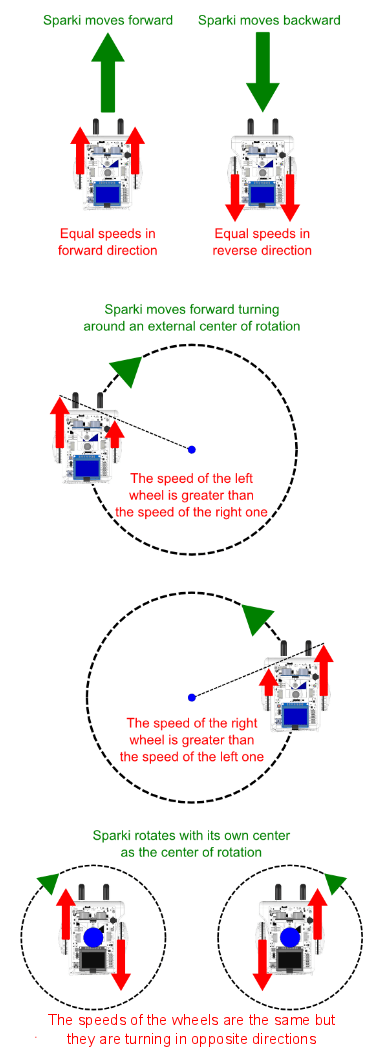
Sparki is a two wheeled robot, and its movement is based on the idea of differential drive. Woah, what does that mean? This means that Sparki’s movement rolling around on the ground is controlled by sending different amounts of power to the left and the right wheel. When the two wheels are powered by different amounts one of the wheels will cover more ground than the other. This causes Sparki to turn in one direction or the other. For example, if the right wheel is rotating faster than the left one, the robot will turn left while traveling forward:

If the wheels move in opposite directions at the same speed, the robot will rotate around its center (which is also where it can hold a marker to draw with) kind of like a breakdancer or a ballerina spinning around in circles while staying in the same place:

To make Sparki travel straight forward you will have to apply the same amount of power to both wheels in the forward direction. Sparki can also moves backwards if you do the opposite and supply the same amount of power to both wheels in reverse.
Movement Commands
Now let’s get comfortable with some of Sparki’s commands!Here are three simple sets of instructions you can use to get Sparki moving. You’ll need to place them inside the loop() function of the Sparkduino code. That means you’ll write your code between the two curly brackets that look like this- { }. Anything you write inside these curly brackets will happen over and over again since the code of the loop( ) function restarts at the beginning once Sparki reaches the end.
Move Sparki forward or backwards:
|
1 2 |
sparki.moveForward(); sparki.moveBackward(); |
|
1 2 |
sparki.moveLeft(); sparki.moveRight(); |
|
1 |
sparki.moveStop(); |
Move Sparki around its own center:
|
1 2 |
sparki.moveLeft(); sparki.moveRight(); |
Stop Sparki if it is moving:
|
1 |
sparki.moveStop(); |
![]() Please remember to check that the batteries are properly connected (and charged!). Also make sure to check that the On/Off Switch is on.
Please remember to check that the batteries are properly connected (and charged!). Also make sure to check that the On/Off Switch is on.
![]() Before you start the activities below make sure that your Sparki is on a level surface that it can’t fall off. It’s ok if Sparki bumps into a couple objects but a long fall off a table could break your Sparki.
Before you start the activities below make sure that your Sparki is on a level surface that it can’t fall off. It’s ok if Sparki bumps into a couple objects but a long fall off a table could break your Sparki.
1. Now let’s try moving Sparki forward or backward. To do this you’ll need to type out a little more than just the commands we looked at above. There are going to be a lot of parenthesis ( ) and curly brackets { }. Don’t worry, you’ll get used to them. Go to the end of this lesson for a thorough explanation of the parts of the code and vocabulary we don’t cover right now. The important thing at this moment is to get your Sparki cruising and you smiling!
|
1 2 3 4 5 6 7 |
#include <sparki.h> //include Sparki library void setup(){ } void loop(){ sparki.moveForward(); } |
or
|
1 2 3 4 5 6 7 8 |
#include <sparki.h> //include Sparki library void setup(){ } void loop() { sparki.moveBackward(); } |
2. Now that we’ve changed a little bit of the code let’s test it out to make sure it works. A good programmer or roboticist always changes just a little bit of code at a time and checks to make sure it works correctly before moving on and adding more code. To test this code first connect Sparki to your computer with the USB cable.
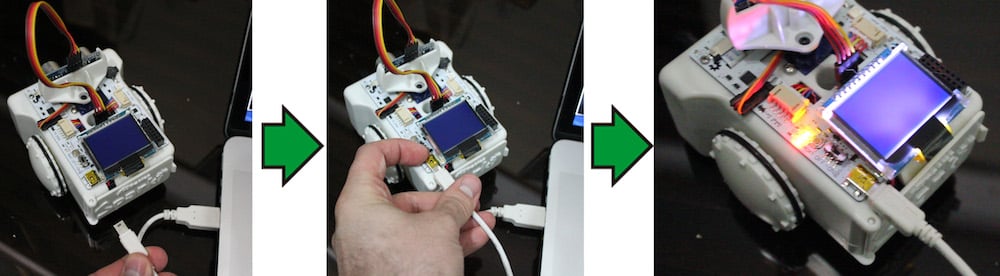
Once you’ve got Sparki and the computer connected you’ll have to make sure that you have the correct port and board type selected before you can upload code. The Arduino environment can talk to almost anything you have plugged into your USB ports. That means you have to figure out which USB port Sparki is plugged into before you can test your code. The Arduino environment is used to code for a whole bunch of boards and you need to select the right board, which is
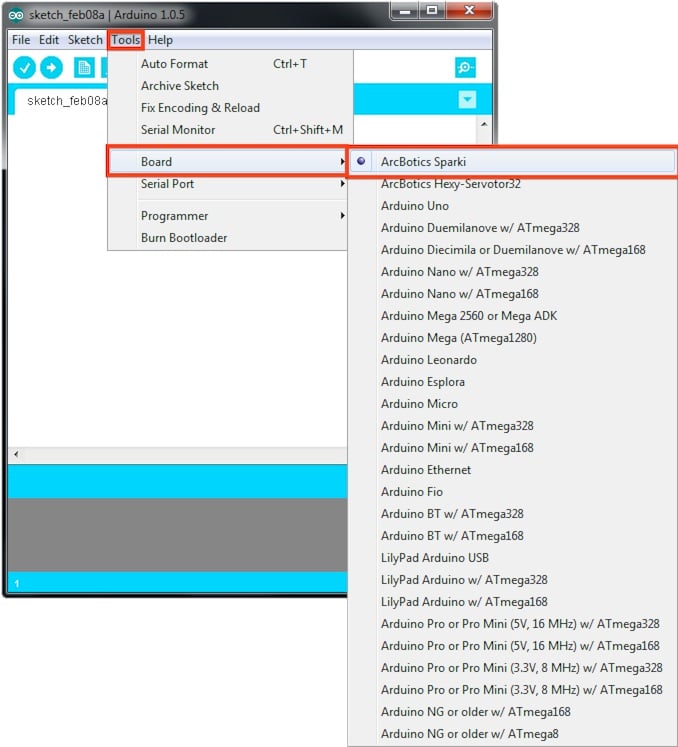
Picking the board type looks like this. Don’t see “ArcBotics Sparki?” Then you probably don’t have the proper libraries installed. If you think you did install the libraries you may need to restart Arduino in order to see them in the board selection menu.

Selecting the correct serial port will look something like this in Windows. If there are multiple options you can always just unplug Sparki and see which serial port disappeared. (You’ll have to exit and re-enter the serial port menu.) The port that disappeared is the one that represents Sparki. Below are a couple tips and tricks to help you out in case you’re stuck.
![]() Windows
Windows
COM1 is never it. This is the port windows only gives a physical serial port in the back of a computer. Serial ports for Arduino boards in windows are COM3 or higher.
![]() Mac OSX
Mac OSX
Arduino serial ports start with ‘tty.usbmodem’ and end in a series of numbers.
![]() Linux
Linux
Arduino serial ports start with tty and usually include some mention of USB.
Still having trouble? Here’s a page all about uploading code to help you out and another page for parents that goes a little more in depth. The second links says it’s for parents, but you’re smart enough to be playing around with Sparki- I’m sure you can figure it out.
Now that you’ve uploaded your code and unplugged Sparki (you did unplug Sparki, right?), what happens? Sparki never really stops moving, does it? Sparki just keeps on rolling in the same direction, huh? Let’s try making Sparki first move forward and then backwards for the same amount. How would you do that? If you typed out the code-
|
1 2 3 4 5 6 7 8 9 |
#include <sparki.h> //include Sparki library void setup(){ } void loop() { sparki.moveForward(); sparki.moveBackward(); } |
You’re halfway there! But this doesn’t actually make Sparki move, does it? That’s because Sparki is fast. Really fast. So fast that there isn’t actually any time for the wheels to move between these two commands. So we have to add a little bit of time where Sparki’s brain (or microprocessor) isn’t doing anything but its wheels keep turning. To do this we’ll use the delay( ) function. It’s kind of like when you’re walking to the store or between classes. You start walking, making sure you’re headed in the right direction, but after that you can think about other things than walking, right? All the while your feet keep going in the same direction. Eventually you might have to stop and check to make sure you’re headed in the right direction. If you’ve gone to far then you start walking in the opposite direction, right? Here’s the code to make Sparki move forward and then backwards-
|
1 2 3 4 5 6 7 8 9 10 11 |
#include <sparki.h> //include Sparki library void setup(){ } void loop() { sparki.moveForward(); delay(3000); sparki.moveBackward(); delay(3000); } |
Try changing the number inside of the parenthesis of the delay( ) function to change how long Sparki moves in either direction. That number inside the parenthesis of the delay function is the number of milliseconds (one thousandths of a second) that Sparki just kind of thinks about nothing while Sparki’s motors continue doing the command above the delay( ) function. That number you put inside the parenthesis is called an argument, it’s one of the ways that computers pass information between sections of code. The delay( ) function takes that information inside the code and uses it to decide for how long it should do nothing, or delay. Upload your code once you make these changes and see if you got Sparki moving the way you want it to move.
3. Now let’s add a turn to Sparki’s code. You can decide whether you want Sparki to turn left or right. In the example code Sparki will be turning right, but you can write whatever you like in your code. (Oh jeeze, I really hope you’re not just following along but creating your own code as well! What’s the worst that could happen? Maybe you get an error message? Then you can just delete the code you added or use the undo function to back up a few steps.)
We could continue to use delay( ) function with the moveRight( ) and moveLeft( ) function like we did with the moveForward and moveBackward function.
|
1 2 3 4 5 6 7 8 9 10 11 12 13 |
#include <sparki.h> //include Sparki library void setup(){ } void loop() { sparki.moveForward(); delay(3000); sparki.moveBackward(); delay(3000); sparki.moveRight(); delay(1000); } |
Now Sparki moves forward, then backwards and turns for one second. I’m sure you can figure out how to make Sparki turn for a different amount of time on your own. But that’s not very precise, is it? Let’s make Sparki turn a certain number of degrees-
|
1 2 3 4 5 6 7 8 9 10 11 12 |
#include <sparki.h> //include Sparki library void setup(){ } void loop() { sparki.moveForward(); delay(3000); sparki.moveBackward(); delay(3000); sparki.moveRight(90); } |
Now we’re starting to get somewhere! (No really, Sparki is actually visiting different places rather than just pacing back and forth.) This code makes Sparki move in a plus sign formation. How would using moveLeft(90) instead of moveRight(90) change what Sparki does? If you’re not sure, just whip up some new code and test it out.
This particular code makes Sparki turn 90 degrees each time moveRight(90) or moveLeft is reached in the loop(90) code. But what if we want to make Sparki turn more or less than 90 degrees? Remember how we passed an argument to the delay( ) function before? Now we’re going to change the argument we’re passing to Sparki’s moveRight(90) and moveLeft(90) functions.
|
1 2 3 4 5 6 7 8 9 10 11 12 |
#include <sparki.h> //include Sparki library void setup(){ } void loop() { sparki.moveForward(); delay(3000); sparki.moveBackward(); delay(3000); sparki.moveRight(15); } |
Now Sparki is creating more of a star pattern than a plus symbol. What other kind of patterns can you create with the commands we’ve been using? Could you spell your name? How about making Sparki shimmy back and forth as it backs up like a basketball player playing defense? Or maybe your Sparki does some fancy dance moves while cruising around your floor. Have fun with it! The code is yours and what Sparki does is up to you.
4. Last, but not least, we’re going to make Sparki stop. Cruising around is cool, but eventually you’re going to want to make Sparki stay in one place while it does other things. In order to do that you’ll need to use the moveStop( ) function. Now that you’re used to moveForward( ), moveBackward( ), moveRight( ) and moveLeft( ) this one should be pretty easy. Change the delay( ) function after the moveStop( ) function to make Sparki wait around for a longer or shorter amount of time.
|
1 2 3 4 5 6 7 8 9 10 11 12 13 14 |
#include <sparki.h> //include Sparki library void setup(){ } void loop() { sparki.moveForward(); delay(3000); sparki.moveBackward(); delay(3000); sparki.moveRight(15); sparki.moveStop(); delay(1000); } |
Now that you’ve taken a look at these three sets of functions you’re truly ready to create code that will have Sparki exploring the world. If you’re looking for a challenge here are some patterns you can try to make Sparki recreate by writing your own code. (Hint, it helps if you look at the angles and patterns in each pattern before starting to write your code.)

Below is some review, vocabulary, explanation of some parts of the code we didn’t talk about and advanced code for those of you who want to dig deeper into Sparki’s commands.
By now you should feel comfortable with-
Moving Sparki around using the moveForward( ), moveBackward( ), moveLeft( ), moveRight( ), moveStop( ) and delay( ) functions. You should also know that the loop( ) function happens over and over again and how to pass an argument to a function.
Vocabulary-
Function: A section of code that has one specific purpose. It can be used over and over again. To call (or use) a function you simply write the name of the function followed by an open and closed parenthesis and a semi-colon. Any information that you need to give to the function is usually written inside the parenthesis. The actual function code is written somewhere else, in a library or in a different section of the code and is probably a lot longer than the length of the function name. It’s a lot easier to write the function name (also known as “calling the function”) each time you want to use this code instead of writing it all out again.
Differential drive: This is a manner of controlling the navigation of a robot or system that uses two wheels. If you make the two wheels move at different speeds or in different directions it causes the robot to turn.
Passing an argument: This is the primary way that information is passed to a function. To pass an argument you will write a number, character or word inside of the parenthesis that comes after a function name. Some functions don’t need to have arguments passed to them, some won’t work if you don’t pass them argument, others need multiple arguments to be passed to them (separated by commas) and then there are some functions that are happy with any of the options I just mentioned. It all depends on how the function was written.
Code in the examples above we didn’t really cover-
|
1 |
#include <sparki.h> |
This is a command to include the file named Sparki.h in the code that is uploaded to Sparki. Sparki.h is a header file that contain a whole bunch of functions and other code which makes Sparki work. This is where you can find the actual code inside the functions you called above.
|
1 |
//include Sparki library |
This is a comment. Anything with two // doesn’t effect your code. It’s just there to explain things to another human being who is reading your code. You can write silly things in here, take credit for your work or use two // at the beginning of a line of code to take the code out of the program Sparki runs but leave it visible to another programmer or yourself. You can also use /* at the beginning of a bunch of lines you wish to comment and */ at the end of the lines you’re commenting out. Code can get confusing. Comments are your best friend when you’re trying to keep track of what’s going on or share your code with others.
|
1 2 |
void setup(){ } |
This is a little section (or function!) of code that happens exactly once before loop( ) takes over and starts happening over and over and over and over. It’s empty right now, but anything you want to happen exactly once should go inside this function’s parenthesis.
|
1 2 3 4 |
void loop() { //code goes here } |
This is the primary function in Sparki’s code. Whatever is inside this function happens over and over until Sparki’s batteries die or it gets turned off. Let’s go over the parts of this code so you understand what each part does.
void– if this function were returning (or spitting out) any information the type of information would be listed here. The word “void” indicates that loop( ) doesn’t return any information.
loop– this is the name of the function. You can name function basically anything as long as there is no space in the name. Some function names, like loop are “reserved” though. This means that the word is special to the program or system and it is already used so you can’t just use it for whatever you like.
( )– if there was any information (or arguments) that was being passed to the loop function the information (or variable) type would be inside of these parenthesis along with the name of the variable. Loop does not get any information passed to it so these parenthesis are empty. *Note, parenthesis are also used for different purposes in code.
{ }– all the code that happens (or executes) when the loop( ) function is called needs to be inside of these curly brackets. Think of the curly brackets as hamburger buns, when you have one going one way { your always need another one going the other way } later on. Otherwise you’ll get ketchup all over your hands. *Note, curly brackets are also used for different purposes in code.
Want to get to programming other parts of your Sparki? You can continue here!
Going even further with the wheels and motors-
And what about controlling the individual speed of each wheel? We can go a little deeper and use some lower level instructions, ones that are close to what Spark is actually doing, but require more of them to get things done:
|
1 2 |
sparki.motorRotate(int motor, int direction, int speed); sparki.motorStop(int motor); |
Where:
- motor is the motor number, which can be MOTOR_LEFT or MOTOR_RIGHT (Tip: you can also try to use this instruction to move the gripper, using the value MOTOR_GRIPPER as the motor parameter).
- direction indicates the direction of rotation for that motor, which can be DIR_CW (clockwise) or DIR_CCW (counterclockwise).
- speed is a number that indicates, as a percentage, the speed of rotation. Thus, its value ranges from 0 to 100.
Here is a small example, to make the robot pivot around an external center of rotation:
|
1 2 3 4 5 6 7 8 9 10 11 12 13 14 15 16 17 18 19 20 21 |
#include <sparki.h> // include the sparki library void setup() { } void loop() { sparki.motorRotate(MOTOR_LEFT, DIR_CCW, 50); sparki.motorRotate(MOTOR_RIGHT, DIR_CW, 100); delay(4000); // wait a second (1000 milliseconds) sparki.motorRotate(MOTOR_LEFT, DIR_CCW, 100); sparki.motorRotate(MOTOR_RIGHT, DIR_CW, 50); delay(4000); sparki.motorStop(MOTOR_LEFT); sparki.motorStop(MOTOR_RIGHT); } |

At this point, you probably have already seen something weird. Guess what? If you take a careful look at the code, you may note that one of the motors (the left motor in this example) rotates counterclockwise, while the other (right motor) rotates clockwise. This is due to the fact that in Sparki the motors are facing the opposite direction.
Take a look at your robot and try to figure this out: imagine that you can disassemble the robot (not a good idea!) and put the motors side by side. Then, if you program both motors to rotate clockwise, they will start to rotate in the same direction. But if you now turn around one of the motors (the way they are placed inside Sparki), you will see that now one motor is spinning in the opposite direction of the first motor. To make both wheels go in the same direction, one motor must be told to spin in the opposite direction.
To understand this better, let’s try the following changes in the code:
|
1 2 3 4 5 6 7 8 9 10 11 12 13 14 15 16 17 18 19 20 21 |
#include <sparki.h> // include the sparki library void setup() { } void loop() { sparki.motorRotate(MOTOR_LEFT, DIR_CW, 50); sparki.motorRotate(MOTOR_RIGHT, DIR_CCW, 100); delay(4000); sparki.motorRotate(MOTOR_LEFT, DIR_CW, 100); sparki.motorRotate(MOTOR_RIGHT, DIR_CCW, 50); delay(4000); sparki.motorStop(MOTOR_LEFT); sparki.motorStop(MOTOR_RIGHT); } |
Can you see the small differences? Finally, as an extra bonus, you can try different speeds for the motors in this example and play a bit around the center of rotation.
Questions
- Why do you think that moving the wheels at different speeds and with opposite directions does not make sense?
- Which is the center of rotation in a robot where one wheel is moving with a speed of 100% and the other wheel is stopped?
- What happens if one moving wheel rotates at 50% speed and the other wheel is stopped?
- What other vehicles in real life use this system (differential drive) to move?