


Cleaning Robot
Fire that Roomba! Get Sparki cleaning up the room.
Lessons You Should Know


Cleaning Robot
Introduction
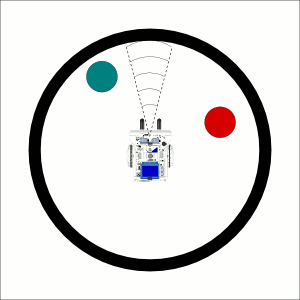
Now that we have learned a lot of things about the Sparki, like moving it or using its distance, light and line sensors, gripper, and buzzer, we can try to make a slightly more complex application. So let’s program the Sparki to clean an area where someone has forgotten a few trash receptacles:
What You’ll Need
- A Sparki.
- A convex polygon with its perimeter line printed in black over a white background.
- Some lightweight obstacles, such as cardboard boxes, cylinders, or even balls.
How It Works
The cleaning robot program is easier to be understand if we first think about what the steps are that the robot should actually do. The overall idea is to program the Sparki to do the following steps:
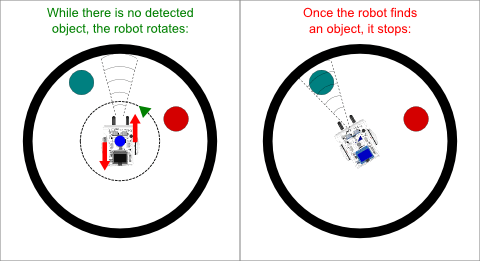
- Sparki rotates in its place, searching for an obstacle with its ultrasonic distance sensor (also called ultrasonic range finder).
- Once Sparki finds the obstacle, it advances (moving forward) towards it in order to expel that object outside the perimeter.
- The movement in the forward direction continues until a line sensor (or infrared reflectance sensor) detects the black line. That’s when the robot stops.
- Now, the robot goes backward for a few milliseconds and rotates to the left a bit more to avoid detecting the same object again.
- The program now goes back to step 1.
Coding!
So, let’s start programming one step at a time, in order to better understand the program.
![]() Please remember to check that the batteries are properly connected (and charged!). And as we are going to use the motors here, please check that the On/Off Switch is on. Another important thing to take care of when playing with the robot’s motors is to be careful not to be working over a table. A fall from that table could permanently damage your Sparki.
Please remember to check that the batteries are properly connected (and charged!). And as we are going to use the motors here, please check that the On/Off Switch is on. Another important thing to take care of when playing with the robot’s motors is to be careful not to be working over a table. A fall from that table could permanently damage your Sparki.
First, let’s make Sparki rotate until it finds an obstacle:
This can be accomplished using the sparki.moveLeft and sparki.moveRight commands. You can read more about how Sparki moves in the Moving Sparki tutorial. Also, we need to stop the robot (using the sparki.moveStop instruction) when its ultrasonic sensor detects a close object in front of the robot:
#include <Sparki.h> // include the sparki library

void setup()
{
  sparki.servo(SERVO_CENTER); // makes the ultrasonic sensor to point forward
}

void loop()
{
  while (sparki.ping() > 25)  // here we can set different distances to detect objects,
                              //depending on the size of our perimeter
  {
    sparki.moveLeft(); // rotates the robot to the left
    delay(150); // this brief delay is to give enough time to the ultrasonic sensor to work
  }
  delay(250); // instead of stopping immediately, rotates a bit more to center the object
  sparki.moveStop(); // stops all the robot's movements
}
Note: The complete code for the final version of this program is available at the end of this lesson.
As you can see in the previous code snippet, everything is executed inside the loop function, which means that the code will be repeating until the robot is turned off (or the batteries are empty). And to be sure that we detect the object in front of the robot, we run another cycle (a while cycle) inside the loop, which ends each time the sensor detects an obstacle close enough (we set the detection distance in the while‘s condition). Finally, as the ultrasonic ranger has a conic detection zone, we added a small delay after the while, just to let the robot to center towards the detected object: 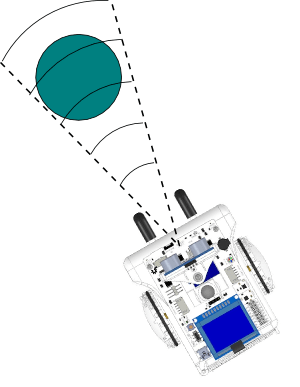 Now we can make the robot move forward in the direction of the detected object, but taking care to not go outside the perimeter:
 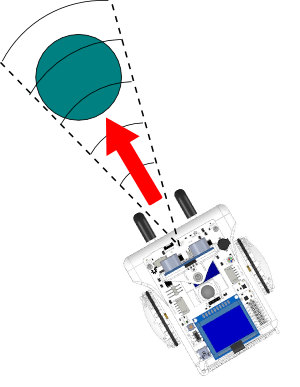 Here is the complete code:
#include <Sparki.h> // include the sparki library

void setup()
{
  sparki.servo(SERVO_CENTER); // makes the ultrasonic sensor to point forward
}

void loop()
{
  while (sparki.ping() > 15)  // here we can set different distances to detect objects,
                              //depending on the size of our perimeter
  {
    sparki.moveLeft(); // rotates the robot to the left
    delay(150); // this brief delay is to give enough time to the ultrasonic sensor to work
  }
  delay(250); // instead of stopping immediately, rotates a bit more to center the object

  sparki.moveStop(); // stops all the robot's movements
  delay(100); //waits a few milliseconds before start moving, just to be nice with the motors

  while (sparki.lineCenter() > 700)  // here we can set different thresholds to detect the line
  {
    sparki.moveForward(); // rotates the robot to the left
  }

  sparki.moveStop(); // stops all the robot's movements
  delay(100); //waits a few milliseconds before start moving, just to be nice with the motors

  sparki.moveBackward();
  delay(1000); // the bigger this number is, the bigger the distance that the Sparki goes backward

  sparki.moveLeft(); // just in case: with this, we prevent Sparki to detect again the same object
  delay(400);
}

As you can see in the previous code, once the line is detected, the robot stops and goes backward for 1 second (you can change this time to experiment!) and then it moves a bit to the left again, just to avoid detecting the same object that it just expelled a few moments ago.
Extra Activities
- Try to use the right, left and edge infrared reflectance sensors to improve the line detection.
- What about adding line detection to the robot’s rotation also (in the “object detection phase”)? This way, we make sure that it never goes outside the perimeter by error.
- Another possible place to add line detection is when the Sparki is going backward. You can try it!
- If you want to completely change the program, you can also take advantage of the capability of Sparki’s ultrasonic sensor to be moved with the servo. So why not code a new program where you move Sparki’s “head” to find the objects?