

Recap of While Loops
What We’ve Covered So Far
What a While Loop Looks Like:
while( sparki.ping() < 10 )
{
 sparki.moveForward(1);
}
Watch Out For Getting Stuck Inside While Loops:
while( loopCount == 10 )
{
 sparki.moveRight();
}

loopCount = loopCount + 1; // sparki will never get to this!
Questions and Activities to Try
1. The example while loop code from the previous page made Sparki move forward while there was something in front of it. Try adding to that code so that while there is nothing in front of Sparki it turns in a circle. Once you get that working try adding a beep using Sparki’s piezo buzzer in between the two while loops you used. Below is a download link for the example code from the previous page and a couple commands to help you get started:

For making a beep:
sparki.beep();
delay(1000);
For turning in a circle:
sparki.moveRight;
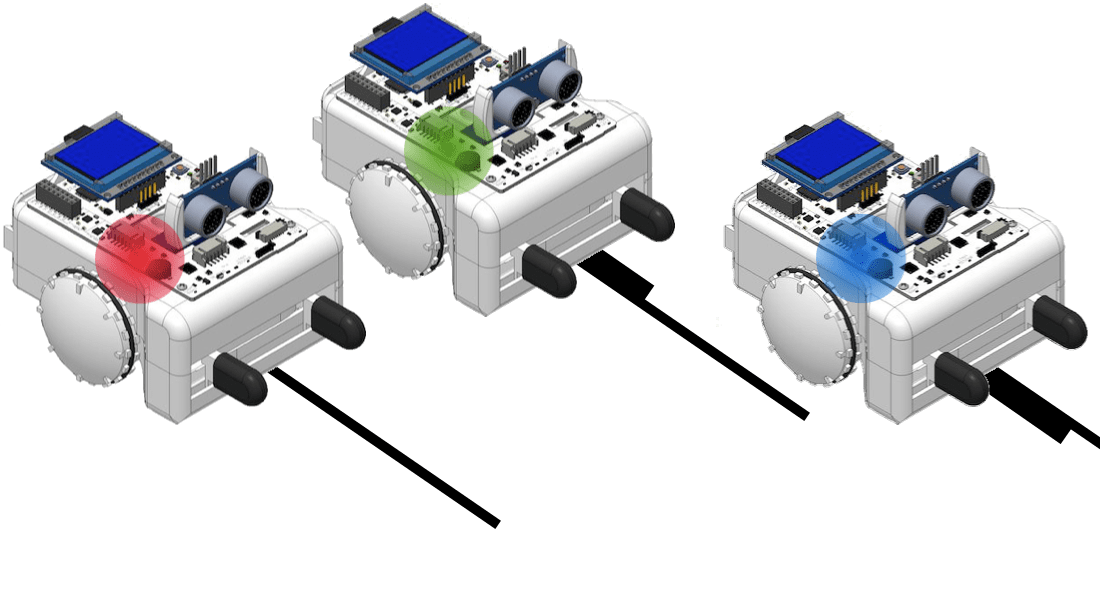
2. We learned that you can nest while loops inside of each other, just like nesting if statements inside of each other. Try playing with the code below to use the IR line following sensors. We’ll make Sparki’s LED light up different colors depending on what is below Sparki’s line following sensors. You’ll also need to create a straight black line with a width that changes on a piece of paper to test the code out. Make sure that your black lines range from a single pen line to at least two centimeters and that they line up with Sparki’s edge sensors. Here’s the line and code to start you off:

Line of varying width
#include <Sparki.h> // include the sparki library

int threshold = 700; // to check the color below the sensor
int leftLine; // to hold sensor value for left line sensor
int centerLine; // to hold sensor value for center line sensor
int rightLine; // to hold sensor value for right line sensor

void setup()
{
}

void loop()
{
 centerLine = sparki.lineCenter(); // read middle sensor
 sparki.RGB( 0, 0, 0 ); //turn off LED
 sparki.moveForward(1);

 while( centerLine < threshold ) // check middle value
  {
  sparki.moveForward(1);
  centerLine = sparki.lineCenter(); // read middle sensor
  sparki.RGB( 100, 0, 0 ); // LED lights up red

  // read sensors so Sparki can enter other while loops
  leftLine = sparki.lineLeft(); // read left sensor
  rightLine = sparki.lineRight(); // read right sensor

  // below is nested inside first while
  while( leftLine < threshold ) // check left value
  {
   leftLine = sparki.lineLeft(); // read left sensor
   sparki.RGB( 0, 100, 0 ); // LED lights up green
  }

  // below is also nested inside first while
  // BUT not inside the second one
  while( rightLine < threshold ) //check right value
  {

   sparki.RGB( 0, 0, 100 ); // LED lights up blue
  }
 }
}
This code works if all you want to do is see different colors light up underneath Sparki depending on the width of the line below Sparki. But there’s a problem! Sparki gets stuck in the blue while loop like we discussed in the lesson. No matter what you do, once the blue LED is on you won’t be able to get it to turn off, unless you restart Sparki. This is because once Sparki is inside the blue while loop it never rechecks the rightLine sensor to see if there is no longer a line below the right line sensor.
You’re going to need to add a line similar to the one inside of the green while statement to the blue while statement. You will need to change the code a little so it checks the right sensor and stores the value in the correct variable. If you’re having trouble figuring that out- the line of code you’re looking for looks like this:
leftLine = sparki.lineLeft(); // read left sensor
3. Even if you fixed the code above there’s still a little bit of an issue! The code itself isn’t stuck in a while loop any longer, but Sparki will get stuck. This is because Sparki stops moving when it reaches a portion of the line that is wide enough to reach the right or left line sensors. Because Sparki doesn’t move, the sensor reading will never change. So Sparki is stuck again! You’ll need to add some movement code to make sure Sparki keeps moving along:
sparki.moveForward( 1 );
See if you can figure out where you’ll have to put this code to get Sparki unstuck. Once you’ve made your changes go ahead an upload the code to test it out!
Next Step:
Now that you know how to make an if statement, we will see how to use a switch statement.