Introduction
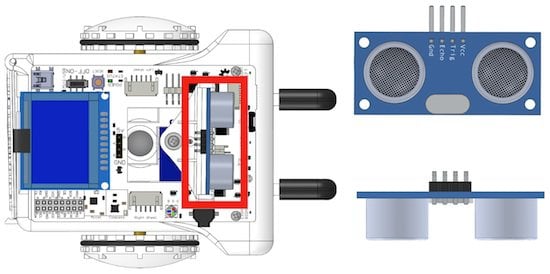
In this lesson, we will start learning how to do some basic tasks with sensors, specifically with the Ultrasonic Distance Sensor, included on Sparki. This lesson only gives a basic example on how it works, a more advanced explanation is shown here. Please take a few minutes to read that link if you are completely new to Ultrasonic Distance Sensors and want to know more.
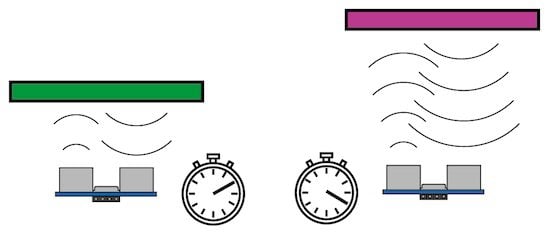
This sensor finds objects with sound the same way a bat or dolphin does. One part of the sensor is a speaker that sends out a sound wave. The other part is a microphone that then measures how long it takes for the sound wave to come back. The longer it takes to come back, the further away the object:

Basic Sensor Usage
To use the ultrasonic sensor, one command is needed. It returns the distance read by the sensor as a number in centimeters:
sparki.ping();
Be careful because this sensor is not as fast as Sparki’s brain. You will always need to add a delay if you are going to use it inside the program’s loop.
Let’s do a basic, short first program. This example reads the value returned by the sensor and print it on Sparki’s LCD display, using the sparki.println function:
#include <Sparki.h>  // include the sparki library

void setup()
{
}

void loop()
{
    sparki.clearLCD(); // wipe the LCD clear
    sparki.print(sparki.ping()); // reads the ultrasonic ranger and prints the result in the LCD
    sparki.println(" cm"); //print and extra " cm", and end line
    sparki.updateLCD(); // put the drawings on the screen
    delay(100);
}
This program will print out the distance read from the ultrasonic ranger in the upper-left corner of the LCD. It even adds the unit (this sensor is metric, so its readings are in centimeters).
Although this is a very basic program, it will be always useful for sensor testing. Some times we can make complex programs using many different sensors at once. If things do not work like we expect (which happens more than we would like!), printing the numbers is helpful. We will use this way of basic sensor debugging with the LCD for other sensors too.
Finally, please take a few moments to see what the maximum range of the ultrasonic distance sensor is. Also, please see how the minimum distance that this sensor can read is around 2 cm. Distances less than 4cm are also not very reliable.
Moving the Head
One nice feature of Sparki is that the ultrasonic sensor is mounted on a rotating head. It’s powered by Sparki’s servo, so we can control it with the following code (please read the this link if you want to know more about servos):
sparki.servo(angle_degrees);
Also, we can use predefined values for the angle_degrees parameter in order to move the robot’s head to useful positions:
SERVO_LEFT
SERVO_CENTER
SERVO_RIGHT
Here is a another basic example that moves Sparki’s head.:
Remember when having Sparki move: it needs fresh batteries, it’s On/Off Switch ‘On’, and to be watched to prevent it from falling off edges.
#include <Sparki.h>  // include the sparki library

void setup()
{
}

void loop()
{
  sparki.servo(SERVO_LEFT); // rotate the servo to is -90 degree postion (left)
  delay(1000); // wait 1000 millieconds (1 second)

  sparki.servo(SERVO_CENTER); // rotate the servo to is 0 degree postion (forward)
  delay(1000); // wait 1000 millieconds (1 second)

  sparki.servo(SERVO_RIGHT); // rotate the servo to is 90 degree postion (right)
  delay(1000); // wait 1000 millieconds (1 second)

  sparki.servo(-90); // rotate the servo to is -90 degree postion (left)
  delay(1000); // wait 1000 millieconds (1 second)

  sparki.servo(0); // rotate the servo to is 0 degree postion (forward)
  delay(1000); // wait 1000 millieconds (1 second)

  sparki.servo(90); // rotate the servo to is 90 degree postion (right)
  delay(1000);  // wait 1000 millieconds (1 second)
}
The previous program just moves the robot’s head without doing anything with the sensor itself. So what about moving and reading it at the same time? Here’s some code for that, too!:
#include <Sparki.h>  // include the sparki library

int left = 0, center = 0, right = 0;
int interval = 800;

void setup()
{
}

void updateSensorReadings()
{
  // refresh all the display data at once:
  sparki.clearLCD(); // erase the lcd

  sparki.print("Left = ");
  sparki.println(left); // print the distance from when Sparki's head is facing left

  sparki.print("Center = ");
  sparki.println(center); // print the distance from when Sparki's head is facing center

  sparki.print("Right = ");
  sparki.println(right); // print the distance from when Sparki's head is facing right

  sparki.updateLCD(); // write the new LCD values to the screen
}

void loop()
{
  sparki.servo(SERVO_LEFT); // rotate the servo to is -90 degree postion (left)
  delay(interval);
  left = sparki.ping(); // get the distance from the distance sensor
  updateSensorReadings(); // refresh the screen

  sparki.servo(SERVO_CENTER); // rotate the servo to is 0 degree postion (forward)
  delay(interval);
  center = sparki.ping(); // get the distance from the distance sensor
  updateSensorReadings(); // refresh the screen

  sparki.servo(SERVO_RIGHT); // rotate the servo to is 90 degree postion (right)
  delay(interval);
  right = sparki.ping(); // get the distance from the distance sensor
  updateSensorReadings(); // refresh the screen
}
Please take a look to the function that we have added here. Without that function, the same code would be repeated 3 times in order to refresh the display each time we have a new reading. Now we can write it just once, and use it 3 times.
Animating a Circle Using the Ranger
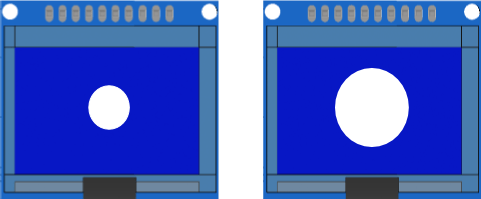
Finally, here is one last example. This one reads the sensor and draws a small circle’s size on the LCD display to show the value. The closer the reading, the bigger the circle:
#include <Sparki.h>  // include the sparki library

int diameter = 0;

void setup()
{
}

void loop()
{
  // refresh all the display data at once:
  sparki.clearLCD();

  radius = sparki.ping()/350*32; // 350 is the maximum aprox. reading (3.5 m)
  if (radius > 32) // max vertical radius, since there are just 64 pixels (radius*2 = diameter)
  {
    sparki.beep();
    radius = 32;
  }

  sparki.drawCircleFilled(63,32, radius); // draw a circle based on the size of Sparki's distance reading

  sparki.updateLCD();

  delay(150);
}
Try taking the Sparki with your hand and moving it towards a wall, so you can see the circle growing and shrinking:

The most important line here is where the program calculates the diameter of the circle:
radius = sparki.ping()/350*32; // 350cm is the maximum aprox. reading (3.5 m)
This line is also pretty complicated, so let’s exmplain it better.
We want Sparki to display a circle as big as we can (radius of 32 pixels), when the sensor is reading the maximum distance (3.5 meters, or 350 centimeters). To do this, we make a new variable called radius. This will be the radius of the circle we will draw.
How do we make this radius number? We will take the distance from the sensor. If we just gave this number as the radius, though, it could go anywhere from 0 to 350. That’s way too big!
We know the biggest it will ever go is 350 centimeters, so if we divide the distance by 350, it will only over go from 0 to 1. Almost there, but we need it to go from 0 to 32, so we multiple by 35. Now it will go from 0 to 32 based on a distance of 0 to 350cm.
Just in case it goes over 350cm, we will also have Sparki beep as well with this code:
if (radius > 32) // max vertical radius, since there are just 64 pixels (radius*2 = diameter)
{
  sparki.beep();
  radius = 32;
}
Questions
- What do you think happens when the sensor is used against materials that can absorb the mechanical ultrasonic waves? Why not make some experiments?
- Have you seen this sensor used in real modern cars? For doing what?
- And what about animals? Which animals use this kind of sensor to navigate?
You may notice that the sensor’s numberes are not always accurate. We explain how to help with this in our Signal Filtering lesson.


