


Remapping the Remote
Sparki's remote is pretty flexible, so learn how to write new code with it!
Lessons You Should Know

Introduction
Ok, now that you’ve got the hang of using Sparki’s remote let’s take a look at how to change the code that actually makes Sparki respond to the remote commands.
First we need to take a look at the remote and figure out what kind of signals it is actually sending to Sparki when you press a button. The infrared LED in the remote sends a bunch of different pulses for each button that Sparki decodes into a number. Then that number gets used in the code (in this case the default code) inside of Sparki’s brain, or microprocessor. Here’s a picture of the remote and the numbers that each button sends:
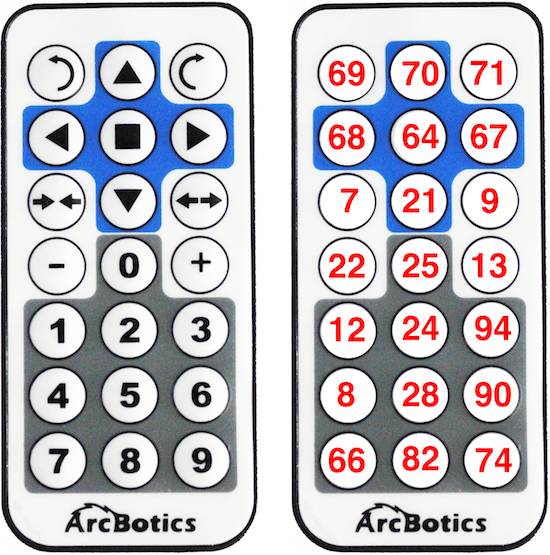
For example, when you press the up (or forward) arrow the remote sends pulses of infrared light that Sparki decodes as seventy. When you press the down (or backwards) arrow the remote sends pulses that Sparki decodes as 21. What number does Sparki decode when you press the stop button? How about the plus (+) button?
Feel good about the numbers and pulses of infrared light that the remote sends? Good! Next we’ll take a look at the code on the receiving side in Sparki’s microprocessor that actually makes Sparki take action when it sees some infrared remote signals.
Starting Code
The code for using the remote comes included with SparkiDuino. You can find it here:
File->Examples->Restore_Default
Here is the complete code for the program:
#include <Sparki.h> // include the robot library

void setup() {
    sparki.servo(SERVO_CENTER); // center the servo
}

int program = true;
void loop() {

    //Scan for IR Receiver
    int code = sparki.readIR();

    // if there is a valid remote button press
    if(code != -1){
        sparki.moveStop(); // stop the motor
        sparki.RGB(RGB_OFF); // clear the RGB
        program = false; // turn off the starter program
    }

    switch(code){
        case 70: sparki.moveForward(); break;
        case 21: sparki.moveBackward(); break;
        case 67: sparki.moveRight(); break;
        case 71: sparki.moveRight(); break;
        case 68: sparki.moveLeft(); break;
        case 69: sparki.moveLeft(); break;
        case 64: sparki.moveStop();
        sparki.gripperStop(); break;

        // Gripper Buttons
        case 9: sparki.gripperOpen(); break;
        case 7: sparki.gripperClose(); break;

        // RGB
        case 25: sparki.RGB(RGB_OFF); break;
        case 12: sparki.RGB(RGB_RED); break;
        case 24: sparki.RGB(RGB_GREEN); break;
        case 94: sparki.RGB(RGB_BLUE); break;

        // Servo
        case 90: sparki.servo(SERVO_LEFT); break;
        case 28: sparki.servo(SERVO_CENTER); break;
        case 8: sparki.servo(SERVO_RIGHT); break;

        // buzzer
        case 74: sparki.beep(); break;

        // Program Control
        case 66:
            sparki.moveStop();
            sparki.RGB(0,0,0);
            program = false; break;
        case 82:
             program = true; break;
    }

    // Run Autonomy Code if
    if(program == true){
        sparki.moveForward();
        sparki.RGB(RGB_GREEN);
        int cm = sparki.ping(); // measures the distance with Sparki's eyes

        if(cm != -1) // make sure its not too close or too far
        {
            if(cm < 20) // if the distance measured is less than 20 centimeters
            {
                sparki.RGB(RGB_RED); // turn the led red
                sparki.beep(); // beep!
                sparki.moveBackward(10); // move sparki backwards
                sparki.moveRight(30);
            }
         }

        delay(100); // wait 0.1 seconds (100 milliseconds)
    }
}

How the Remote Works
Now that you’ve taken a look at the code we’ll do a little cutting and pasting to get you comfortable with how the remote works. If you’re comfortable with code and want to actually type your own code into the switch statement (check out the section at the end of this lesson for a full explanation of switch/case statements) by all means go ahead! For those of you who are just starting to get comfortable with robots and code we’ll be taking the code that makes Sparki move forward (sparki.moveForward();) and backwards (sparki.moveBackward();) and moving it so that Sparki moves when you press the plus (+) and minus (-) buttons instead of the arrows.
The first thing we need to do is find the code that makes Sparki move forward and backwards. Let’s look at the remote again. What signals are sent to Sparki when you press the up and down arrows?
The remote sends pulses of infrared that represent the numbers 70 and 21 when you press the forward and backwards buttons. Let’s remember that so we can look for it in the code in a little bit. Before we do that let’s also find the plus and minus buttons. What numbers do they send to Sparki? You’ll need to remember that information as well in order to continue with this lesson. Now that we know the information the buttons send to Sparki let’s look at the code and figure out how to remap Sparki’s movement. We need to find the code that executes when each button is pressed. Here is the forward button to get you started-
case 70: sparki.moveForward(); break;
This line of code tells Sparki to move forward in the case that it hears the number 70 from the infrared remote. Then the command break; tells the computer to stop looking for numbers after telling Sparki to move forward because there is no need to search for more commands- Sparki found the code for the forward button.
Adding More Commands
Next we need to add code that tells Sparki to do something if the plus sign is pressed. Do you remember the number that the infrared remote sends to Sparki when you press the plus sign? We’re going to make a new case statement below the case 70: statement for that number like this:
   case 70: sparki.moveForward(); break;
   case 13:
This tells Sparki to listen up if the plus symbol on the remote is pressed. Next we’re going to just copy and paste the sparki.moveForward(); line from the arrow line into the plus symbol line. Make sure that you leave the break; command in the case 70: line, that’s a piece of code that tells Sparki it doesn’t have to search for other code if you’ve pressed the forward button. It’s best just to leave that in there, every case statement should have it’s own break; command. It’s also ok to leave the sparki.moveForward command in the case 70: statement if you like. Now our code looks like this-
   case 70:  break;
   case 13: sparki.moveForward();
Sparki will move forward when you press the button that is mapped to the number 13 (the plus sign) now, but we’re missing something… what else does this line need? That’s right! Every case statement needs a break; statement. Let’s add command that in as well-
   case 70:  break;
   case 13: sparki.moveForward(); break;
Uploading the code
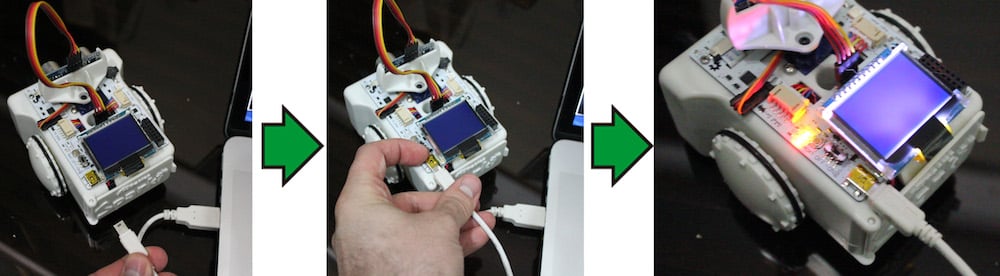
Now that we’ve changed a little bit of the code let’s test it out to make sure it works. A good programmer or roboticist always changes just a little bit of code at a time and checks to make sure it works correctly before moving on and adding more code. (Unless you’re practicing to get better at debugging code, but let’s take things one step at a time, huh?) To test this code first connect Sparki to your computer with the USB cable.
Once you’ve got Sparki and the computer connected you’ll have to make sure that you have the correct port and board type selected before you can upload code. The Arduino environment can talk to almost anything you have plugged into your USB ports. That means you have to figure out which USB port Sparki is plugged into before you can test your code. The Arduino environment is used to code for a whole bunch of boards and you need to select the right board, which is
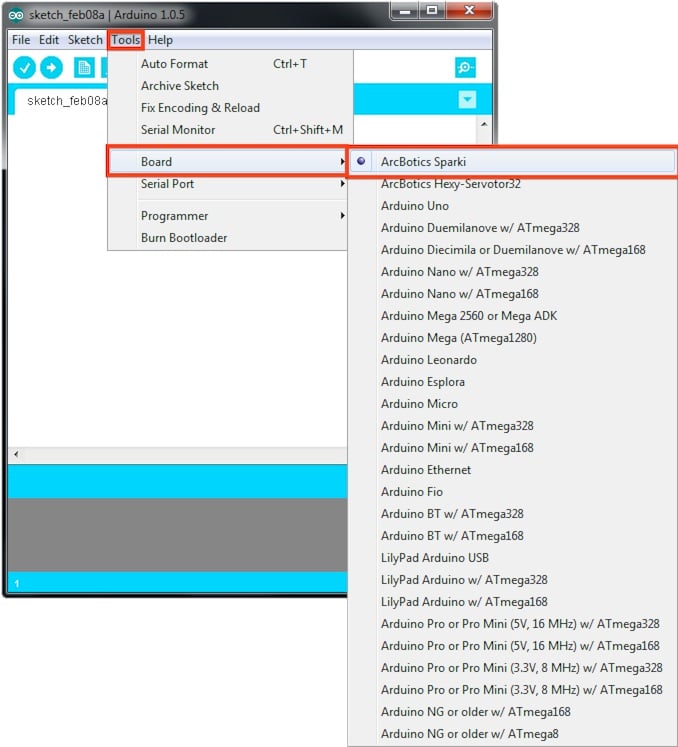
Picking the board type looks like this. Don’t see “ArcBotics Sparki?” Then you probably don’t have the proper libraries installed. If you think you did install the libraries you may need to restart Arduino in order to see them in the board selection menu.

Selecting the correct serial port will look something like this in Windows. If there are multiple options you can always just unplug Sparki and see which serial port disappeared. (You’ll have to exit and re-enter the serial port menu.) The port that disappeared is the one that represents Sparki. Below are a couple tips and tricks to help you out in case you’re stuck.
 Windows
COM1 is never it. This is the port windows only gives a physical serial port in the back of a computer. Serial ports for Arduino boards in windows are COM3 or higher.
 Mac OSX
Arduino serial ports start with ‘tty.usbmodem’ and end in a series of numbers.
 Linux
Linux
Arduino serial ports start with tty and usually include some mention of USB.
Still having trouble? Here’s a page all about uploading code to help you out and another page for parents that goes a little more in depth. The second links says it’s for parents, but you’re smart enough to be playing around with Sparki- I’m sure you can figure it out.
Testing the Code
Phew, done with serial ports and boards….Now comes the fun part, testing your code! (Errr, you’ll probably want to unplug Sparki from your computer first.) Try pressing the plus symbol. Does Sparki start moving forward? If so, then congratulations! You’ve create a successful case statement. If not, go back to your code and make sure all the parts are there. If you really got off track don’t worry, just close your code without saving and open it back up to start with the fresh default code.
Wrapping Up
Once you’ve got the plus symbol working it should be pretty easy to go back and make a case statement for the minus symbol as well. Just make sure you have all three parts of the statement- the case with the number for the minus symbol, the command you want Sparki to do when you press the minus symbol and the all important break; command.
Below is some review, vocabulary, explanation of some parts of the code we didn’t talk about and a link for those of you who want to dig deeper into Sparki’s commands.
By now you should feel comfortable with-
What a case statement is and the numbers that the infrared remote sends to Sparki when you press the buttons on the remote. We didn’t really go over the beginning of the switch/case statements but if you want to learn more about that keep reading below.
Vocabulary-
Switch statement: Calling this a statement isn’t really accurate, it’s actually a function (but it’s almost always called a statement, I have no clue why). A switch statement needs a single integer variable inside of its parenthesis which the code compares to the numbers in the case statements inside of the switch statement’s curly brackets. When the value of the variable in the switch statement matches the number of the case statement the computer or robot knows it has found the code it should execute. Every switch statement needs a default: case statement so if the variable isn’t the same as one of the case statements the computer has another case statement to execute and it doesn’t stay stuck inside of the switch statement.
switch(code)
{
    //case statements go inside of the switch statement's curly brackets
    //a switch statement can have as many case statements as you like

    case 70: sparki.moveForward;
       break; //if code is equal to 70 this line happens
    //every switch statement needs a default case statement in case the variable
    //does not match any of the case statements

    default:
       break;
    //the default statement always contains the break; command
    //it can contain other code as well but it always needs break;
}
Case statement: These are the portions of the switch/case statements that actually make something happen. If the variable in the switch statement’s parenthesis is equal to the number in the case statement then the code after the number and the colon executes.
Infrared pulses: This is one way for robotics and electrical systems to communicate wirelessly. An infrared light emitting diode (LED) turns on and off in a pattern in order to send out information. The receiving end has a photo-transistor (basically a switch that opens and closes depending on if there presence or lack of infrared light) that translates the infrared pulses into electrical pulses that the computer or robot can record and translate into numbers or characters. Infrared based communication works with infrared light, or photons, so there cannot be anything between the emitter (the remote) and detector (on Sparki).
Want to get to programming other parts of your Sparki? You can continue here!
Going even further with the infrared remote-
How about the rest of the unused buttons on the remote? What kind of code would you like to add to the switch/case statement that executes when you press the number buttons, for example?