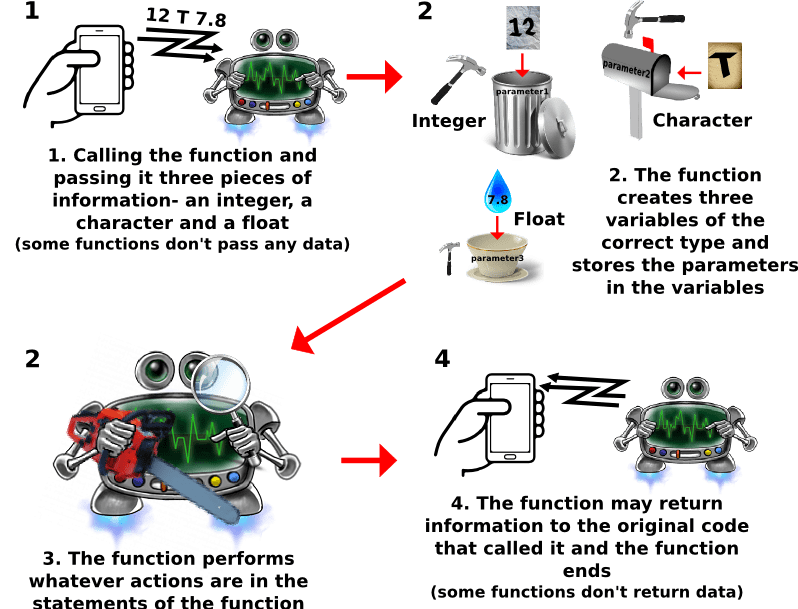
Functions are a way to group commands together into chunks, so that code can be re-used.
Here’s what we’ll be covering on this page:
You’ve probably already been using functions and you might not have known it. The sparki library is made up of a whole bunch of different functions. When Sparki sees a call to a function in its code it jumps to wherever that function is stored in the code, executes the function, and then jumps back to where it was inside the loop( ) code. This way you can use the function multiple times but you (or someone else) only had to write it once.
Functions are kind of like robots- they sometimes take input (like a robot gets input from its sensors), sometimes create output (like a robot will beep or turn motors) and you can easily use them over and over again once the original function code has been written.
Calling a Function
Using a function is referred to as “calling” a function. You call a function by typing its name, open and closed parentheses, then a semicolon like so:
functionName();
This is the most basic way to use a function, but many functions are more complicated than that. There are also functions that take data in as an input parameter. Giving a function an input parameter is called “passing” information. You would use this function along with an input parameter like so:
functionName(parameter);
Or if it had three inputs:
functionName(parameter1, parameter2, parameter3);
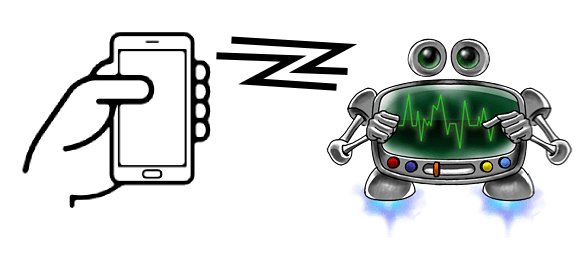
You can pass as many pieces of data as you like to a function, as long as the function was written to accept all of the pieces of information. We’ll learn about how to write functions in a little bit. If we continue to think of the function like a robot you can think of calling the function as physically calling the robot on a phone. You can either ask the robot to come to wherever you are located to do the work it is preprogrammed to do, or you can give it some information over the phone that it can use when it does the work for you.
Returning Data
Somer functions can also give back, or return data. You can think of this as if our robotic function leaves a note with some information on it once the robot is done performing its tasks. One thing you have to be sure of is that the type of variable you are storing the return information in (in this case returnValue) matches the information that the function is spitting out. Here is an example of a function that returns an integer-
int returnValue;
returnValue = functionName(parameter);
Once this code is run the variable returnValue has the value returned by the functionName function.
Writing a Function
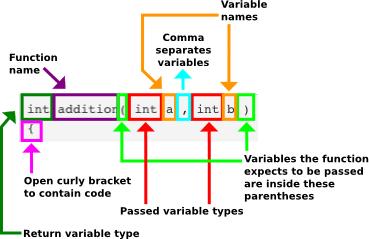
Writing a function is pretty easy. Once you write out a function it is called a function definition and you can call it from anywhere in the code that contains the function. You’ll just need to get comfortable with the beginning of a function, which always looks more or less the same. This part of the function is called the function “header.” It has a bunch of different parts of you can see below-
You can create your own function using the following format:
type name (variableType1 parameter1, variableType2 parameter2, ...)
{
//statements
}
Vocabulary
Let’s talk about the various parts of the function above-
– function header: these are the first couple lines of a function. It will always contain a return variable type (or void) a name, parentheses and an open curly bracket. It may contain variable types and names inside the parentheses if the function expects to receive any information when it is called.
– type: the variable type of the data returned by the function. If you are not returning any data, use void as the type. So if you want your function to spit out a character after it is done running your would need to write “char” here at the beginning of the function.
– name: the name by which the function can be called. In the examples above, the name of the function is functionName. You could name your function whatever you like as long as it is one word (or multiple words with no spaces). That can get confusing though, so programmers have agreed that all functions should start with a lower case letter. Also, your function name should be related to whatever your function does. It’s a little confusing if you call your function puppiesAndKittens when the function code makes your robot beep. People reading your code will have a tough time figuring out what is going on.
– parentheses: the parameters that the function expects to be passed are contained inside the open and closed parentheses.
– variable type: the variable type of the parameter that comes after this part of the code. So if parameter1 is an integer, where the example reads variableType1 you would type “int.” If parameter1 is a character you would type “char.”
– parameters: (as many as needed): these are the pieces of information that get passed to the function. Each new parameter has a comma before it. You declare each variable just like you would in any other code as we discussed above.
Because you are declaring new variables to hold the information entering the function, while this is the same information as the variables that are passed to the function, they are stored separately. That means that any changes you make to the parameter variables inside the function will not effect the original variables outside the function.
Each variable declared at the beginning of the function is deleted after the function is finished. If you want to use the data in the variable, you can return it or you can include code in the statements portion of your function that reassigns the original variable value.
– curly brackets: are used to indicate the beginning and end of the code statements that actually make the function perform actions. There is an open curly bracket { at the beginning of the statement code and a closing curly bracket at the end of the function so the computer or robot knows the function is done.
– statements: is where the statement code for the function lives, it is also called the function “body.” It is a block of statements surrounded by curly brackets { } that specify what the function actually does. This is where you’ll write all the code that changes variables, move wheels, reads sensors, beeps or whatever you want your function to do.
A Robot as a Function
Functions are really important parts of code and can be confusing if it’s your first time trying to understand them so here is an example using our robot friend as an analogy.
Here is code of an example function definition that takes in two different integers, and returns an integer:
int addition( int a , int b )
{
    int r;
    r = a + b;
    return r;
}
Notice the use of the command return. You use the return statement as shown above, by typing return and then the variable or value you want to return. Functions that do not return anything will have void as the return type in the function header. You would use the function above this way:
int sum;
sum = addition(3, 5);
The variable sum would then equal eight after the function returns.
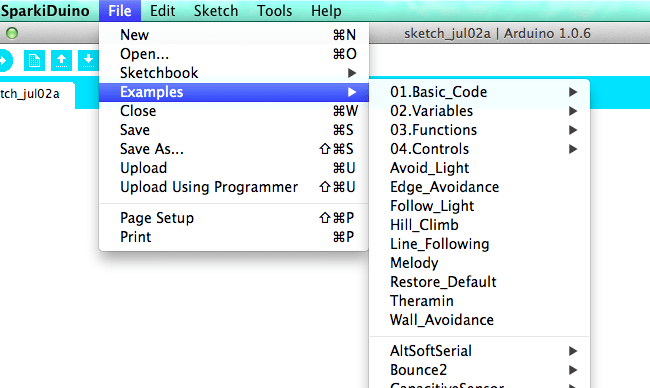
Sparki already comes pre-loaded with a lot of different functions already written, along with all of the Arduino functions. You can explore them by going to the example section in the menu-
Try it with Sparki
#include <Sparki.h> // include the sparki library

void setup() // code inside these brackets runs first, and only once
{
}

void loop() // code inside these brackets runs over and over forever
{
  sparki.clearLCD();

  int sum;
  sum = addition(3, 5);
  sparki.println(sum);

  sparki.updateLCD();
}

int addition( int a, int b )
{
    int r;
    r = a + b;
    return r;
}
Recap of What We’ve Covered So Far
or
Next Step:
Now that you have some idea how functions works, you can use them to operate Sparki. But without being able to make any decisions, it is just preforming actions according to a list. How do we make Sparki intelligent? With Control Statements!
Next Lesson – Controls


