


Room Navigation
Teach Sparki how to move freely around the room.
SparkiDuino
Hard
Lessons You Should Know

Introduction
Room navigation can be a complex task for a mobile robot. There are a lot of different approaches to program a robot to let it “know where it is”, or to go from one room to another one. These are the basic problems of mapping / localization and navigation. When them are put together and done at the same time, their are called Simultaneous Localization And Mapping, or SLAM. We will try to learn a few basic concepts in this lesson, that will help to enable our little Sparki to move on a small house-like environment. But for simplicity, we will also rely on some previous knowledge about the rooms where Sparki is going to navigate, as well as some marks that we will add to the environment to make the work easier for our robot.What You’ll Need
- A Sparki.
- The rooms to be navigated by Sparki. We will show you soon how to make a simple cardboard house for this.
The Rooms
We will need the rooms where Sparki will navigate. Of course, you can always design your own house for Sparki to navigate in, but we will see in this section one possible way of making them with cheap and widely available materials, and also with a geometry which should be friendly to our little robot. Here is the idea: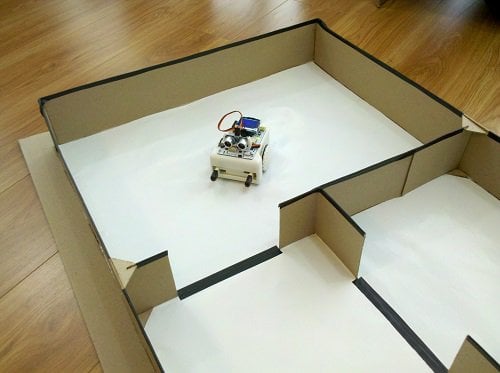 And these are some possible dimensions, which takes into account parameters like the robot’s size, and other constraints:
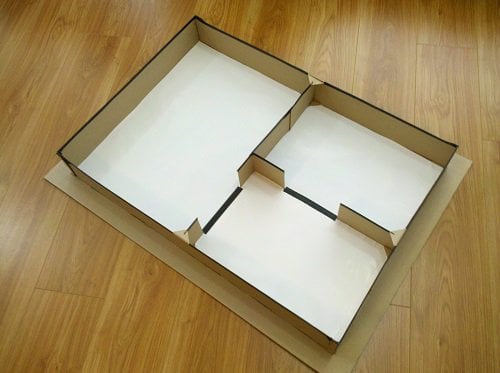
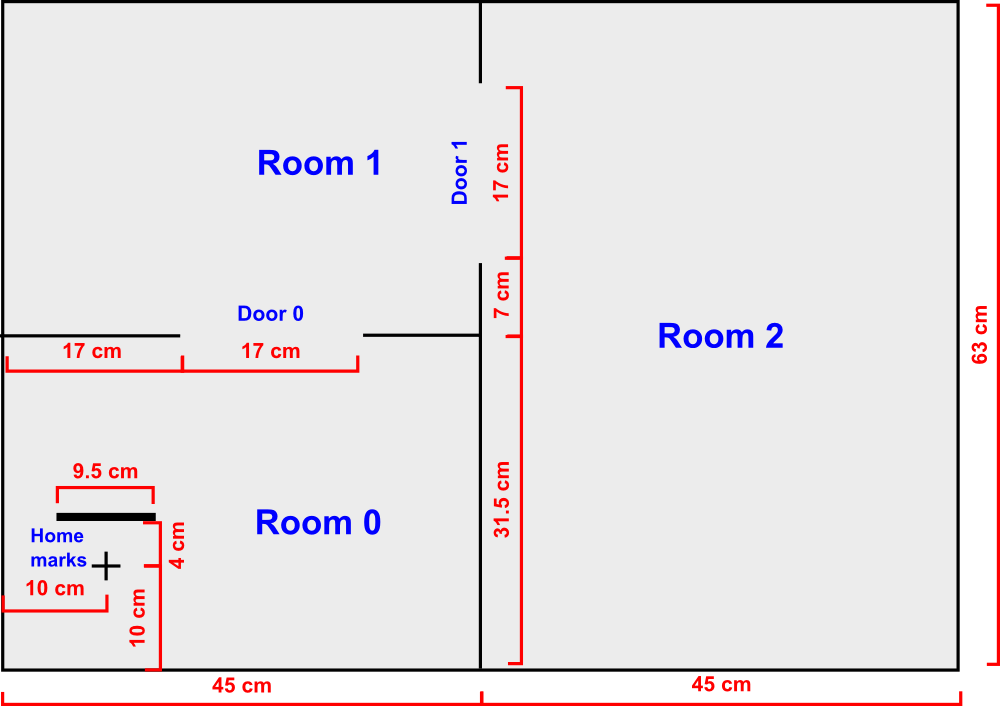 The above image can be downloaded, since it has higher resolution than the shown on this wab page. As you will see in the following steps, the Home marks are just that: marks (more on this soon). The other black lines on the image are walls, which will be made of cardboard. The walls should have an 11 cm tall as a minimum, to ensure that the robot’s ultrasonic range finder detects them.
It may be convenient to start building the external walls:
The above image can be downloaded, since it has higher resolution than the shown on this wab page. As you will see in the following steps, the Home marks are just that: marks (more on this soon). The other black lines on the image are walls, which will be made of cardboard. The walls should have an 11 cm tall as a minimum, to ensure that the robot’s ultrasonic range finder detects them.
It may be convenient to start building the external walls:
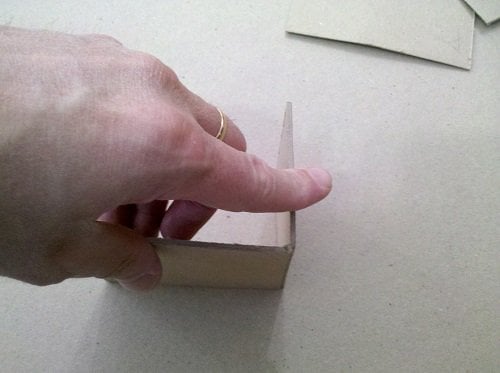
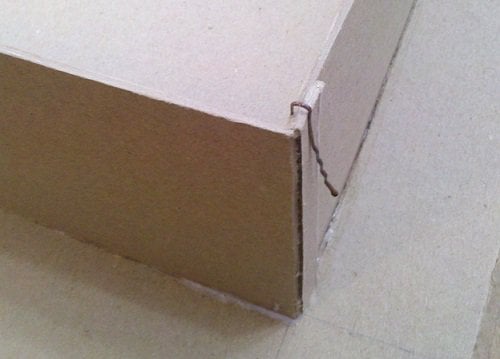
 The following pictures shows that it may be convenient to cut the walls a bit longer than needed. This will allow us to fold them, with the help of a small cut which does not pass the cardboard thickness:
 After gluing the parts, you can use clips to hold them while the glue dries:
 Here you can see them together after having glued them:
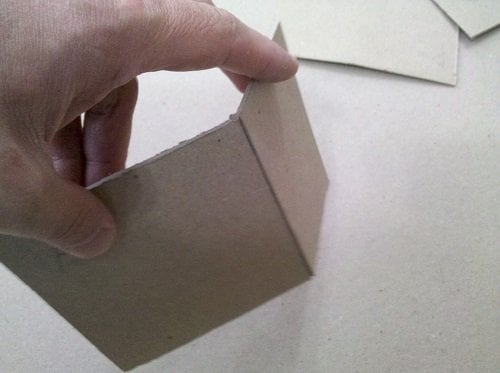
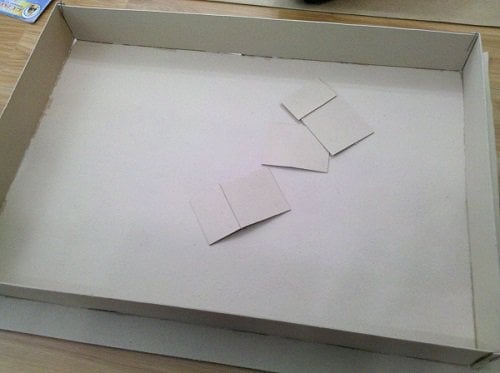
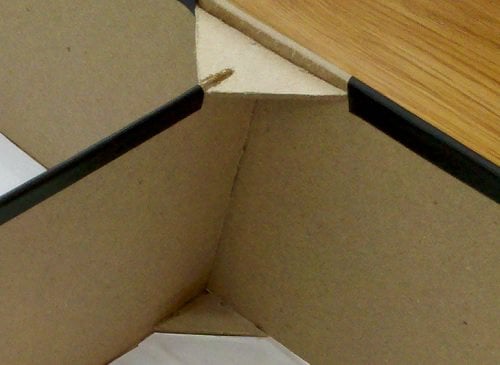
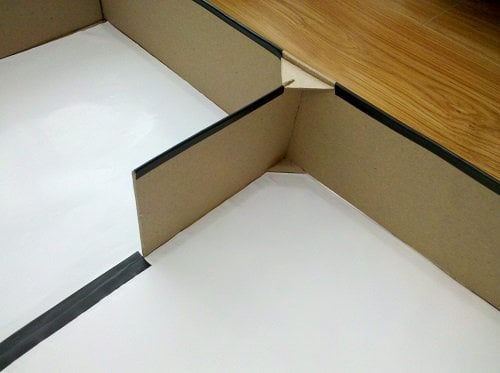
 Please note the small triangles added as reinforcements for the structure:
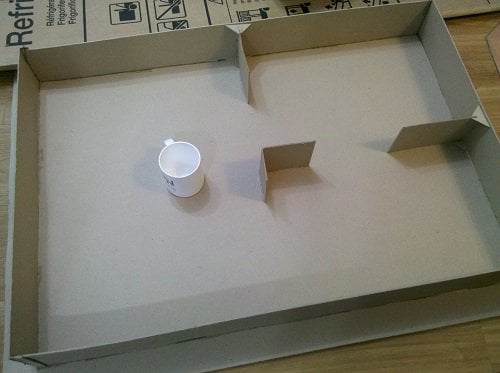
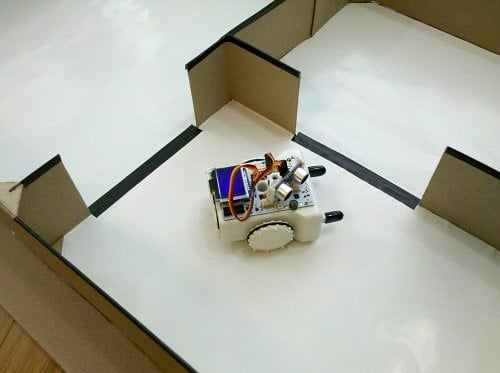
 Finally, to ensure that the line Infrared Reflectance Sensors will work properly, white paper should be used to cover the floor. We will add some black marks to the doors, using insulating black tape:
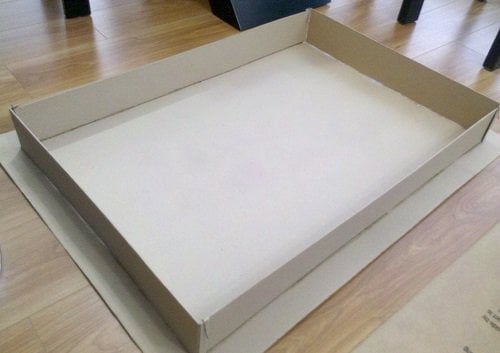
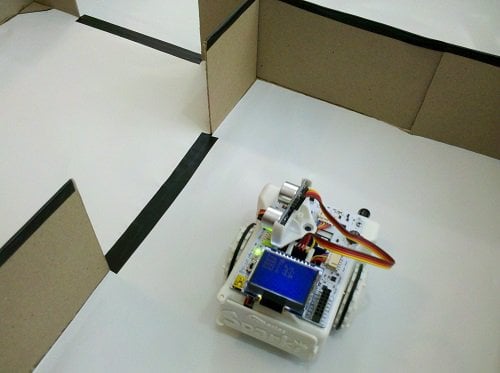
 And finally, here is how our small robot’s house looks:
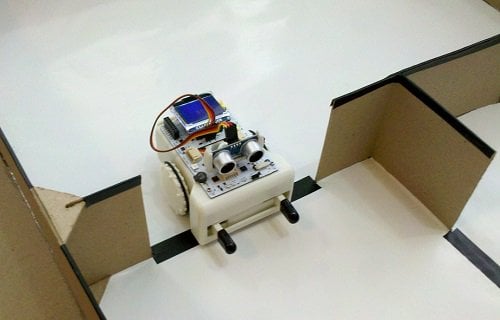
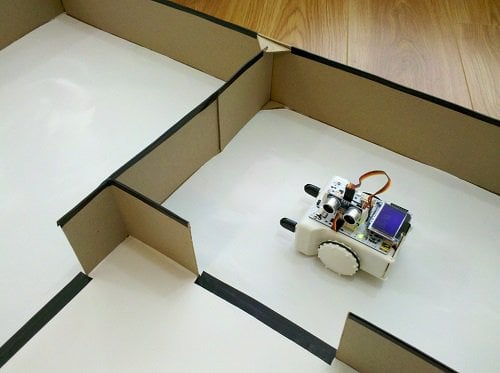
 As you can see in the following picture, the robot has space enough to cross a door, even if it’s not when centered against it:
Robot’s Home
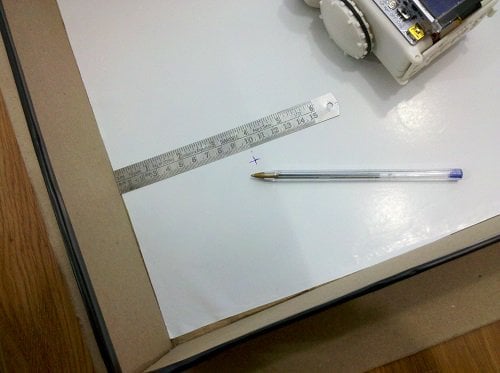
One of the really important aspects here is that we need to define a coordinate system for the house. And it will be a 2D Cartesian one. Or course, to do that, we need to define an origin: the point labeled (0, 0) (where both x = 0 and y = 0). Here is the coordinate system that we are going to use along this lesson: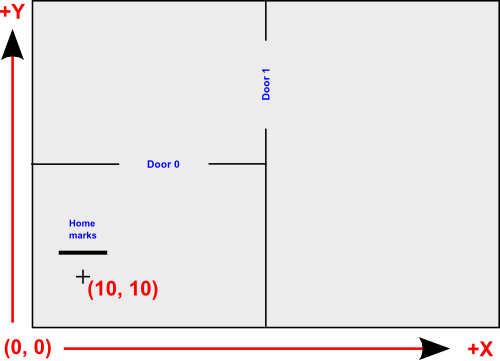 So the most left-bottom corner is our (0, 0) point, while the home cross mark is going to be centered on the (10, 10) point. It’s good to note that the units that we are using are centimeters (cm). The cross mark is not something that the robot needs to detect, but it’s just a mark that we can see through the robot’s marker holder to help us position the robot at the beginning of each activity, as shown in the following picture:
 You can measure the 10 cm from each side easily and draw the (10, 10) mark with a pen:
 But there is a black mark that we will add to be detected by Sparki’s IR sensors. This one will help the robot to automatically center itself on start. We have used black insulating plastic tape. But please note that it’s half the width (we have cut the tape by the middle). This is important because if this mark is too wide, the centering algorithm will not work properly. In the following picture you can see the difference between this thin line and the mark on a door (which was made with the same tape, but keeping it original width):
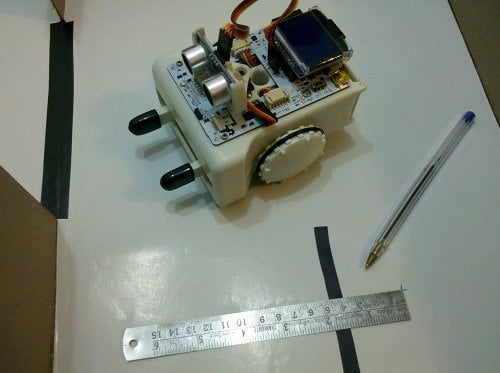 As can be seen in the image above, the mark is centered on the cross on the X axis and separated by 4 cm on the Y axis.
Other Important Parameters
##Under construction: Rules for making an easy to navigate Sparki’s home.Robot’s Homing
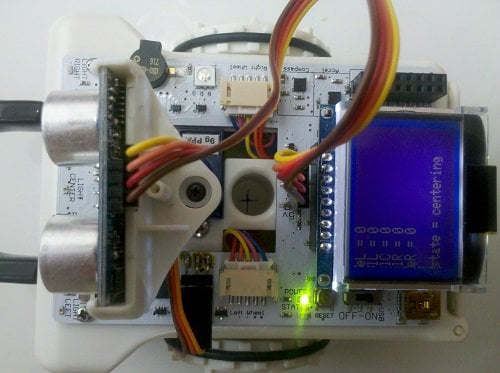
Now that we have a house with rooms and an univocal coordinate system, let’s start programming the robot to navigate through it. Our first task will be to place the robot at the home point, but giving to Sparki the ability to determine if it’s at the right initial position by himself.|
1 2 3 4 5 6 7 8 9 10 11 12 13 14 15 16 17 18 19 20 21 22 23 24 25 26 27 28 29 30 31 32 33 34 35 36 37 38 39 40 41 42 43 44 45 46 47 48 49 50 51 52 53 54 55 56 57 58 59 60 61 62 63 64 65 66 67 68 69 70 71 72 |
#include <Sparki.h> // include the sparki library const int threshold = 500; //line and edge sensors thereshold. bool edgeLeft = false, lineLeft = false, lineCenter = false, lineRight = false, edgeRight = false; String state = "undefined"; void showSensorsAndState() { sparki.clearLCD(); sparki.print("eL = "); sparki.println(edgeLeft); sparki.print("lL = "); sparki.println(lineLeft); sparki.print("lC = "); sparki.println(lineCenter); sparki.print("lR = "); sparki.println(lineRight); sparki.print("eR = "); sparki.println(edgeRight); sparki.println(); sparki.println(String("state = ") + state); sparki.updateLCD(); } void readIRSensors() { //each sensor is 1 if reading white, and 0 if reading black: edgeLeft = sparki.edgeLeft() > threshold; lineLeft = sparki.lineLeft() > threshold; lineCenter = sparki.lineCenter() > threshold; lineRight = sparki.lineRight() > threshold; edgeRight = sparki.edgeRight() > threshold; } //Returns true if the robot is centered over the Home mark: bool robotIsCenteredOverHomeMark() { //The robot is centered once all it's edge and line sensors read black: return !edgeLeft && !lineLeft && !lineCenter && !lineRight && !edgeRight; } void centerRobotOverHomeMark() { state = "centering"; readIRSensors(); while(!robotIsCenteredOverHomeMark()) { readIRSensors(); showSensorsAndState(); } sparki.beep(); } void setup() { sparki.servo(SERVO_CENTER); centerRobotOverHomeMark(); } void loop() { showSensorsAndState(); delay(50); } |

Basic Room Measurements
##|
1 2 3 4 5 6 7 8 9 10 11 12 13 14 15 16 17 18 19 20 21 22 23 24 25 26 27 28 29 30 31 32 33 34 35 36 37 38 39 40 41 42 43 44 45 46 47 48 49 50 51 52 53 54 55 56 57 58 59 60 61 62 63 64 65 66 67 68 69 70 71 72 73 74 75 76 77 78 79 80 81 82 83 84 85 86 87 88 89 90 91 92 93 94 95 96 97 98 99 100 101 102 103 104 105 106 107 108 109 110 111 112 113 114 115 116 117 118 119 120 121 122 123 124 125 126 127 128 129 130 131 132 133 134 135 136 137 138 139 140 141 142 143 144 145 146 147 148 149 150 151 152 153 154 |
#include <Sparki.h> // Include the sparki library. // Robot data: const int threshold = 500; // Line and edge sensors thereshold [0 - 1015 w/out units]. const int servoDelay = 350; // Minumum time to give to the servo to rotate 90 degrees [ms]. const int rangerToCentreDistanceFront = 4; // Distance from the measuring edge of the (centered) ultrasonic sensor to the robot's centre [cm]. const int rangerToCentreDistanceSide = 3; // Distance from the measuring edge of the (90 degrees rotated) ultrasonic sensor to the robot's centre [cm]. // Robot variables: bool edgeLeft = false, lineLeft = false, lineCenter = false, lineRight = false, edgeRight = false; int ping = 0; // [cm]. String state = "undefined"; // Map variables: int roomMaxX = 0; // [cm]. int roomMaxY = 0; // [cm]. void printPingData() { sparki.print("Ping="); // Ultrasonic ranger on screen. sparki.print(ping); sparki.println(" cm"); } void showSensorsAndState() { sparki.clearLCD(); sparki.print("edgeL="); sparki.println(edgeLeft); sparki.print("lineL="); sparki.println(lineLeft); sparki.print("lineC="); sparki.println(lineCenter); sparki.print("lineR="); sparki.println(lineRight); sparki.print("edgeR="); sparki.println(edgeRight); printPingData(); sparki.println(String("state=") + state); sparki.updateLCD(); } void showRoomData() { sparki.clearLCD(); sparki.print("roomMaxX="); sparki.println(roomMaxX); sparki.print("roomMaxY="); sparki.println(roomMaxY); printPingData(); sparki.println(String("state=") + state); sparki.updateLCD(); } void readIRSensors() { //each sensor is 1 if reading white, and 0 if reading black: edgeLeft = sparki.edgeLeft() > threshold; lineLeft = sparki.lineLeft() > threshold; lineCenter = sparki.lineCenter() > threshold; lineRight = sparki.lineRight() > threshold; edgeRight = sparki.edgeRight() > threshold; } //Returns true if the robot is centered over the Home mark: bool robotIsCenteredOverHomeMark() { //The robot is centered once all it's edge and line sensors read black: return !edgeLeft && !lineLeft && !lineCenter && !lineRight && !edgeRight; } void centerRobotOverHomeMark() { state = "centering"; readIRSensors(); while(!robotIsCenteredOverHomeMark()) { readIRSensors(); showSensorsAndState(); } sparki.beep(); showSensorsAndState(); } void measureRoom(bool robotAtHome) { // Starts to measure the X longitude: sparki.servo(SERVO_CENTER); delay(servoDelay); ping = sparki.ping(); //"ping" variable is used to show the sensor value on the LCD. roomMaxX = rangerToCentreDistanceFront + ping; showRoomData(); // Measures the Y longitude: sparki.servo(SERVO_RIGHT); delay(servoDelay); ping = sparki.ping(); roomMaxY = rangerToCentreDistanceSide + ping; showRoomData(); sparki.servo(SERVO_LEFT); delay(2*servoDelay); // Twice the time of 1/4 of revolution rotation. ping = sparki.ping(); roomMaxY += rangerToCentreDistanceSide + ping; showRoomData(); // Finishes to measure the X longitude: sparki.servo(SERVO_CENTER); delay(servoDelay); sparki.moveLeft(90); // The robot rotation has more relative error than the servo rotation: sparki.servo(SERVO_LEFT); // so we rotate the robot 90 degrees and the servo the other 90 degrees. delay(servoDelay); ping = sparki.ping(); //"ping" variable is used to show the sensor value on the LCD. roomMaxX += rangerToCentreDistanceFront + ping; // If at home, centers the robot again: if (robotAtHome) { sparki.moveLeft(); centerRobotOverHomeMark(); sparki.moveStop(); } // Leaves the ultrasonic sensor centered: sparki.servo(SERVO_CENTER); delay(servoDelay); } void setup() { centerRobotOverHomeMark(); delay(1500); // Give time to the human to take her/his hands off. measureRoom(true); } void loop() { ping = sparki.ping(); //update the ultrasonic sensor data to be displayed. showRoomData(); delay(50); } |
Now that our robot has some basic data of the room where it is, let’s try to do a very simple Cartesian moving routine. Since the Sparki features relatively precise movements due to its stepper motors, we can try to make it move blindly (without any sensor feedback to determine the position). But after experimenting a bit with the real robot, we will soon realize the problems that emerge when we do not grab information from the sensors to correct the position. This technique, which consists basically on calculating the current position based on the data from the previous one is called dead reckoning. And although it could give us an estimation of the current position, it has the severe drawback of an intrinsic accumulative error. So, let’s try to move our Sparki to the middle of the room by just using the information from its motors:
123456789101112131415161718192021222324252627282930313233343536373839404142434445464748495051525354555657585960616263646566676869707172737475767778798081828384858687888990919293949596979899100101102103104105106107108109110111112113114115116117118119120121122123124125126127128129130131132133134135136137138139140141142143144145146147148149150151152153154155156157158159160161162163164165166167168169170171172173174175176177178179180181182183184185186187188189190191192193194195196197198199200201202203204205206207208209210211212213214215216217218219220221222223224225226227228229230231232233234235236237238239240241242243244245
#include <Sparki.h> // Include the sparki library. const float pi = 3.14159265358979323846; // Robot + External World data:const float initialHeading = 90.0; // Intial heading in the current coordinates system: 90 degs = pi/2 [rad]. // Robot data:const int threshold = 500; // Line and edge sensors thereshold [0 - 1015 w/out units].const int servoDelay = 350; // Minumum time to give to the servo to rotate 90 degrees [ms].const int robotRadius = 9; // Necessary radius to rotate, from the robot's center [cm].const int rangerToCentreDistanceFront = 4; // Distance from the measuring edge of the (centered) ultrasonic sensor to the robot's centre [cm].const int rangerToCentreDistanceSide = 2; // Distance from the measuring edge of the (rotated) ultrasonic sensor to the robot's centre [cm]. Rounded to floor.const int rangerToFrontDistance = 5; // Distnace from the measuring edge of the (centered) ultrasonic sensor to the gripper's extreme [cm]. // Robot variables:bool edgeLeft = false, lineLeft = false, lineCenter = false, lineRight = false, edgeRight = false;int ping = 0; // [cm].String state = "undefined";float heading = initialHeading; // [degs].int posX = 0; // [cm].int posY = 0; // [cm].int homeX = 0; // [cm].int homeY = 0; // [cm]. // Map variables:int roomMaxX = 0; // [cm].int roomMaxY = 0; // [cm]. void printPingData(){ sparki.print("Ping="); // Ultrasonic ranger on screen. sparki.print(ping); sparki.println(" cm"); } void showSensorsAndState(){ sparki.clearLCD(); sparki.print("edgeL="); sparki.println(edgeLeft); sparki.print("lineL="); sparki.println(lineLeft); sparki.print("lineC="); sparki.println(lineCenter); sparki.print("lineR="); sparki.println(lineRight); sparki.print("edgeR="); sparki.println(edgeRight); printPingData(); sparki.println(String("state=") + state); sparki.updateLCD();} void showRoomData(float value0 = 0.0, float value1 = 0.0){ sparki.clearLCD(); if (state == "moveTo") { sparki.print("goToX="); sparki.println(value0); sparki.print("goToY="); sparki.println(value1); } else // Default: { sparki.print("roomMaxX="); sparki.println(roomMaxX); sparki.print("roomMaxY="); sparki.println(roomMaxY); } sparki.print("posX="); sparki.println(posX); sparki.print("posY="); sparki.println(posY); sparki.print("heading="); sparki.println(heading); printPingData(); sparki.println(String("state=") + state); sparki.updateLCD(); } void readIRSensors(){ //each sensor is 1 if reading white, and 0 if reading black: edgeLeft = sparki.edgeLeft() > threshold; lineLeft = sparki.lineLeft() > threshold; lineCenter = sparki.lineCenter() > threshold; lineRight = sparki.lineRight() > threshold; edgeRight = sparki.edgeRight() > threshold;} //Returns true if the robot is centered over the Home mark:bool robotIsCenteredOverHomeMark(){ //The robot is centered once all it's edge and line sensors read black: return !edgeLeft && !lineLeft && !lineCenter && !lineRight && !edgeRight;} void centerRobotOverHomeMark(){ state = "centering"; readIRSensors(); while(!robotIsCenteredOverHomeMark()) { readIRSensors(); showSensorsAndState(); } sparki.beep(); showSensorsAndState();} void rotate(float angle){ if (angle > 0.0) sparki.moveLeft(angle); else sparki.moveRight(-angle); heading += angle;} void measureRoom(bool robotAtHome){ state = "measureRoom"; showSensorsAndState(); // Starts to measure the Y longitude: sparki.servo(SERVO_CENTER); delay(servoDelay); ping = sparki.ping(); //"ping" variable is used to show the sensor value on the LCD. roomMaxY = rangerToCentreDistanceFront + ping; showRoomData(); // Measures the X longitude: sparki.servo(SERVO_RIGHT); delay(servoDelay); ping = sparki.ping(); roomMaxX = rangerToCentreDistanceSide + ping; showRoomData(); sparki.servo(SERVO_LEFT); delay(2*servoDelay); // Twice the time of 1/4 of revolution rotation. ping = sparki.ping(); roomMaxX += rangerToCentreDistanceSide + ping; posX = rangerToCentreDistanceSide + ping; showRoomData(); // Finishes to measure the Y longitude: rotate(90); // The robot rotation has more relative error than the servo rotation: delay(servoDelay); // Just to stop the robot for a few milliseconds, so it can measure distance. ping = sparki.ping(); //"ping" variable is used to show the sensor value on the LCD. roomMaxY += rangerToCentreDistanceSide + ping; posY = rangerToCentreDistanceSide + ping; // If at home, centers the robot again: if (robotAtHome) { sparki.moveLeft(); centerRobotOverHomeMark(); heading = initialHeading; // Special case with external mark centering: the heading goes back to it's intial state. sparki.moveStop(); homeX = posX; homeY = posY; } // Leaves the ultrasonic sensor centered: sparki.servo(SERVO_CENTER); delay(servoDelay); } // Non diagonal (Cartesian) moveTo version. There are no negative possible positions in this coordinates system:void moveTo(int x, int y){ state = "moveTo"; showRoomData(x - posX, y - posY); // No security or other checks in this first version: rotate(-heading); // Rotates the robot to zero heading. if ((x - posX) > 0) { sparki.moveForward(x - posX); } else { sparki.moveBackward(posX - x); } posX = x; showRoomData(x - posX, y - posY); rotate(90); showRoomData(x - posX, y - posY); if ((y - posY) > 0) sparki.moveForward(y - posY); else sparki.moveBackward(posY - y); posY = y; showRoomData(x - posX, y - posY);} void beepAndWait(int delayTime = 250){ sparki.beep(); delay(delayTime);} void setup(){ centerRobotOverHomeMark(); delay(1500); // Give time to the human to take her/his hands off. measureRoom(true); // Tests: moveTo(roomMaxX/2, roomMaxY/2); beepAndWait(); moveTo(roomMaxX/2 + 5, roomMaxY/2 + 5); //beepAndWait(2000); //##Debug beepAndWait(); moveTo(roomMaxX/2, roomMaxY/2); beepAndWait(); moveTo(homeX, homeY); beepAndWait();} void loop(){ ping = sparki.ping(); //update the ultrasonic sensor data to be displayed. showRoomData(); delay(50);}
##Function explanation here.
As you can see in the setup function we are trying to move the robot to some positions or waypoints (the middle of the room being the first of them) and then going back through the same waypoints to the home again. If you try the example you will get noticed of the cumulative error from this dead reckoning navigation technique when the robot comes back to the home point. But why not experiment a bit more with this issue, repeating 3 times the same movements? Here is the code for the setup function:
1234567891011121314151617181920
void setup(){ centerRobotOverHomeMark(); delay(1500); // Give time to the human to take her/his hands off. measureRoom(true); // Tests: for (int i=0; i<=3; i++) { moveTo(roomMaxX/2, roomMaxY/2); beepAndWait(); moveTo(roomMaxX/2 + 5, roomMaxY/2 + 5); //beepAndWait(2000); //##Debug beepAndWait(); moveTo(roomMaxX/2, roomMaxY/2); beepAndWait(); moveTo(homeX, homeY); beepAndWait(); }}
See the problem? Some of the sources of errors are:
- Discretization: ##.
- Differences between the physical robot and it’s software model: ##.
- Round errors: ##.
- Sensing errors: ##.
Navigating Blindly With a Precomputed Map
##Under construction
Finding Doors
##Under construction.
 ##Under construction.
Basic Room Navigation
##Under construction.
Extra Activities
- ##
|
1 2 3 4 5 6 7 8 9 10 11 12 13 14 15 16 17 18 19 20 21 22 23 24 25 26 27 28 29 30 31 32 33 34 35 36 37 38 39 40 41 42 43 44 45 46 47 48 49 50 51 52 53 54 55 56 57 58 59 60 61 62 63 64 65 66 67 68 69 70 71 72 73 74 75 76 77 78 79 80 81 82 83 84 85 86 87 88 89 90 91 92 93 94 95 96 97 98 99 100 101 102 103 104 105 106 107 108 109 110 111 112 113 114 115 116 117 118 119 120 121 122 123 124 125 126 127 128 129 130 131 132 133 134 135 136 137 138 139 140 141 142 143 144 145 146 147 148 149 150 151 152 153 154 155 156 157 158 159 160 161 162 163 164 165 166 167 168 169 170 171 172 173 174 175 176 177 178 179 180 181 182 183 184 185 186 187 188 189 190 191 192 193 194 195 196 197 198 199 200 201 202 203 204 205 206 207 208 209 210 211 212 213 214 215 216 217 218 219 220 221 222 223 224 225 226 227 228 229 230 231 232 233 234 235 236 237 238 239 240 241 242 243 244 245 |
#include <Sparki.h> // Include the sparki library. const float pi = 3.14159265358979323846; // Robot + External World data: const float initialHeading = 90.0; // Intial heading in the current coordinates system: 90 degs = pi/2 [rad]. // Robot data: const int threshold = 500; // Line and edge sensors thereshold [0 - 1015 w/out units]. const int servoDelay = 350; // Minumum time to give to the servo to rotate 90 degrees [ms]. const int robotRadius = 9; // Necessary radius to rotate, from the robot's center [cm]. const int rangerToCentreDistanceFront = 4; // Distance from the measuring edge of the (centered) ultrasonic sensor to the robot's centre [cm]. const int rangerToCentreDistanceSide = 2; // Distance from the measuring edge of the (rotated) ultrasonic sensor to the robot's centre [cm]. Rounded to floor. const int rangerToFrontDistance = 5; // Distnace from the measuring edge of the (centered) ultrasonic sensor to the gripper's extreme [cm]. // Robot variables: bool edgeLeft = false, lineLeft = false, lineCenter = false, lineRight = false, edgeRight = false; int ping = 0; // [cm]. String state = "undefined"; float heading = initialHeading; // [degs]. int posX = 0; // [cm]. int posY = 0; // [cm]. int homeX = 0; // [cm]. int homeY = 0; // [cm]. // Map variables: int roomMaxX = 0; // [cm]. int roomMaxY = 0; // [cm]. void printPingData() { sparki.print("Ping="); // Ultrasonic ranger on screen. sparki.print(ping); sparki.println(" cm"); } void showSensorsAndState() { sparki.clearLCD(); sparki.print("edgeL="); sparki.println(edgeLeft); sparki.print("lineL="); sparki.println(lineLeft); sparki.print("lineC="); sparki.println(lineCenter); sparki.print("lineR="); sparki.println(lineRight); sparki.print("edgeR="); sparki.println(edgeRight); printPingData(); sparki.println(String("state=") + state); sparki.updateLCD(); } void showRoomData(float value0 = 0.0, float value1 = 0.0) { sparki.clearLCD(); if (state == "moveTo") { sparki.print("goToX="); sparki.println(value0); sparki.print("goToY="); sparki.println(value1); } else // Default: { sparki.print("roomMaxX="); sparki.println(roomMaxX); sparki.print("roomMaxY="); sparki.println(roomMaxY); } sparki.print("posX="); sparki.println(posX); sparki.print("posY="); sparki.println(posY); sparki.print("heading="); sparki.println(heading); printPingData(); sparki.println(String("state=") + state); sparki.updateLCD(); } void readIRSensors() { //each sensor is 1 if reading white, and 0 if reading black: edgeLeft = sparki.edgeLeft() > threshold; lineLeft = sparki.lineLeft() > threshold; lineCenter = sparki.lineCenter() > threshold; lineRight = sparki.lineRight() > threshold; edgeRight = sparki.edgeRight() > threshold; } //Returns true if the robot is centered over the Home mark: bool robotIsCenteredOverHomeMark() { //The robot is centered once all it's edge and line sensors read black: return !edgeLeft && !lineLeft && !lineCenter && !lineRight && !edgeRight; } void centerRobotOverHomeMark() { state = "centering"; readIRSensors(); while(!robotIsCenteredOverHomeMark()) { readIRSensors(); showSensorsAndState(); } sparki.beep(); showSensorsAndState(); } void rotate(float angle) { if (angle > 0.0) sparki.moveLeft(angle); else sparki.moveRight(-angle); heading += angle; } void measureRoom(bool robotAtHome) { state = "measureRoom"; showSensorsAndState(); // Starts to measure the Y longitude: sparki.servo(SERVO_CENTER); delay(servoDelay); ping = sparki.ping(); //"ping" variable is used to show the sensor value on the LCD. roomMaxY = rangerToCentreDistanceFront + ping; showRoomData(); // Measures the X longitude: sparki.servo(SERVO_RIGHT); delay(servoDelay); ping = sparki.ping(); roomMaxX = rangerToCentreDistanceSide + ping; showRoomData(); sparki.servo(SERVO_LEFT); delay(2*servoDelay); // Twice the time of 1/4 of revolution rotation. ping = sparki.ping(); roomMaxX += rangerToCentreDistanceSide + ping; posX = rangerToCentreDistanceSide + ping; showRoomData(); // Finishes to measure the Y longitude: rotate(90); // The robot rotation has more relative error than the servo rotation: delay(servoDelay); // Just to stop the robot for a few milliseconds, so it can measure distance. ping = sparki.ping(); //"ping" variable is used to show the sensor value on the LCD. roomMaxY += rangerToCentreDistanceSide + ping; posY = rangerToCentreDistanceSide + ping; // If at home, centers the robot again: if (robotAtHome) { sparki.moveLeft(); centerRobotOverHomeMark(); heading = initialHeading; // Special case with external mark centering: the heading goes back to it's intial state. sparki.moveStop(); homeX = posX; homeY = posY; } // Leaves the ultrasonic sensor centered: sparki.servo(SERVO_CENTER); delay(servoDelay); } // Non diagonal (Cartesian) moveTo version. There are no negative possible positions in this coordinates system: void moveTo(int x, int y) { state = "moveTo"; showRoomData(x - posX, y - posY); // No security or other checks in this first version: rotate(-heading); // Rotates the robot to zero heading. if ((x - posX) > 0) { sparki.moveForward(x - posX); } else { sparki.moveBackward(posX - x); } posX = x; showRoomData(x - posX, y - posY); rotate(90); showRoomData(x - posX, y - posY); if ((y - posY) > 0) sparki.moveForward(y - posY); else sparki.moveBackward(posY - y); posY = y; showRoomData(x - posX, y - posY); } void beepAndWait(int delayTime = 250) { sparki.beep(); delay(delayTime); } void setup() { centerRobotOverHomeMark(); delay(1500); // Give time to the human to take her/his hands off. measureRoom(true); // Tests: moveTo(roomMaxX/2, roomMaxY/2); beepAndWait(); moveTo(roomMaxX/2 + 5, roomMaxY/2 + 5); //beepAndWait(2000); //##Debug beepAndWait(); moveTo(roomMaxX/2, roomMaxY/2); beepAndWait(); moveTo(homeX, homeY); beepAndWait(); } void loop() { ping = sparki.ping(); //update the ultrasonic sensor data to be displayed. showRoomData(); delay(50); } |
|
1 2 3 4 5 6 7 8 9 10 11 12 13 14 15 16 17 18 19 20 |
void setup() { centerRobotOverHomeMark(); delay(1500); // Give time to the human to take her/his hands off. measureRoom(true); // Tests: for (int i=0; i<=3; i++) { moveTo(roomMaxX/2, roomMaxY/2); beepAndWait(); moveTo(roomMaxX/2 + 5, roomMaxY/2 + 5); //beepAndWait(2000); //##Debug beepAndWait(); moveTo(roomMaxX/2, roomMaxY/2); beepAndWait(); moveTo(homeX, homeY); beepAndWait(); } } |