


Mixing RGB Colors
Learn how colors work, and how to get Sparki to shine them.
Lessons You Should Know

Introduction
Sparki features an RGB (Red, Green, Blue) LED, which is a light capable of illuminating nearly any visible color. It’s great for lighting up a party, sending messages about what Sparki is doing (Think about lighting it up green if there is nothing in Sparki’s path, but red if Sparki senses something in its way.) or maybe something a little more creative such as indicating which Sparki is “it” in a game of tag with other Sparkis….
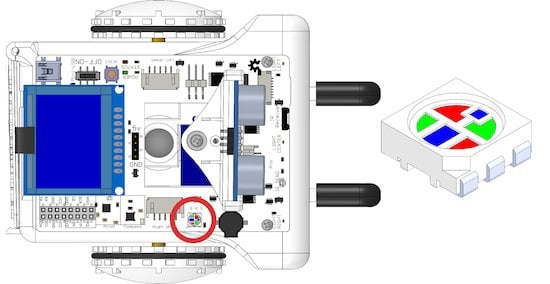
We’re going to learn a little bit more about this output and how to use. Although to call it an output is a little misleading, it’s really three different outputs in one package!
What You’ll Need
- A Sparki.
How It Works
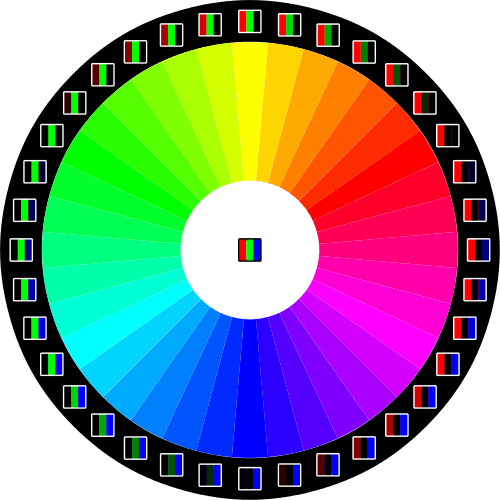
RGB LED stands for Red, Green and Blue Light Emitting Diode. As its name implies, an RGB LED combines the red, green and blue colors to create a broad range of light in visible colors. It does this by adding the three different colors together. This is called the RGB Color Model.
You can get an idea about how the colors are combined in an RGB LED by looking at the following picture:
There are actually three different LEDs inside the RGB LED. To get different colors of different intensities the three individual LEDs inside the RGB LED at different rates. In this lesson we’ll explore how to get different intensities of one color, how to mix colors and how to change Sparki’s RGB LED colors over time.
There are also Red, Green, Yellow LEDs that work exactly the same way, only with different colors, just in case you work with any multi-color LEDs after you get an introduction through Sparki!
Programming Sparki’s RGB LED
Sparkiduino comes with one command that can change Sparki’s RGB LED To any color:
|
1 |
sparki.RGB(red, green, blue); |
It receives three (numeric) parameters:
A. The first value defines the intensity or brightness of the red component.
B. The second value defines the intensity or brightness of the green component.
C. And the third value defines the intensity or brightness of the blue component.
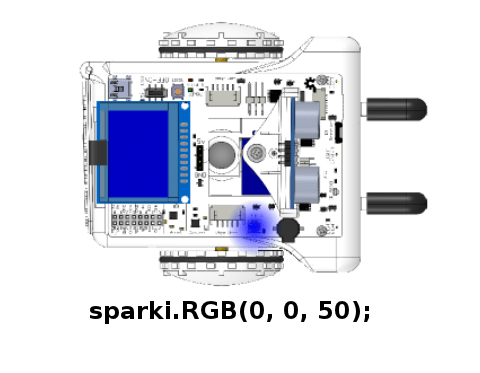
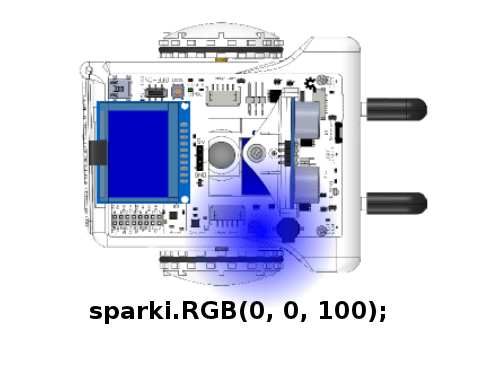
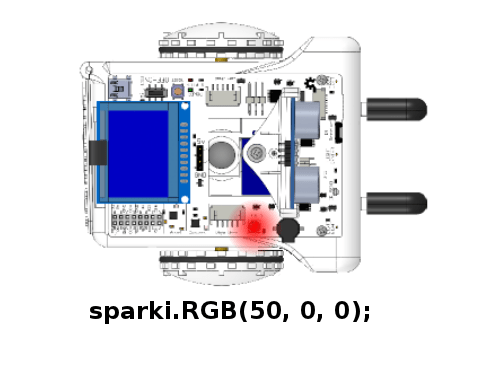
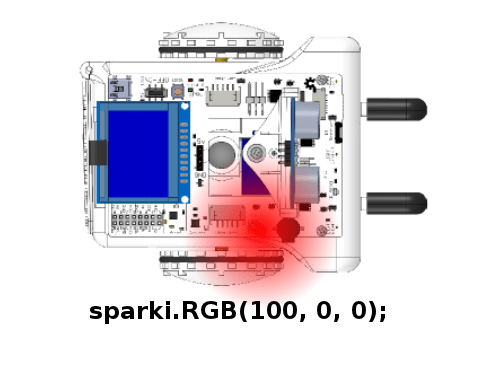
Each number ranges from 0 to 100, where a value of 0 means none of that color, while 100 means the LED will light up as bright as it can in that color. For example, the following program lights the LED in pure red:
|
1 2 3 4 5 6 7 8 9 10 |
#include <Sparki.h> // include the sparki library void setup() { sparki.RGB(100,0,0); // Make the LED maximum Red } void loop() { } |

You can play a bit with the other values there to create different colors. For example, try to change the previous program with the following RGB combinations:
- sparki.RGB(50, 100, 100)
- sparki.RGB(0, 20, 50)
- sparki.RGB(0, 80, 10)
But what’s really going on here? We’ll talk about this in steps, since what’s going on behind the scenes is an extremely important topic in robotics called Pulse Width Modulation. If you want to skip the technical details (it won’t take long, promise!) and just continue lighting up the LED skip down to the next section, One More Thing About Intensity.
So, if we go one layer deeper what is happening is that each command that lights up one of the LEDs causes Sparki to send a certain amount of voltage through the LED. Sparki’s system can supply up to 50 milliamps of electrical current. This means that the command sparki.RGB(0, 50, 100); sends 0 mA through the red LED, somewhere around 25 mA through the green LED and, you guessed it, all 50 mA through the blue LED. The more current that is supplied to an LED, the brighter it lights up. But to be truly honest, that’s not exactly what is going on inside of Sparki.
Here’s where we start talking about pulse width modulation. Because Sparki is a robot it only speaks and works in binary, right? That means Sparki is only capable of turning something on or off. Kind of like a light switch. Sparki has no light dimmer dial, because robots can’t actually deal with analog inside their robotic brains! Because of this, Sparki should only be able to supply 0 mA or 50 mA of current, what’s going on? Really Sparki is turning the LED on and off at an extremely fast speed. So fast that our eyes can’t keep up and we see the LED lighting up brighter or dimmer. It’s actually so fast that a multimeter (a tool for measuring electricity) can’t keep up either! So the multimeter does the same thing as our eyes and averages the on and off values into something in between all the way on and all the way off. The lower the value you pass to Sparki’s RGB LED, the longer Sparki holds the LED off, before turning it on. If you increase the value you pass to the RGB LED Sparki turns the LED on more and more in comparison to how long the LED stays off.
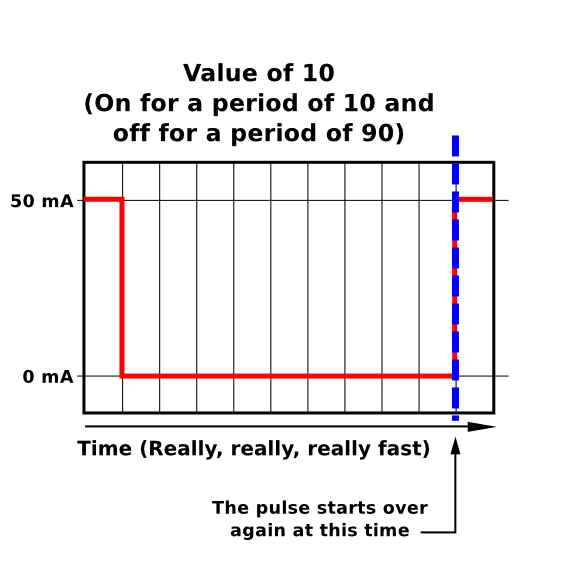
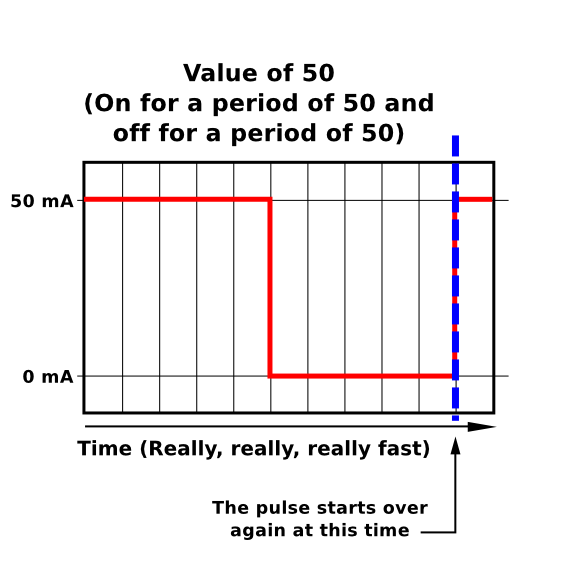

When you pass Sparki a value of 1 for the red LED it turns the LED on for a (really fast, robotic) count of 1 and then turns it off for a count of 99. A value of 50 means the LED is on half the time, a count of 50 on and a count of 50 off.
Try passing a really low value to one of the LEDs inside Sparki’s RGB LED. Look really closely, can you see it flickering a little? That’s an example of Pulse Width Modulation, or PWM. PWM is used a lot for LEDs and motors, as well as some other applications.
Wow. You stayed with us during the whole technical bit, huh? You’re going to make a great roboticist, scientist or engineer! And the more technical those people are, the more they get to work on cooler and cooler projects. Nice job! Keep it up.
One More Thing About Intensity
Since you’re mixing colors with the RGB LED, when you’re creating colors other than plain old red, green or blue what really matters is the ratio of colors you mix. For example the following commands will all create the same color purple, but at different intensities:
- sparki.RGB(100, 0, 100);
- sparki.RGB(50, 0, 50);
- sparki.RGB(10, 0, 10);
While these commands will all create different shades of purple, increasing in their likeness to the color blue as the list goes down and the blue value increases (or the red value decreases).
- sparki.RGB(100, 0, 25);
- sparki.RGB(50, 0, 50);
- sparki.RGB(25, 0, 100);
So, while there are one million (100 x 100 x 100) different combinations of red, green and blue values you can pass to Sparki, there aren’t actually that one million different colors that Sparki can create… but there are one million different colors and intensities that Sparki can show off!
Take a moment to have fun with different combinations of colors. Can you make orange? How about a greener aqua? What’s your favorite color? See if you can get Sparki showing off that color, make Sparki your own personal mascot before talking the next portion of this lesson!
Passing Sparki’s RGB LED Colors
Another way of using the sparki.RGB command is by passing the name of a color as a parameter (making sure it is written all in capital letters with RGB_ just before it) to display it. So for example, instead of using sparki.RGB(100, 0, 0) you could write:
|
1 |
sparki.RGB(RGB_RED); |
Sparki’s library comes with the following predefined colors:
|
1 2 3 4 5 |
RGB_RED RGB_GREEN RGB_BLUE RGB_WHITE RGB_OFF |
Most of these colors are pretty straight forward, but what values do you think are being passed to Sparki to create the color white?
Changing Colors Over Time
Now that we understand the basics beyond the RGB LED, let’s do something that changes with time. Because, after all, colored lights are cool, but blinking and pulsing colored lights are even cooler! The following program will increase the blue color’s brightness, and when it reaches the maximum value (100), it will reset to zero. As always, you can make changes to the different values used in this program. Once you feel comfortable with the code below and get it working on Sparki, how about trying to write code to slow down the change in brightness, or maybe you want to speed it up? (Hint, there are actually two different ways to achieve each of these changes to the code, see if you can figure out both of the different ways.)
|
1 2 3 4 5 6 7 8 9 10 11 12 13 14 15 16 17 18 19 |
#include <Sparki.h> // include the sparki library int B = 100; void setup() { } void loop() { sparki.RGB(0, 0, B); if (B < 100) B+= 5; else B = 0; delay(100); } |
Now, you can try to modify this program to create different color combinations by fading the other green and blue LEDs, too.
Changing Colors Over Time with Math
Now, let’s use a bit of math. The next program uses a sine trigonometric function to achieve a smoother fading of the color blue. The crazy thing is, most of this code happens all in one line! Woah, let’s break this down for a second so we can make sure we understand all of this code. Remember pseudo-code? It’s also a great way to explain code to people, something that technical people often have to do with less technical people on their team. (Maybe you have a younger sibling who might want Sparki explained to them? That would be a great way to develop this skill so you can be a great leader on a robotics, engineering or scientific team in your future!)
Here’s the line of code we’re talking about-
|
1 |
sparki.RGB(0, 0, 100*abs(sin(B))); |
To explain this we have to work backwards, using the order of operations to explain the code that happens first before anything else. (Which is the code inside the most parenthesis.)
- First up, the sin() function– this command returns a value between -1.0 and +1.0, the value is created by applying this function to the variable B.
- Then the abs() function converts any number it receives to a positive number, or the absolute value (in case the number from the sine function was a negative).
- Then the code multiplies the result of the two prior steps by 100 so that the number makes sense to control one of the RGB LEDs.
- Finally, the result of the three steps above is crammed into the third value of a sparki.RGB( ) function so that it effects the blue LED.
(You can actually jam as much math as you like into any section of code that is a variable. The robot or computer does all the math without a complaint before executing the function that contains the variable. But be careful with this ability, it’s a great way to write really confusing code that trips you or other people on your team up!)
Also, please note that this time the B variable is a float, instead of an integer number. That means that B can be equal to a decimal value, which is super handy since the code adds .1 to B at the beginning of each loop.
|
1 2 3 4 5 6 7 8 9 10 11 12 13 14 |
#include <Sparki.h> // include the sparki library float B = 0.0; void setup() { } void loop() { B += 0.1; sparki.RGB(0, 0, 100*abs(sin(B))); delay(100); } |
Again, there are two different ways you could speed up or slow this code down. Can you figure out how to do that?
What about if you didn’t want the LED to turn all the way on? How might you do that?
Were those too easy? How about this- what if you didn’t ever want the LED to turn all the way off? How could you change the code above to do that?
(Scroll to the bottom of this lesson for the answer to these last two questions.)
Mixing Colors Over Time with Math
How about taking that last section one step further and controlling multiple LEDs at once? There are an infinite number of ways to combine the colors over time, we’ll cover one tiny bit of code so you feel comfortable getting started with your RGB palette creating rainbows over time.
To do this we’ll simple make one LED intensity move up as the other one goes down. It’s pretty easy, really. We’ll start a second variable, R, off at a value of 1. This way the value that pops out of the sin( ) function will start at 1, instead of 0, where B starts. Then the value of sin(R) will go down as the value of sin(B) goes up and vice versa.
|
1 2 3 4 5 6 7 8 9 10 11 12 13 14 15 16 |
#include <Sparki.h> // include the sparki library float B = 0.0; float R = 1.0; void setup() { } void loop() { B += 0.1; R += 0.1; sparki.RGB(100*abs(sin(R)), 0, 100*abs(sin(B))); delay(100); } |
Now we’ve got red, blue and purple! Adding the third LED, green, is a little trickier. First, see if you can do it the way we did above, but using a value different than 0.0 or 1.0. Once you feel comfortable with that, for a real challenge, think about how you might mix all three colors but make sure that the red, green and blue LEDs each shine on their own for some time above fifty percent intensity. (Hint, think about using some “if” statements to control when each variable gets 0.1 added to it.)
RGB LEDs are tons of fun! Now you can create strobe lights by turning the LEDs on and off quickly, or pulse them by making the intensities go up and down. Maybe you want to make some code that matches up the changes of the RGB LED with your favorite song? Combine that code with some of themovement commands and you’ve basically got yourself a dancing light show!
Lesson available for the miniBloq Programming Environment
A similar lesson is also available for the miniBloq Programming Environment. miniBloq is a graphical programming environment that you can use to easily program your Sparki.
Extra Code Examples
Here are the answers to a couple of the more difficult questions we asked you above. Remember, these aren’t the only answers, they’re just the ones we wrote! You may have done something completely different such as using some “if” statements. That’s cool and a legitimate answer, too! There are always an infinite number of ways to achieve anything with code. As long as your code works, and does what you want, it’s correct. As you become a better and better programmer you’ll start to think about things like saving memory space by making your code eloquent (which making something happen using as little code as possible), but for now, just have fun with it!
What about if you didn’t want the LED to turn all the way on? How might you do that? (Multiply by a number smaller than 100.)
|
1 |
sparki.RGB(0, 0, 90*abs(sin(B))); |
What if you didn’t ever want the LED to turn all the way off? How could you change the code to do that? (Multiply by a number smaller than 100 and add the difference onto the end of the value.)
|
1 |
sparki.RGB(0, 0, 90*abs(sin(B))+10); |